Introduction
CTRIP is one of the OTA channels where you can manage the connection, perform room and rate plan mapping, import data from the OTA, and configure other settings through the following tabs: Information, Username, Mapping, Assignments, and Settings.
Ctrip Information
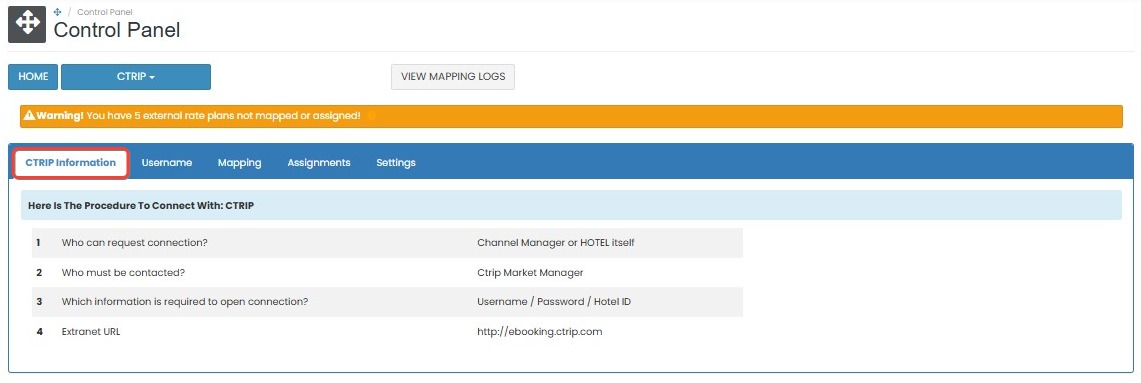
The Ctrip Information tab provides the basic connection procedure between the system and Ctrip. Make sure you follow these steps:
| Step | Description |
|---|---|
| 1. Who can request connection? | Channel Manager or the hotel directly |
| 2. Who must be contacted? | Ctrip Market Manager |
| 3. Which information is required to open connection? | Username, Password, Hotel ID |
| 4. Extranet URL | http://ebooking.ctrip.com |
 |
[!NOTE]
Troubleshooting Ctrip Information
Cannot initiate connection with Ctrip
- Confirm that the person initiating the request is either the Channel Manager or a hotel representative.
- Ensure you have contacted the correct Ctrip Market Manager.
Missing required information
- Double-check that Username, Password, and Hotel ID are prepared before requesting the connection.
Invalid or outdated extranet URL
- Use the correct URL:
http://ebooking.ctrip.com. If it still fails, check with Ctrip support for updates.
Username
In the Username tab, you can enter or update the credentials required to connect to Ctrip.
How to Update Username and Hotel ID
- Enter the Username used for your Ctrip account.
- Fill in the Password that matches your Ctrip account.
- Enter the Hotel ID registered in Ctrip’s system.
- Click the save (✓) button to apply the changes.
- If you don’t want to save the changes, click cancel (✖).

[!NOTE]
Troubleshooting Username
Unable to save credentials
- Make sure all fields (Username, Password, and Hotel ID) are filled.
- Click the ✓ save button explicitly to apply the changes.
Login credentials not accepted
- Double-check that the username and password match those used in the Ctrip extranet.
- Ensure the hotel ID is correctly assigned by Ctrip and belongs to the right property.
Mapping
The Mapping tab allows you to link each internal rate plan to the corresponding room and rate plan in Ctrip. This enables the system to push rate, availability, and restriction data to the OTA.
How to Add Mapping
- On the Mapping tab, locate the Internal Rate Plan Name you want to map.
- Click Add Mapping next to the rate plan.

- A list of available room and rate plan combinations from Ctrip will appear.
- Select one option that matches the room and rate plan you want to connect.

- Click Update to save the mapping.
- If you don’t want to continue, click Close to cancel the process.
NOTE: Mapping allows you to push rate, availability, and restrictions to Ctrip once the mapping is complete.

[!NOTE]
Troubleshooting Mapping
No room or rate plan appears for mapping
- Ensure you have imported the latest room data from Ctrip using the Import Rooms feature.
- If data still does not show, confirm with Ctrip that your account has available rate plans.
Unable to save mapping
- Check that a room and rate plan are selected before clicking Update.
- If the mapping fails to save, try refreshing the page and repeating the process.
Import Rooms
The Import Rooms feature helps you retrieve and display room and rate plan data from Ctrip before doing any mapping.
How to Import Rooms from Ctrip
- Click the Import Rooms button at the top of the Mapping tab.

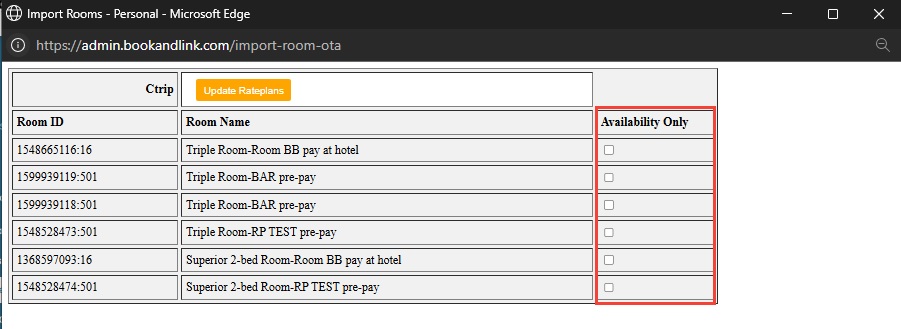
- A new page will display the room and rate plans available from Ctrip.
- Review the list of rooms under the Room Name column.
- If you only want to push availability (without pushing pricing), tick the Availability Only checkbox.
- If you leave the checkbox unticked, the system will push both rate and availability.
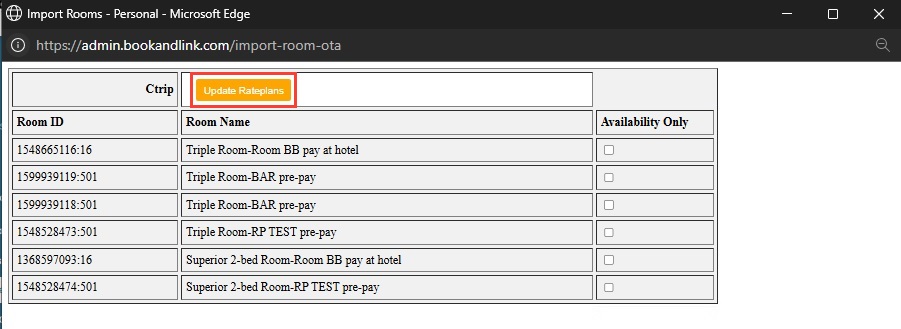
- Click Update Rateplans to complete the import. Once imported, the data will be ready for mapping.
[!NOTE]
Troubleshooting Import Rooms
Import Rooms button not working
- Make sure the internet connection is stable.
- Try logging out and back in, then attempt to import again.
Imported data missing rooms or rate plans
- Confirm with Ctrip that the room types and rate plans are correctly configured on their side.
- Ensure the property is active and connected in Ctrip’s system.
Availability only checkbox not working as expected
- Ensure the checkbox is selected before clicking Update Rateplans.
- If both rate and availability are pushed unintentionally, re-import and re-check the setting.
Assignments
The Assignments tab allows you to link child rate plans from Ctrip to your internal rate plans for the purpose of receiving reservations. This function does not support pushing rate, availability, or restriction data — it is receive-only.
How to Assign Child Rate Plans
- On the Assignments tab, find the OTA Rate Plan Name you want to assign.
- Click Add Internal Rateplan next to the selected OTA rate plan.

- Select the internal rate plan from the dropdown.
- Click Save New Assignment to complete the assignment.
- To cancel the process, click the cancel (✖) button before saving.

- If needed, you can remove a previously assigned rate plan by clicking Remove This Ota Room.
NOTE: Use the assignment feature when the OTA provides child rate plans that you want to connect for reservation purposes only. These rate plans will not send updates for price or availability.

[!NOTE]
Troubleshooting Assignments
Cannot find internal rate plan in the dropdown
- Verify that the internal rate plan has already been created in the system.
- Refresh the page to load the latest internal rate plans.
Reservation not received despite assignment
- Make sure the assignment is properly saved.
- Confirm with Ctrip that reservations are being sent for the assigned child rate plan.
Unable to remove an assignment
- If the Remove This Ota Room button does not respond, refresh the page and try again.
- Ensure the user has permission to edit assignments.
Settings
The Settings tab allows you to manage how the system interacts with Ctrip, including enabling the channel, handling updates, and configuring reservation options.
How to Configure Settings
- Go to the Settings tab.
- Enable the Enable Channel option to activate the connection between your property and Ctrip.
- Turn on Activate Updates to allow the system to push rate, availability, and restriction updates to Ctrip.
- Enable Activate Reservations if you want to receive bookings from Ctrip into the system.
- If you want the system to send an email voucher each time a reservation is received, enable the Send Reservation Voucher Email option.
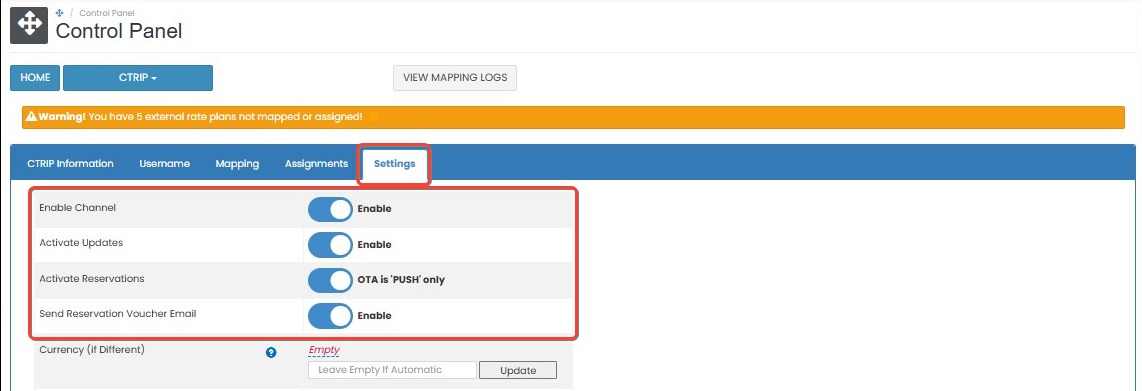
- In the Currency (if Different) field, click empty and select the currency code if your Ctrip currency is different from your system’s default. If left blank, the system will detect the appropriate currency automatically.
- Click the Update button to save all your changes.

How to Configure Manual OTA Update
- Scroll down to the OTA Update section.
- Click the OTA Update button to open the pop up window

- Complete all the form field below:
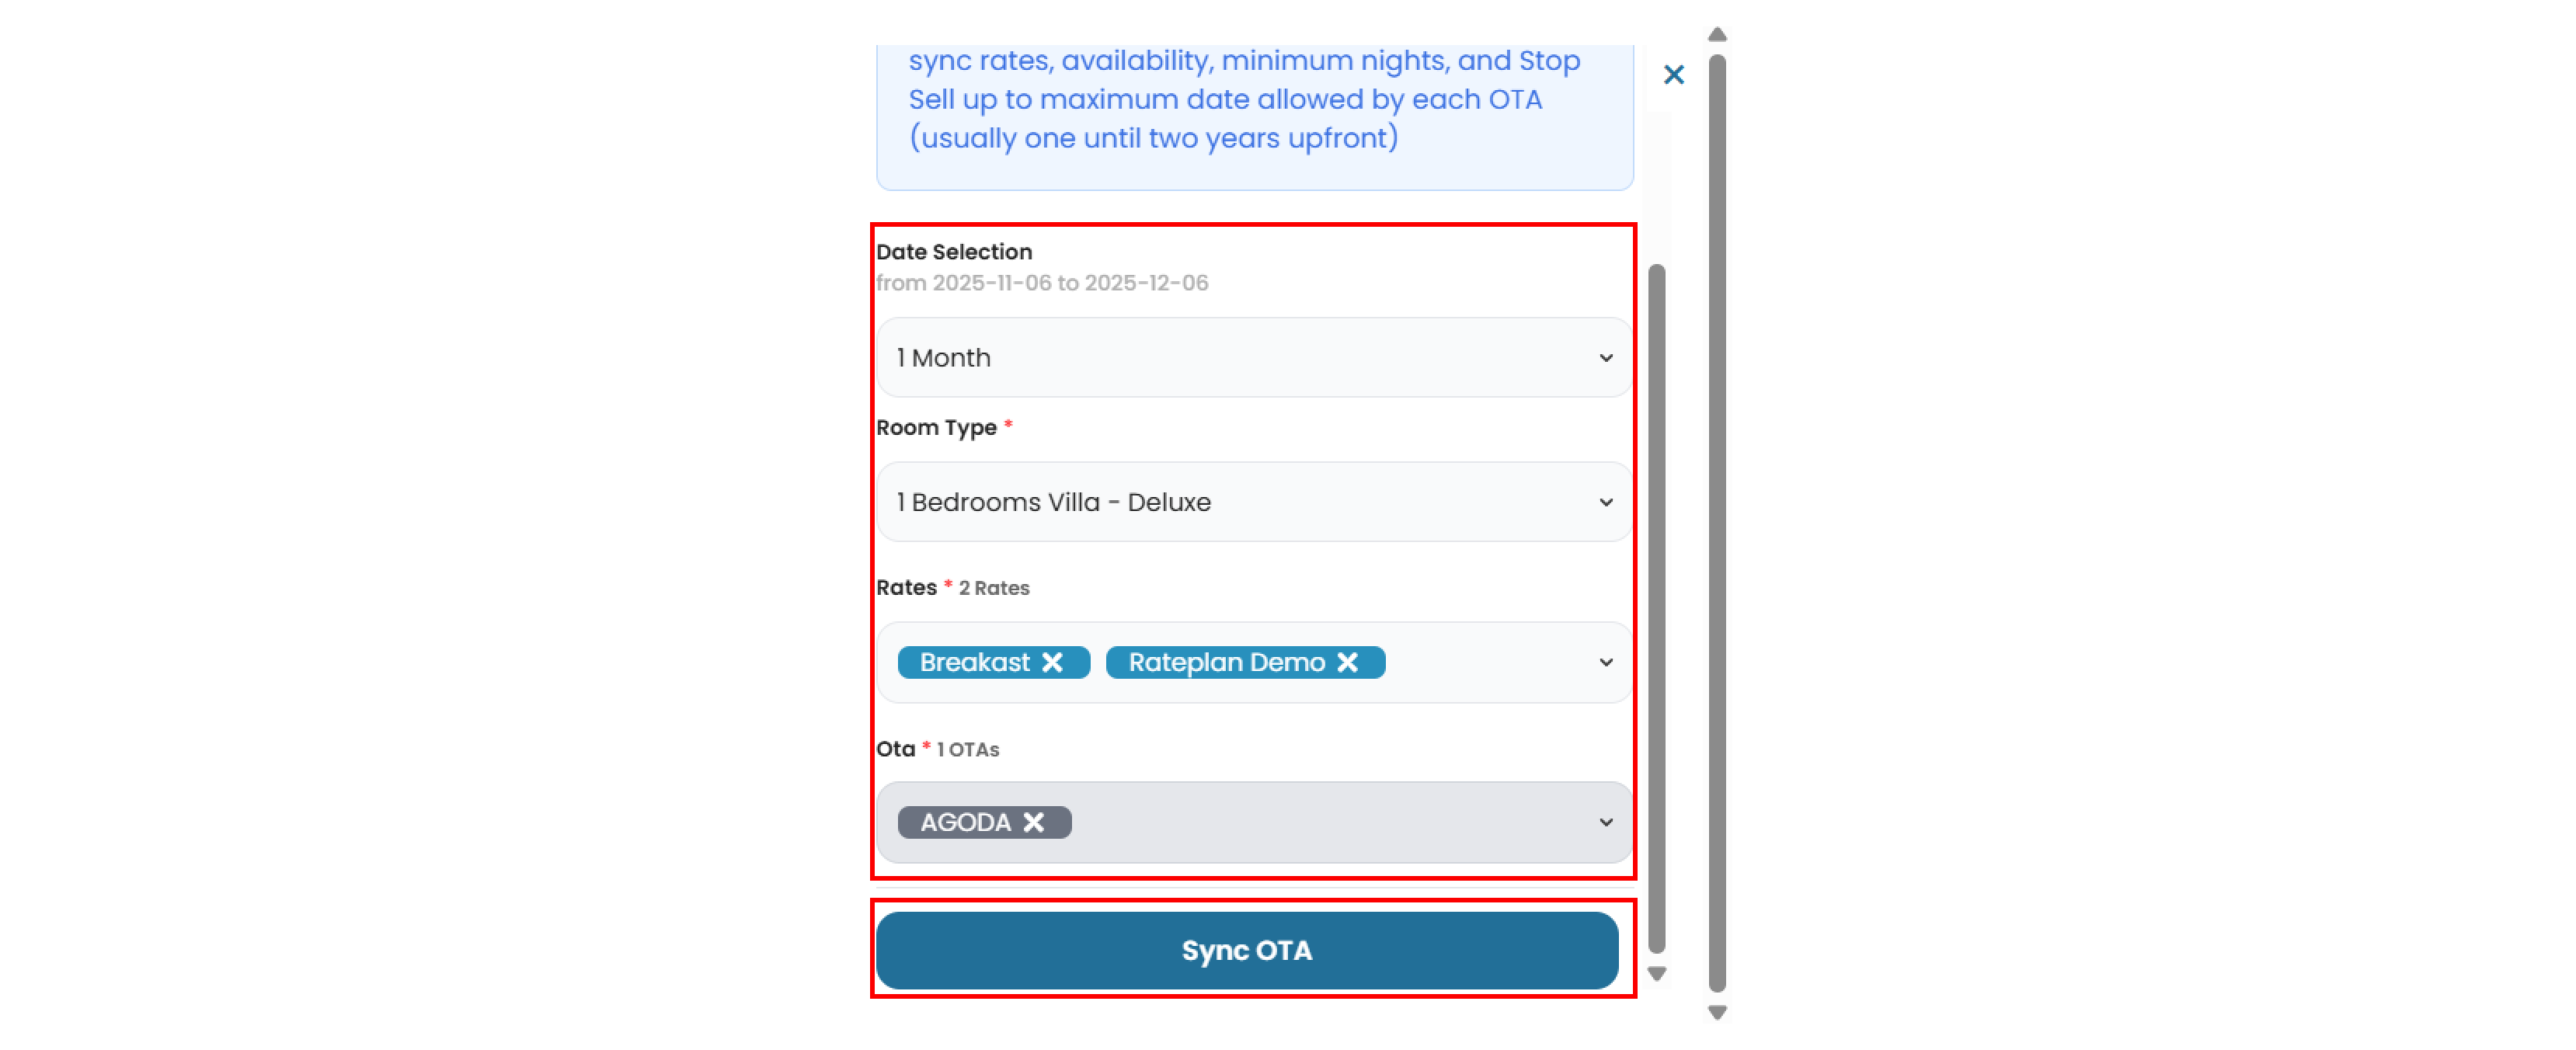
- Date Selection : Choose the duration of the OTA update (e.g 1 month, 3 months, etc)
- Room Type : Select the room type from the list.
- Rate : Choose one or more rate plans. You can also select all rate plan if needed.
- Click Sync OTA to save and apply the changes.
Viewing Update History
At the bottom of the Settings tab, you will find the Last 10 Updates section.
This section shows details about the most recent updates sent to Ctrip, including the time of update, room type, rate plan, and whether the update was successful or failed. You can use this log to track and confirm that data is being correctly sent to Ctrip.

[!NOTE]
Troubleshooting Settings
Enable Channel or Activate Updates not working
- Make sure the checkbox is selected and click the Update button afterward.
- If the changes do not apply, refresh the page and try again.
Not receiving reservations from Ctrip
- Confirm that Activate Reservations is turned on.
- Check the Last 10 Updates to see if any errors occurred.
Reservation voucher email not received
- Ensure Send Reservation Voucher Email is enabled.
- Check email spam/junk folder, or confirm that the correct notification email is configured.
Currency field remains blank after selection
- Click once to clear and then select the currency code again.
- If left empty, ensure the system is detecting currency correctly by checking the reservation preview.
OTA Update does not trigger any change
- Ensure at least one room is selected (or choose “All Room Types”).
- Review the Last 10 Updates section to confirm if the update was triggered or failed.
Update history not showing recent updates
- Wait a few moments and refresh the page.
- If updates still don’t appear, check whether the update was successful or encountered errors.