Introduction
Yearly Deals is a feature within the Channel Manager that allows users to update rates, room availability, and restrictions for an entire year in bulk. This feature simplifies long-term management and ensures data consistency across all OTAs.
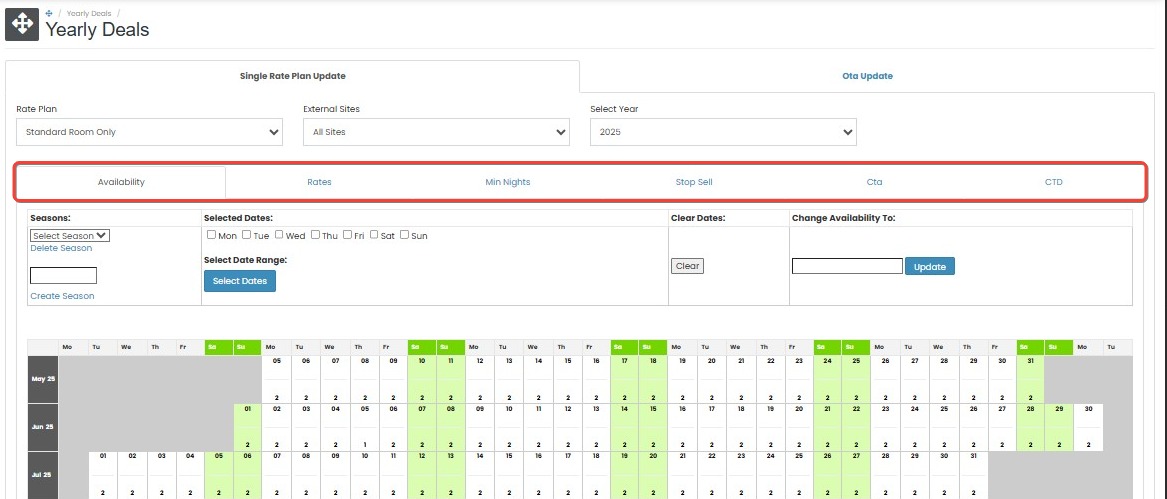
With Yearly Deals, you can manage rates, availability, and restrictions such as Minimum Night Stay, Stop Sell, Close to Arrival (CTA), and Close to Departure (CTD) from a single centralized view.
How to Use Single Rate Plan Update
When accessing the Yearly Deals page for the first time, the display will appear empty. To manage a Single Rateplan Update, you must first select the required parameters.
- Ensure you are in Single Rate Plan Update tab.

- Choose the Rate Plan, External Site, and Year.

- After selection, the page will display a grid containing rates, availability, and restriction information by month.
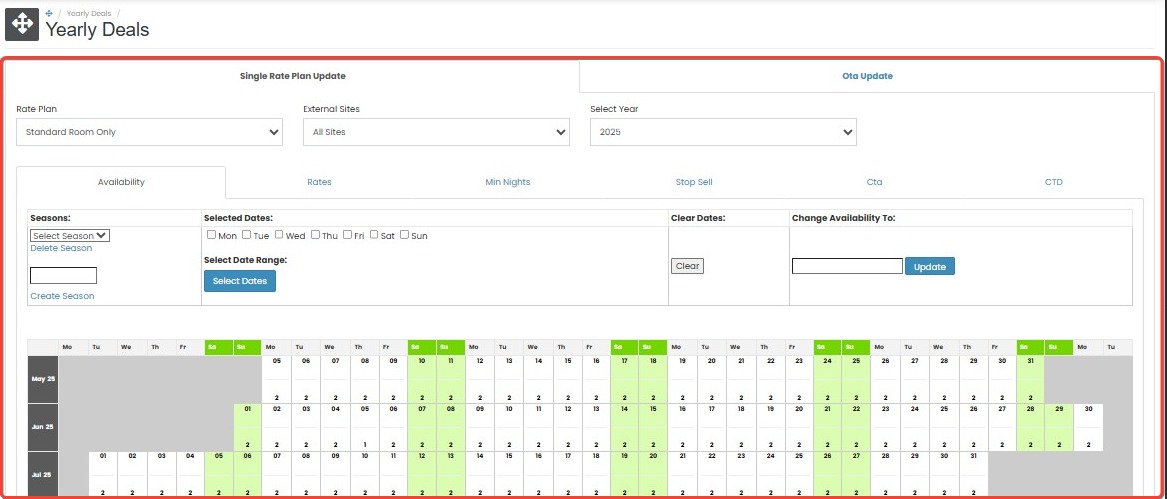
- To update values for a specific column (e.g., Rate, Availability, Min. Night, CTA, etc.), click on the desired month column in the corresponding data row.
[!NOTE]
Troubleshooting Single Rate Plan Update Access
The Yearly Deals page appears blank after loading
- Make sure you have selected a valid combination of Rate Plan, External Site, and Year.
- Try refreshing the page or switching to a different browser if the issue persists.
The grid does not appear after selecting parameters
- Double-check if all required fields (Rate Plan, External Site, and Year) are filled correctly.
- Wait a few seconds—loading the grid may take time depending on the amount of data.
- If the problem continues, clear your browser cache and reload the page.
Unable to click or select a month in the grid
- Ensure you have proper access rights to perform updates on the selected Rate Plan and External Site.
- Try zooming out your browser view (e.g., press
Ctrl+-) to make sure all grid elements are visible.No update options appear after clicking a cell
- Make sure you are in the correct tab (Single Rate Plan Update) before interacting with the grid.
- Some fields may not be editable if data is synced externally or restricted by system settings.
Single Rate Plan Update Availabillity
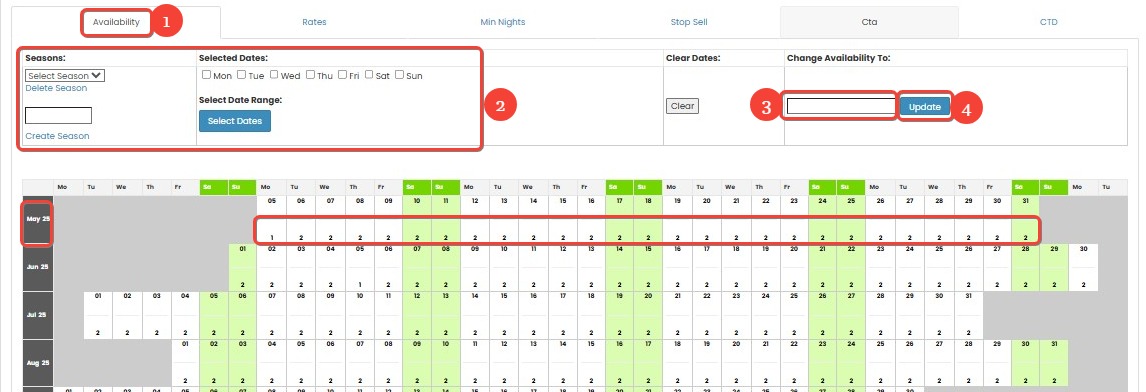
How to Update Availability
This feature allows users to update room availability for a single rate plan throughout the year. There are two available update methods:
General Update
- Select the Availability tab.
- Choose the dates you want to update using one of the following options:
- Check specific days (e.g., Monday to Friday),
- Use Select Date Range to choose a date range,
- Or select based on a previously created Season.
NOTE: If you haven’t created any Seasons yet, you can create them first. Detailed instructions are available in the How to Create Seasons section.
- Enter the new rate in the Change Rate To: input field.
- Click Update to apply the changes.
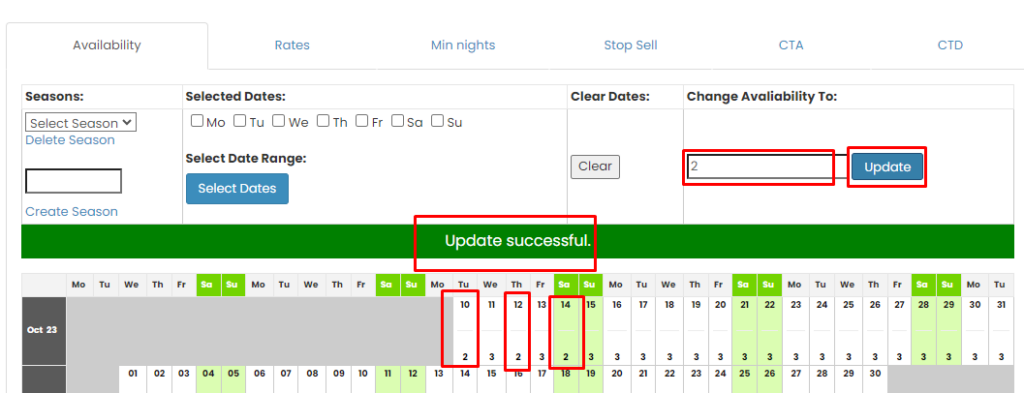
Row-Based Update
- Scroll down to the calendar table view.
- Click directly on the date you want to update.
- Enter the availability value in the Change Availability To: input field.
- Click Update to apply the update.
[!NOTE]
Troubleshooting Single Rate Plan Availability Updates
The Availability tab does not respond when clicked
- Ensure you are in the correct Single Rate Plan Update section.
- Try refreshing the page or switching browsers.
Cannot select date range or season
- Make sure you have selected a valid Rate Plan, External Site, and Year before attempting updates.
- If using Season, ensure at least one season has been created.
Update button is disabled or unresponsive
- Check that you have entered a valid number in the Change Availability To field.
- Confirm that at least one day or season has been selected for update.
Changes do not reflect after clicking Update
- Updates may take a few seconds to process; try refreshing the page.
- Check the Last 10 Update History tab to verify if the update was submitted successfully.
Availability value reverts after update
- Ensure that the value entered is allowed based on inventory rules or restrictions.
- If synced with an OTA, the update may be overridden—confirm with your OTA’s extranet.
Error: "Invalid availability format"
- Only whole numbers (e.g.,
1,5) are allowed. Do not include symbols or text.
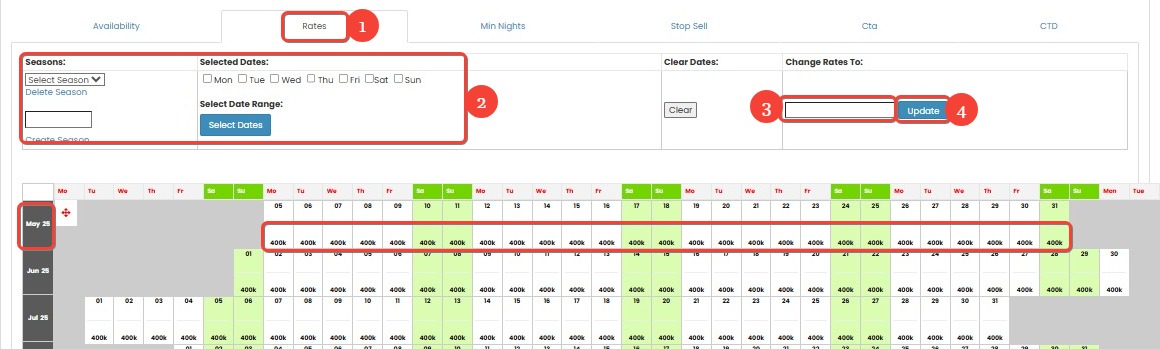
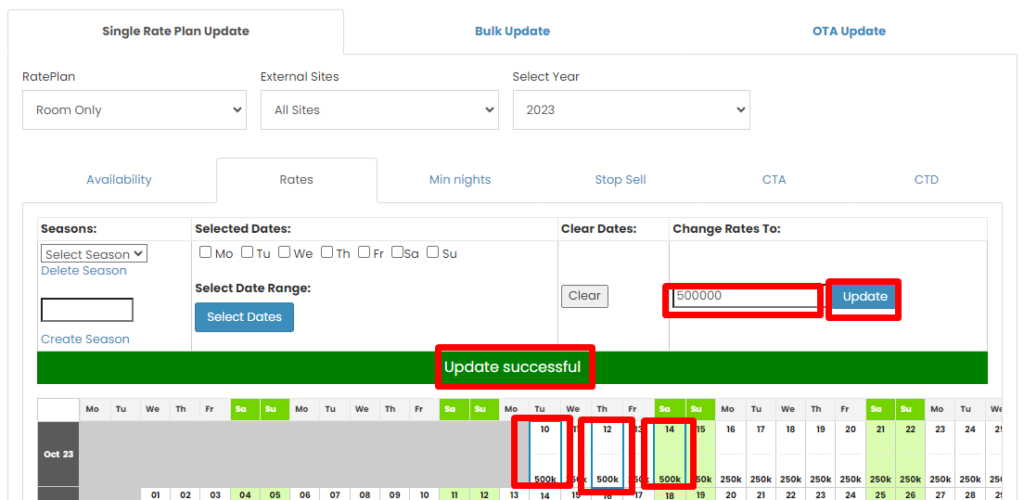
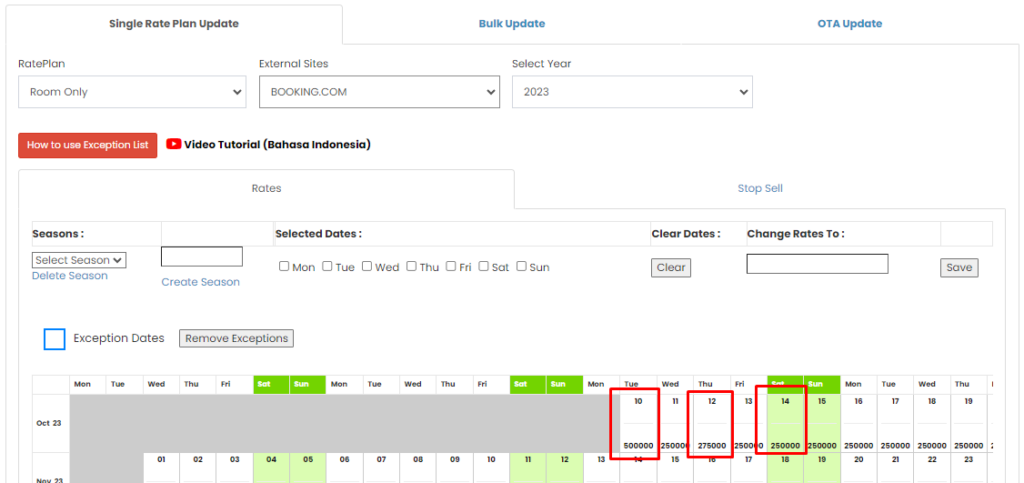
Single Rate Plan Update Rates
How to Update Rates
This feature allows property managers to update room rates in bulk over a selected date range or specific days, ensuring pricing consistency across all connected OTAs. There are two ways to update rates:
General Update
- Select the Rates tab.
- Choose the dates you want to update using one of the following options:
- Check specific days (e.g., Monday to Friday),
- Use Select Date Range to choose a date range,
- Or select based on a previously created Season.
NOTE: If you haven’t created any Seasons yet, you can create them first. Detailed instructions are available in the How to Create Seasons section.
- Enter the new rate in the Change Rate To: input field.
- Click Update to apply the changes.
Row-Based Update
- Scroll to the calendar section below.
- Click a specific date box under the Rates row.
- Enter the new rate in the Change Rate To: field.
- Click Submit to save the changes.
[!NOTE]
Troubleshooting Single Rate Plan Rate Updates
The Rates tab is not selectable or missing
- Make sure you are on the Single Rate Plan Update page.
- Confirm that a Rate Plan, External Site, and Year have been selected.
The rate input field is disabled or does not accept input
- Ensure you have selected at least one day, date range, or season before entering the rate.
- Try clearing your browser cache or refreshing the page.
Update is submitted but no changes appear
- Rate updates are processed in the background. Wait a few seconds and refresh the calendar view.
- Check the Last 10 Update History tab to confirm if the update was successful.
Rates revert back after submission
- The entered rate might conflict with restrictions set in the rate plan or by the OTA.
- If connected to an OTA, check the OTA’s extranet to ensure the update is not being overridden.
Error: "Invalid rate format"
- Enter the rate as a whole number only (e.g.,
750000), without any commas, dots, or currency symbols.Unable to edit a specific date's rate
- Some dates may be locked due to restrictions or promotions.
- Contact your system administrator if the issue persists.
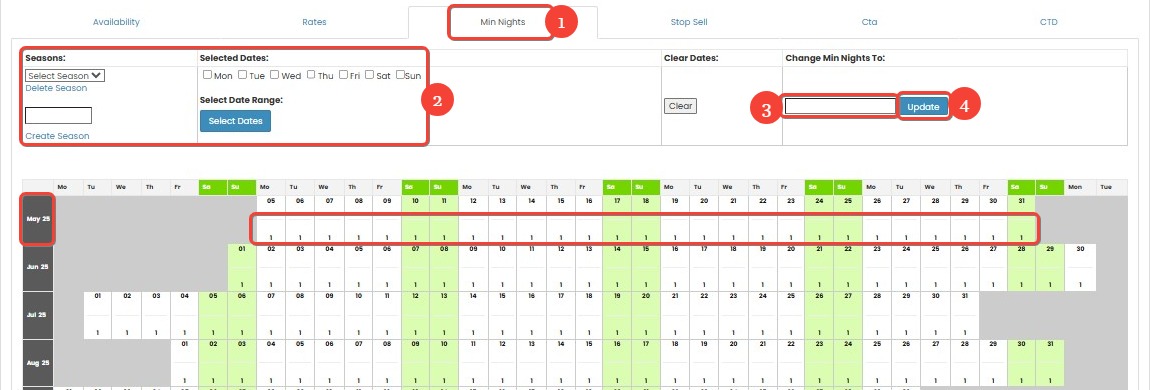
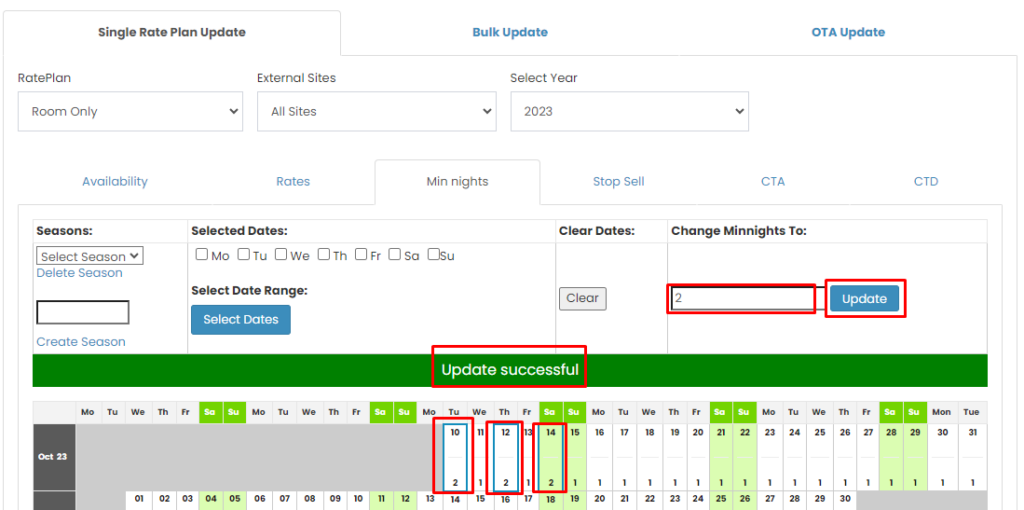
Single Rate Plan Update Minimum Night
How to Update Minimum Night Stay
This feature allows property managers to set the minimum number of nights required for a booking within a specific date range or on selected days, helping enforce stay policies across OTAs. There are two ways to update minimum night stay:
General Update
- Select the Min Nights tab.
- Choose the dates you want to update using one of the following options:
- Check specific days (e.g., Monday to Friday),
- Use Select Date Range to choose a date range,
- Or select based on a previously created Season.
NOTE: If you haven’t created any Seasons yet, you can create them first. Detailed instructions are available in the How to Create Seasons section.
- Enter the number of nights in the Change Min Night To: input field.
- Click Update to apply the changes.
Row-Based Update
- Scroll to the calendar section below.
- Click on a specific date in the Min Nights row.
- Input the minimum night value in the Change Min Night To: input field.
- Click Submit to save the changes.
[!NOTE]
Troubleshooting Minimum Night Updates
The Min Nights tab is missing or cannot be clicked
- Ensure you have selected a Rate Plan, External Site, and Year before attempting to update.
- Try refreshing the page or clearing your browser cache.
Cannot input value in the "Change Min Night To" field
- Make sure you have selected at least one date, specific day, or season before entering the value.
- Ensure your browser is not blocking interactive content.
Update submitted, but no change is shown on the calendar
- Updates are applied in the background. Try refreshing the page to see the latest changes.
- Verify the update through the Last 10 Update History tab.
Minimum night value resets or disappears after submission
- Some OTAs may have default restrictions that override values.
- Confirm that the connected OTA allows manual control over minimum night settings.
Error: "Invalid minimum night format"
- Use only numeric whole numbers (e.g.,
2,3) without any decimal points or non-numeric characters.Unable to update a specific date
- The selected date may be locked due to a conflicting promotion or system rule.
- Contact support if the date remains uneditable after multiple attempts.
Single Rate Plan Update Stop Sell
This feature allows property managers to activate or remove Stop Sell for specific dates using the Yearly Deals interface.
How to Do Stop Sell
This feature allows property managers to activate Stop Sell for selected dates using the Yearly Deals interface.
General Update
- Go to the Stop Sell tab in the Single Rateplan panel.
- Choose the dates you want to update using one of the following options:
- Check specific days (e.g., Monday to Friday),
- Use Select Date Range to choose a date range,
- Or select based on a previously created Season.
NOTE: If you haven’t created any Seasons yet, you can create them first. Detailed instructions are available in the How to Create Seasons section.
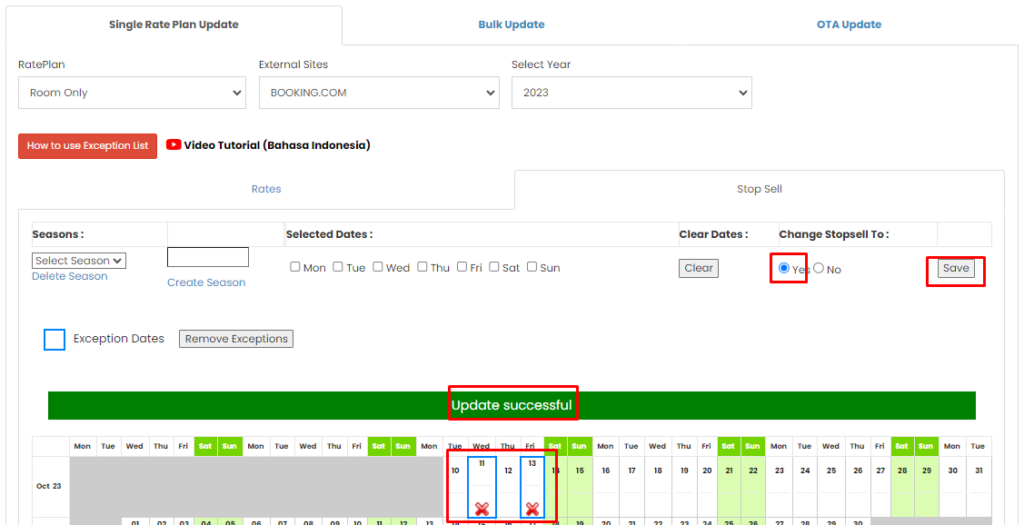
- Set the Stop Sell status to YES next to the "Update" button.
- Click Update to apply the changes. A success notification will confirm the update.
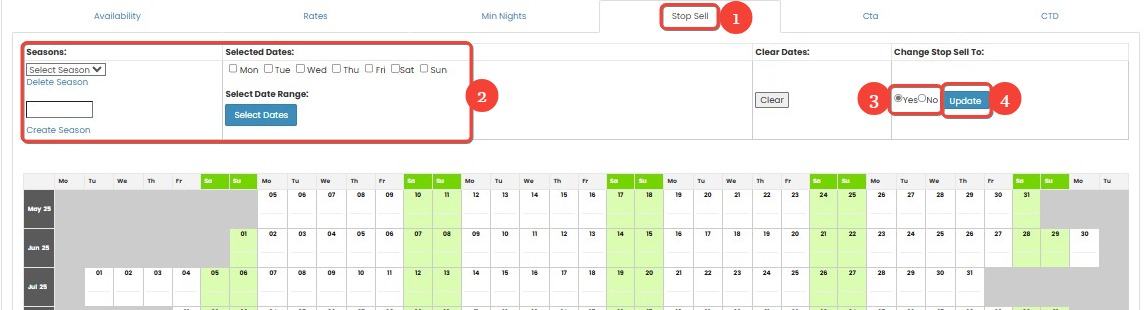
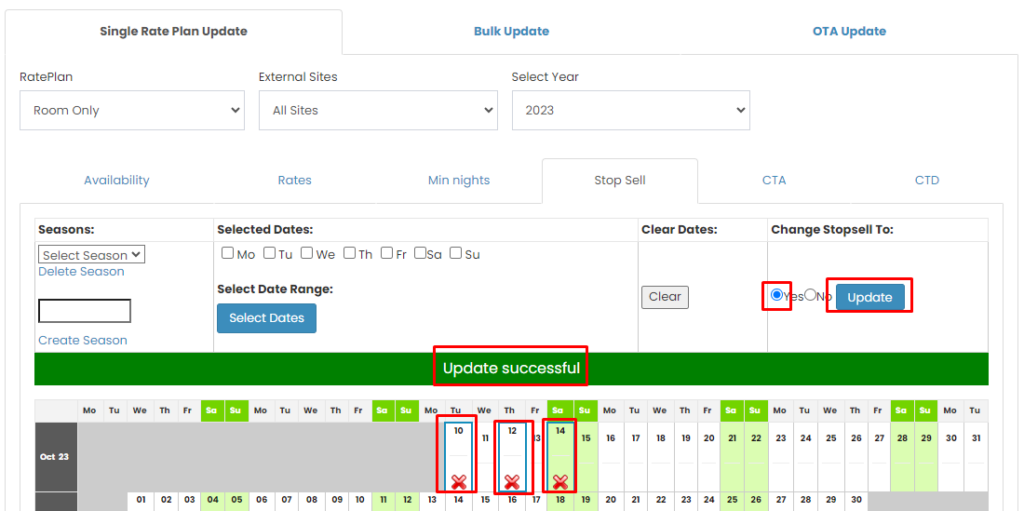
Row-Based Update
- Scroll down to the calendar table section.
- Click on any date in the Stop Sell row to modify.
- Select YES in the dropdown next to "Change Stop Sell To:".
- Click Submit to save the changes.
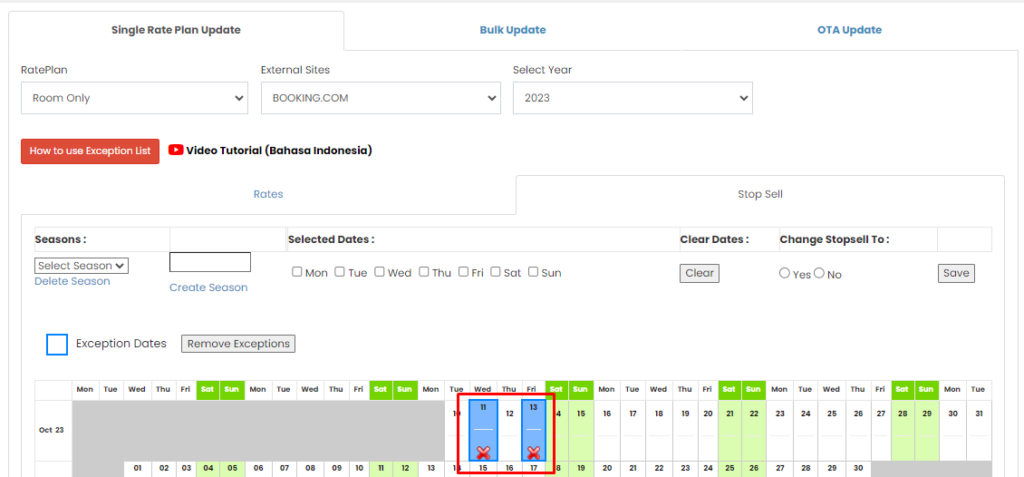
How to Remove Stop Sell
This feature allows property managers to remove or deactivate Stop Sell for selected dates.
General Update
- Go to the Stop Sell tab in the Single Rateplan panel.
- Choose the dates by:
- Check specific days (e.g., Monday to Friday),
- Use Select Date Range to choose a date range,
- Or select based on a previously created Season.
NOTE: If you haven’t created any Seasons yet, you can create them first. Detailed instructions are available in the How to Create Seasons section.
- Set the Stop Sell status to NO next to the "Update" button.
- Click Update to apply the changes. A success message will confirm the update.
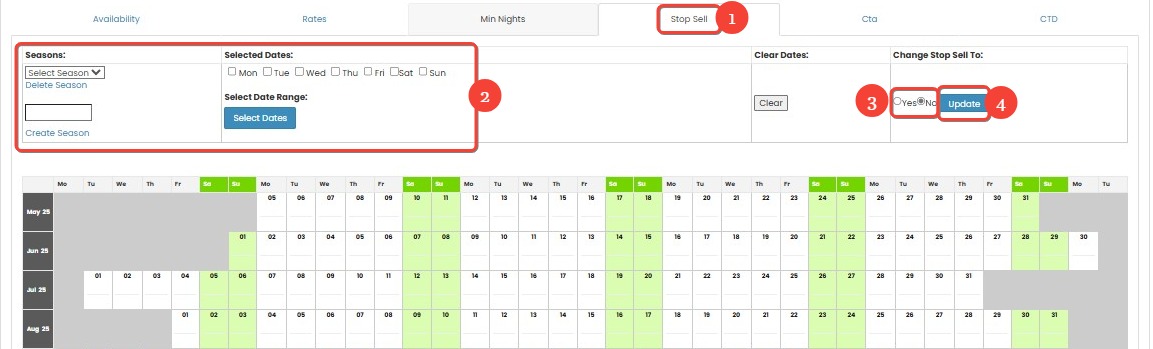
Row-Based Update
- Scroll down to the calendar table section.
- Click on any date in the Stop Sell row to modify.
- Select NO in the dropdown next to "Change Stop Sell To:".
- Click Submit to save the changes.
[!NOTE]
Troubleshooting Stop Sell Updates
Stop Sell tab is not visible or clickable
- Make sure a Rate Plan, External Site, and Year have been selected.
- Refresh the page or try using a different browser.
Cannot change Stop Sell value in dropdown
- Ensure you've selected at least one date, specific day, or season before making a change.
- If the dropdown is disabled, the date might be locked due to another restriction or system rule.
Stop Sell status doesn't change after clicking Update/Submit
- Refresh the calendar to check if the changes were applied.
- Review the Last 10 Update History for confirmation.
- If changes are still not reflected, try clearing the browser cache and repeating the update.
Update button is disabled
- Verify that a Stop Sell value (YES/NO) has been selected.
- Double-check that dates have been properly selected using one of the available methods.
Error: "Invalid value for Stop Sell"
- Ensure you are selecting either YES or NO only from the provided dropdown options.
- Manual text input is not supported in the Stop Sell dropdown.
Unable to apply updates to specific dates
- Certain dates may be managed automatically by connected OTA policies or promotions.
- Contact support if the same issue occurs consistently on specific dates.
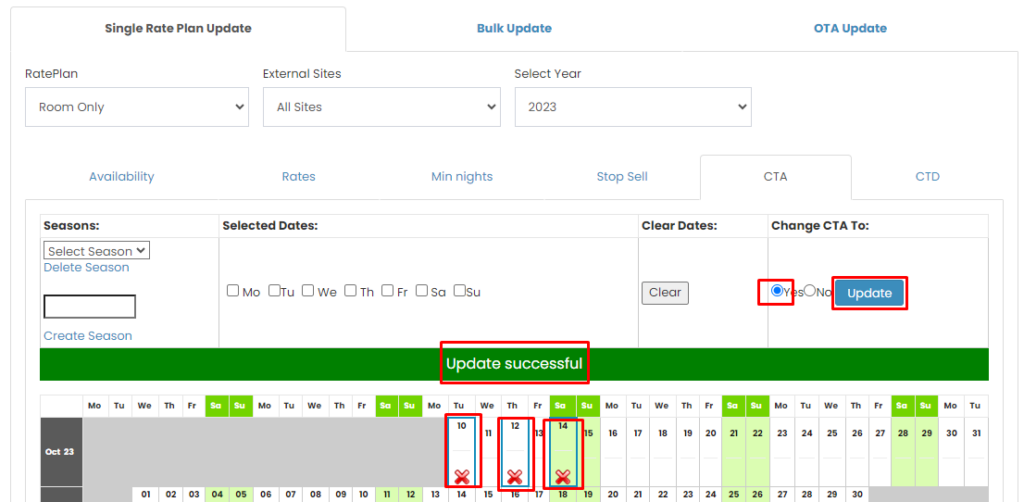
Single Rate Plan Update Close To Arrival
How to Do Close To Arrival (CTA)
This feature allows property managers to activate Close To Arrival (CTA) for selected dates using the Yearly Deals interface.
General Update
- Go to the CTA tab in the Single Rateplan panel.
- Choose the dates by:
- Check specific days (e.g., Monday to Friday),
- Use Select Date Range to choose a date range,
- Or select based on a previously created Season.
NOTE: If you haven’t created any Seasons yet, you can create them first. Detailed instructions are available in the How to Create Seasons section.
- Set the Close To Arrival status to YES next to the "Update" button.
- Click Update to apply the changes. A success notification will confirm the update._

Row-Based Update
- Scroll down to the calendar table section.
- Click on any date in the CTA row to modify.
- Select YES in the dropdown next to "Change CTA To:".
- Click Submit to save the changes.
How to Remove Close To Arrival (CTA)
This feature allows property managers to remove or deactivate Close To Arrival (CTA) for selected dates.
General Update
- Go to the CTA tab in the Single Rateplan panel.
- Choose the dates by:
- Check specific days (e.g., Monday to Friday),
- Use Select Date Range to choose a date range,
- Or select based on a previously created Season.
NOTE: If you haven’t created any Seasons yet, you can create them first. Detailed instructions are available in the How to Create Seasons section.
- Set the Close To Arrival status to NO next to the "Update" button.
- Click Update to apply the changes. A success notification will confirm the update.
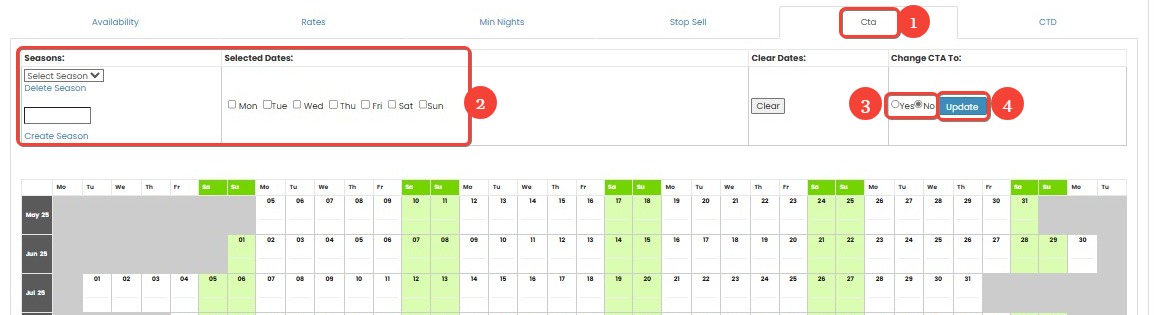
Row-Based Update
- Scroll down to the calendar table section.
- Click on any date in the CTA row to modify.
- Select NO in the dropdown next to "Change CTA To:".
- Click Submit to save the changes.
[!NOTE]
Troubleshooting Close To Arrival (CTA) Updates
CTA tab is missing or unresponsive
- Confirm that you've selected a Rate Plan, External Site, and Year before accessing the CTA tab.
- Reload the page or try using another browser.
Unable to select YES/NO for CTA
- Ensure that dates have been properly selected via days, date range, or Season options.
- If the dropdown is greyed out, the date might be restricted by another configuration or promotion.
Update button doesn't respond after clicking
- Double-check that a valid CTA value (YES or NO) has been selected.
- Make sure dates are selected before clicking Update.
Changes not reflected in the calendar
- Click the Refresh button on the calendar view or reload the page.
- You can also check the Last 10 Update History for confirmation.
Receive error when submitting a row-based update
- Confirm that you're choosing either YES or NO from the dropdown.
- Avoid typing manually into the dropdown, as only predefined options are accepted.
CTA status resets after submitting
- Some connected channels may override CTA rules based on OTA-specific restrictions.
- If it keeps happening on the same dates, contact Bookandlink support for further assistance.
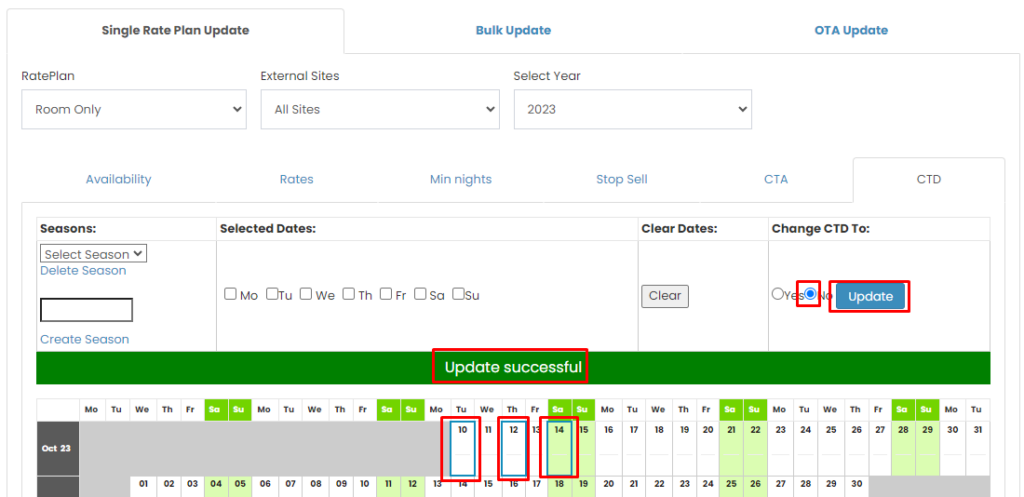
Single Rate Plan Update Close To Departure
How to Do Close To Departure (CTD)
This feature allows property managers to activate Close To Departure (CTD) for selected dates using the Yearly Deals interface.
General Update
- Go to the CTD tab in the Single Rateplan panel.
- Choose the dates by:
- Check specific days (e.g., Monday to Friday),
- Use Select Date Range to choose a date range,
- Or select based on a previously created Season.
NOTE: If you haven’t created any Seasons yet, you can create them first. Detailed instructions are available in the How to Create Seasons section.
- Set the Close To Departure status to YES next to the "Update" button.
- Click Update to apply the changes. A success notification will confirm the update.

Row-Based Update
- Scroll down to the calendar table section.
- Click on any date in the CTD row to modify.
- Select YES in the dropdown next to "Change CTD To:".
- Click Submit to save the changes.
How to Remove Close To Departure (CTD)
This feature allows property managers to deactivate Close To Departure (CTD) for selected dates.
General Update
- Go to the CTD tab in the Single Rateplan panel.
- Choose the dates by:
- Check specific days (e.g., Monday to Friday),
- Use Select Date Range to choose a date range,
- Or select based on a previously created Season.
NOTE: If you haven’t created any Seasons yet, you can create them first. Detailed instructions are available in the How to Create Seasons section.
- Set the Close To Departure status to NO next to the "Update" button.
- Click Update to apply the changes. A success notification will confirm the update.
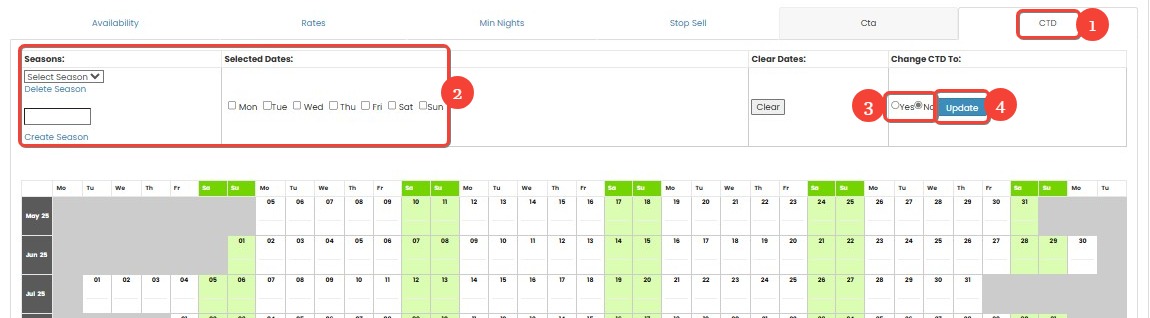
Row-Based Update
- Scroll down to the calendar table section.
- Click on any date in the CTD row to modify.
- Select NO in the dropdown next to "Change CTD To:".
- Click Submit to save the changes.
[!NOTE]
Troubleshooting Close To Departure (CTD) Updates
CTD tab is missing or unresponsive
- Ensure that you've selected the correct Rate Plan, External Site, and Year.
- Reload the page or try using a different browser to resolve any interface issues.
Unable to select YES/NO for CTD
- Make sure you've selected valid dates via specific days, date range, or a previously created Season.
- If the dropdown is greyed out, the dates might be restricted by other settings.
Update button doesn’t work after clicking
- Ensure you've selected either YES or NO in the CTA dropdown before clicking Update.
- Double-check that dates are properly chosen.
Changes are not reflected in the calendar view
- Click the Refresh button or reload the page.
- You can verify if the changes were applied through the Last 10 Update History log.
Error when submitting row-based update
- Only select YES or NO from the dropdown menu.
- Typing manually into the dropdown will result in errors.
CTD status resets after submission
- Some channels or external systems might override the CTA/CTD settings.
- If this occurs regularly, contact Bookandlink support for assistance.
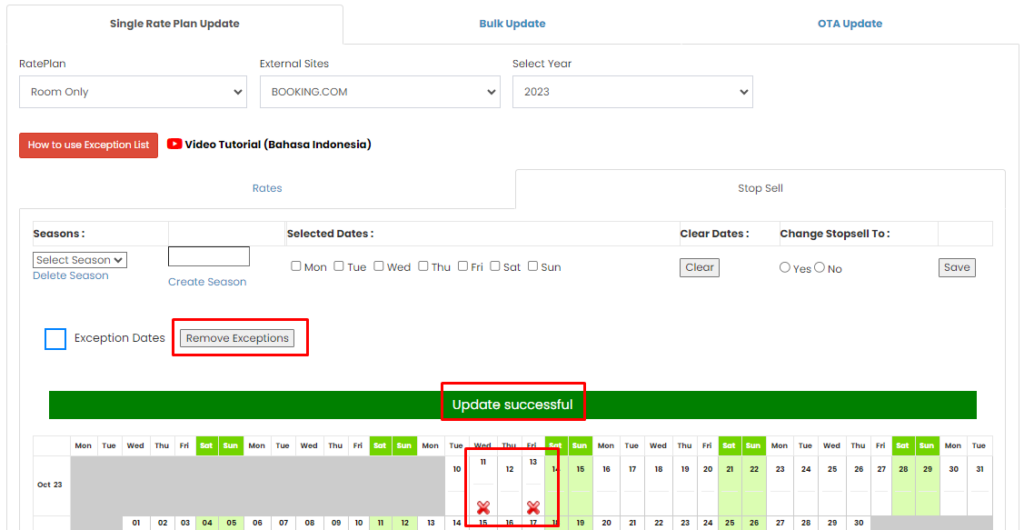
Exception
The Exception feature allows you to set different values (such as rates or stop sell) specifically for certain external sites (OTAs). This option is only available when you select a specific External Site. If All Sites is selected, the Exception feature will not be displayed.
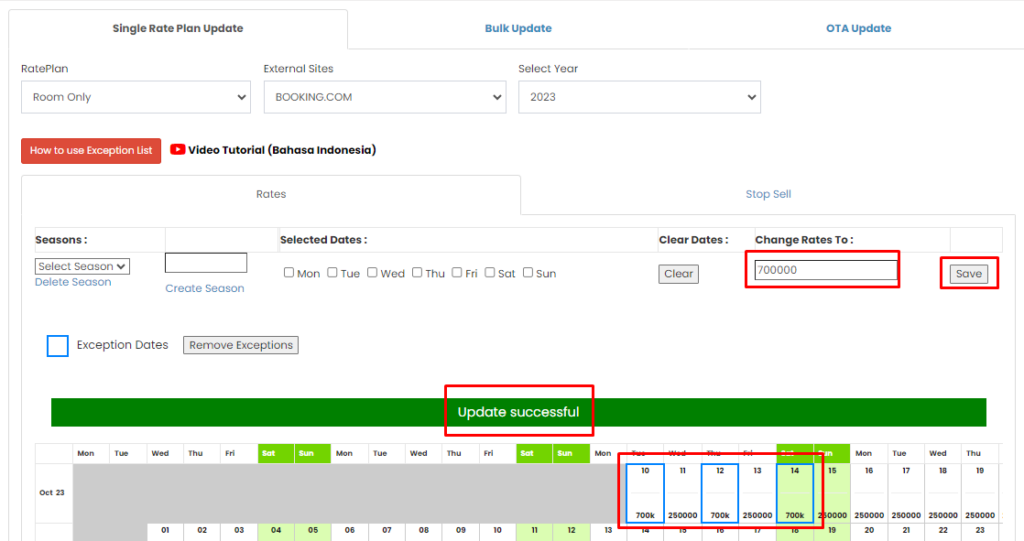
Rate Exception
This feature lets you apply different room rates for a selected rate plan on a specific OTA.
How to Set Rate Exception
- Select Room Type and Rate Plan.
- Choose a specific External Site (not "All Sites").
- Go to the Rates tab.
- Select or block the dates you want to update.
- Enter the desired rate in the input box next to the Save button.
- Click Save to apply.
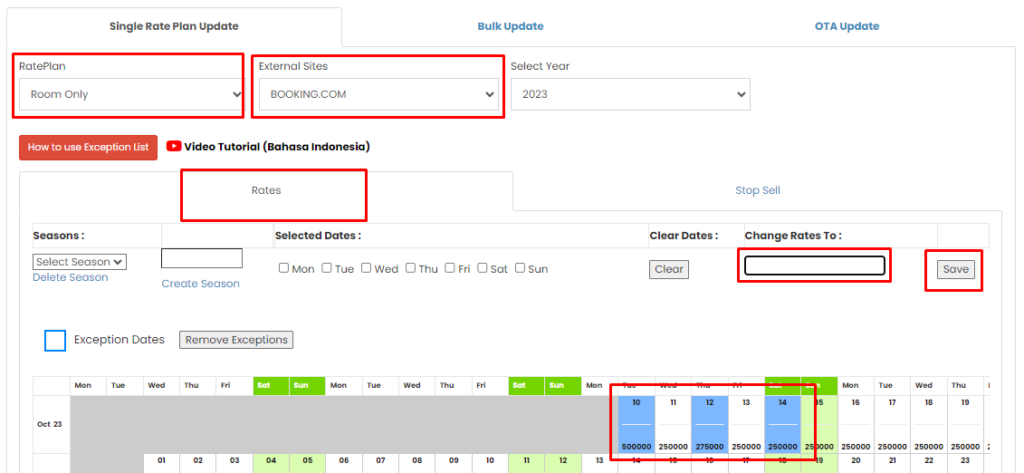
- Once updated successfully, refresh the page and re-check by repeating steps 1–3.
Note: Rate exceptions will only be reflected on the OTA’s extranet.
How to Remove Rate Exceptions
- Select Room Type and Rate Plan.
- Choose the same External Site used when the exception was set.
- Go to the Rates tab.
- Select the dates that show a blue line.
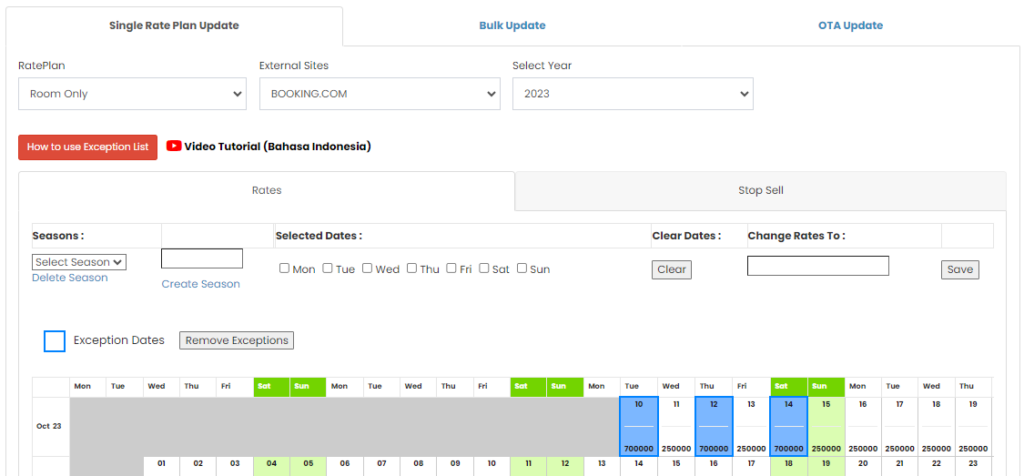
- Click Remove Exceptions.
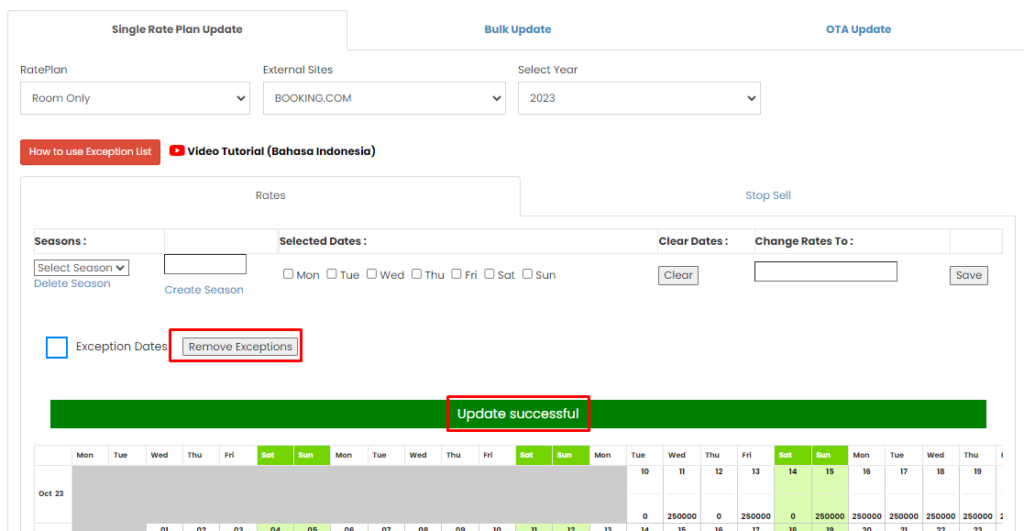
- Once updated successfully, refresh the page and re-check by repeating steps 1–3.
[!NOTE]
Troubleshooting Rate Exception Updates
Rate Exception option is not showing up
- Ensure that you have selected a specific External Site instead of All Sites. The Exception feature will only appear when a specific External Site is chosen.
Unable to enter rate value
- Ensure that you have selected a valid Room Type, Rate Plan, and External Site.
- Check if the dates you are trying to update are locked or restricted by other settings, such as Stop Sell or Close To Arrival/Departure being enabled.
Error when saving rate exception
- Double-check that the rate value entered is correct and valid (numeric value).
- Try refreshing the page and attempt saving again after ensuring all settings are correct.
Rate exception is not reflected on the OTA extranet
- Changes made through this system may take time to sync with the OTA extranet.
- Ensure that the External Site selected is properly connected, and there are no connectivity issues between the platform.
Cannot remove rate exception
- Ensure that you are selecting the same External Site used when the rate exception was first set.
- If the dates you want to remove still show a blue line, try refreshing the page and check that no other settings are preventing the change.
Changes not visible after removing exceptions
- After removing a rate exception, ensure to refresh the page and verify in the Rates tab that the changes have been correctly applied.
Stop Sell Exception
This feature allows you to apply Stop Sell to specific OTAs.
How to Set Stop Sell Exception
- Select Room Type and Rate Plan.
- Choose a specific External Site.
- Go to the Stop Sell tab.
- Select or block the dates you want to update.
- Choose Yes to activate Stop Sell.
- Click Save to apply.
- Once successfully updated, a blue line and "x" mark will appear on the selected dates.
Note: Stop Sell exceptions will only be reflected on the OTA’s extranet.
How to Remove Stop Sell Exceptions
- Select Room Type and Rate Plan.
- Choose the same External Site used when the exception was set.
- Go to the Stop Sell tab.
- Select the dates that show a blue line and "x" mark.
- Click Remove Exceptions.
- After the update, refresh the page and repeat steps 1–3 to confirm removal.
[!NOTE]
Troubleshooting Stop Sell Exception Updates
Stop Sell option is not visible
- Ensure that you have selected a specific External Site instead of All Sites. The Stop Sell Exception feature will only appear when a specific External Site is chosen.
Unable to activate Stop Sell
- Verify that you have selected a valid Room Type, Rate Plan, and External Site.
- Check if the dates you are trying to update are restricted by other settings, such as Close To Arrival/Departure or existing rate exceptions.
Error when saving Stop Sell
- Ensure that all settings are correctly filled out, especially Room Type, Rate Plan, and External Site.
- Check if the dates you’ve chosen are valid and not already blocked by other exceptions or system configurations.
Stop Sell is not reflected on the OTA extranet
- Changes made may take some time to sync with the OTA extranet.
- Ensure that the External Site selected is connected and that there are no issues with the platform’s connection to the OTA.
Cannot remove Stop Sell exception
- Make sure that you are selecting the correct External Site used when the Stop Sell exception was first set.
- If the dates you wish to remove still show the blue line and "x" mark, try refreshing the page and attempt removing the exception again.
Changes not visible after removing Stop Sell exception
- After removal, refresh the page to confirm that the changes have been properly applied.
- Double-check that no other settings are conflicting with the Stop Sell status for the dates you are trying to update.
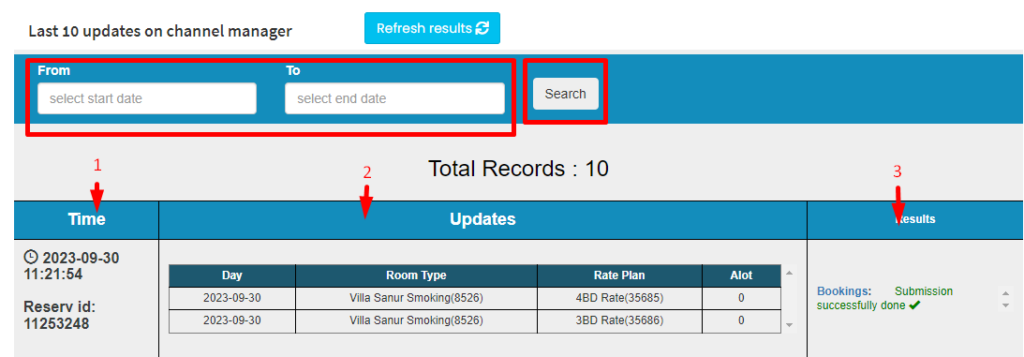
Last 10 Update History
This feature allows you to review the latest updates made through Yearly Deals. It helps track activity and identify any errors that may have occurred during the update process.
How to Check Update History
- Go to the Last 10 Update History section at the bottom of the Yearly Deals page.
- Select a date range using the Search From – To fields to display the update log.
- The system will show a list of recent updates with the following details:
- Timestamp: The time when the update was performed.
- Updates:
- Day → The updated date(s).
- Room Type → The updated room type.
- Rateplan → The updated rate plan.
- Alot → The updated inventory.
- Results:
- OTA → Displays the submission result to each OTA, for example: Submission successfully done.
- OTA → Displays the submission result to each OTA, for example: Submission successfully done.
[!NOTE]
Troubleshooting Last 10 Update History
Update History not showing
- Ensure that you have selected the correct date range in the Search From – To fields.
- Verify that the updates have actually been performed during the selected time frame. If no updates were made within that range, the history log will be empty.
Update history is incomplete or missing information
- Check if there were any issues during the update process that may have caused incomplete entries.
- Ensure that all relevant fields, such as Room Type, Rateplan, and Alot values, were properly updated. Missing fields could indicate an error during the process.
Unable to view the update results for a specific OTA
- Confirm that the update was successfully submitted to the chosen OTA. If the submission was unsuccessful, the system will display an error or failure message in the Results column.
- If the OTA did not receive the update, recheck your connection and submission status for that OTA.
Update log not reflecting recent changes
- Refresh the page to ensure that any new updates made are visible in the history log.
- If updates were recently made, but not reflected in the log, ensure that there were no network interruptions or issues with the system’s update functionality.
Errors or warnings displayed in the update history
- Review the Results column to identify any specific error messages or warnings related to the updates.
- Address any errors by revisiting the update settings for the affected Room Type, Rateplan, or Alot values.
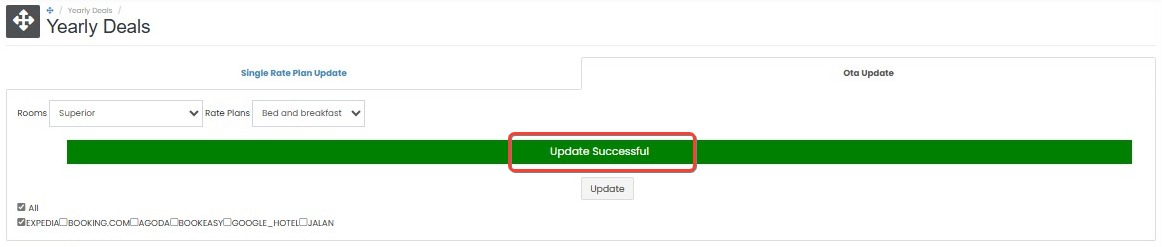
OTA Update
The OTA Update tab is used to push existing data from the Channel Manager (CM) to the connected OTAs. This function does not update anything in the CM—it only re-sends the data from CM to the OTA side.
When to Use OTA Update: Use this feature in the following cases:
- After first connecting an OTA.
- When the data in CM and OTA extranet are not synchronized.
- To re-push availability, rates, or restrictions without making changes in CM.
How to Perform OTA Update
- Go to the OTA Update tab.
- Select the room type you want to update.
- Choose the rate plan associated with that room.
- Select the OTA (external site) you wish to push data to.
- Click the Update button.

- After submission, the system will process the update in the background and indicate success with an 'Update Successful' message.
[!NOTE]
Troubleshooting OTA Update
OTA Update button is disabled or unclickable
- Make sure that a Room Type and Rate Plan have been selected. If either of these fields is left unselected, the Update button will remain disabled.
- Verify that an OTA (external site) has been chosen from the available list. If no OTA is selected, the button will not be clickable.
No changes reflected on the OTA after performing the update
- Confirm that the data in the Channel Manager (CM) is properly synchronized with the OTA. If there is a mismatch, perform the OTA update again, ensuring the data is correct in the CM before re-sending.
- Check whether the OTA’s extranet received the update. If the update was successful in CM but not reflected in the OTA, review the extranet for any system delays or outages.
'Update Successful' message not appearing
- Ensure that the system has completed the background process. If the message does not appear, refresh the page and verify that the Room Type, Rate Plan, and OTA are correctly selected.
- If the issue persists, contact support to ensure that the system is functioning properly.
Error during the update process
- Review any error messages shown after submitting the update. These messages should provide specific details about the failure.
- If the update fails due to a network or connection issue, try the process again after ensuring a stable internet connection.
- Double-check that the data being pushed (availability, rates, restrictions) is correct and doesn’t contain conflicting information.
Update not sending data to the OTA
- Make sure that the OTA is connected and active in the system. If there are connection issues, the data will not be pushed to the OTA.
- Revisit the OTA connection settings and verify the credentials or configuration are correct.
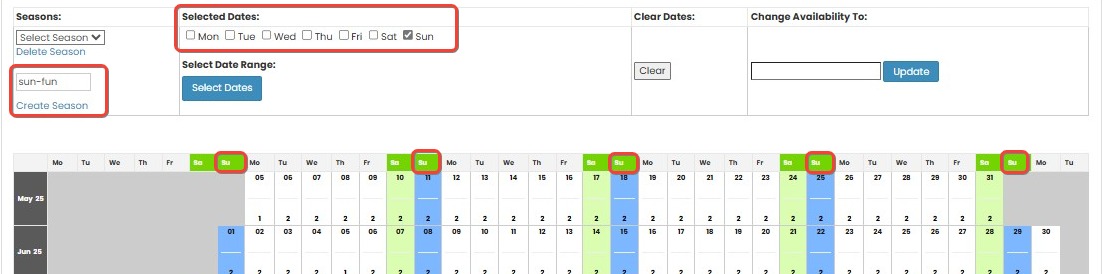
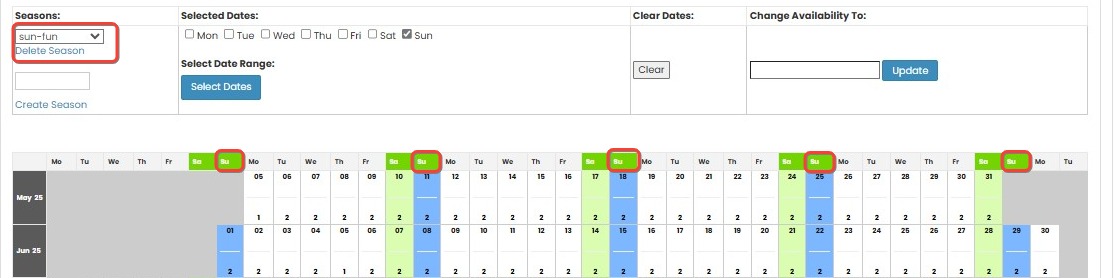
Seasons
How to Create Season
The Season feature allows you to group specific dates and days into a named preset. This can be used later when updating rates, availability, or restrictions in Yearly Deals.
- Navigate to the Season section in the Yearly Deals page.
- Enter the Season Name in the input field.
- Select the days and dates you want to include in the season by clicking them on the calendar.
- Click Create Season to save.
- If the season is created successfully, it will appear in the Select Season dropdown.
How to Delete a Season
- Select the Season you want to delete.
- Click the Delete Season button next to the created season.
- A confirmation alert will appear. Click Yes to proceed.
- The season will be removed from the list once successfully deleted.
[!NOTE]
Troubleshooting Seasons
Unable to create a season
- Ensure that the Season Name field is not empty. The system will not allow you to create a season without a name.
- Double-check that you have selected valid dates and days on the calendar. If no dates are selected, the system will not allow the season to be created.
- If the "Create Season" button is unresponsive, check for any browser issues or clear the cache to resolve the problem.
Season does not appear in the Select Season dropdown
- Refresh the page after creating the season. Sometimes it may take a few moments for the season to appear in the dropdown.
- Ensure that the season was created successfully. If the page was not refreshed properly after creating the season, it may not be visible.
Unable to delete a season
- Verify that the season is not actively used in any Yearly Deals. If it is, you must remove or modify any deals using that season before it can be deleted.
- Ensure you clicked Yes in the confirmation dialog after selecting Delete Season. If the confirmation is skipped, the season will not be deleted.
Confirmation alert not appearing when deleting a season
- Ensure the page is not being blocked by pop-up blockers or any browser extensions that could prevent the confirmation alert from displaying.
- Try refreshing the page and attempt deleting the season again.
Season is not being deleted after confirmation
- After confirming the deletion, check if there is a system delay or issue with saving changes. Refresh the page to verify if the season has been removed.
- If the season still appears, try again after clearing your browser’s cache or using a different browser.