Introduction
The Navigation Menu consists of the Left Sidebar and the Top Navigation Bar, providing easy access to all functionalities. This guide offers a comprehensive overview of how to navigate and manage your website efficiently.
Left Sidebar Menu
The Left Sidebar Menu is your primary navigation tool, offering categorized access to essential website management sections.
Main Sections
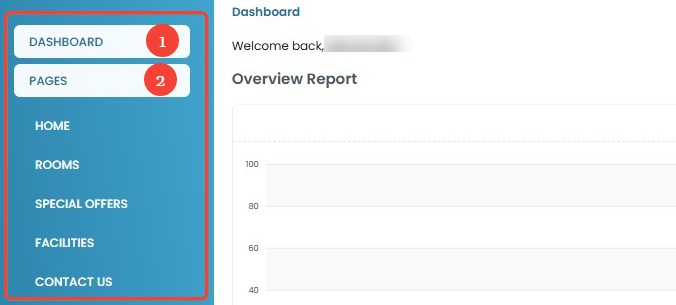
- Dashboard: Monitor website performance and key metrics, such as visitor numbers and page views.
- Pages: Customize the content and appearance of your website's pages.
- Home: Manage hero image, introduction, featured rooms, special offers, activities, about us section, partner, facilities, and SEO settings for your homepage.
- Rooms: Showcase your rooms with detailed descriptions, images, and pricing. Manage SEO settings to improve visibility.
- Special Offers: Highlight promotions and packages. Configure offer details, images, and SEO settings.
- Facilities: Display facilities with descriptions and images. Optimize SEO for easy discovery.
- Contact Us: Provide contact information and location details. Manage SEO for easy accessibility.
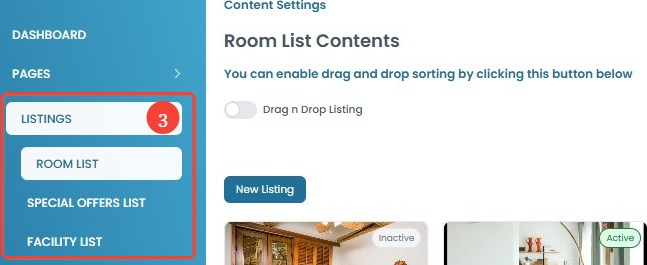
- Listings: Manage dynamic content on your website.
- Room List: Add, edit, and manage room listings, including availability, pricing, and descriptions. Use the drag-and-drop feature to reorder rooms.
- Special Offers List: Create and manage special offers, including details, pricing, and images. Reorder offers using drag and drop.
- Facility List: Available in Theme 7, this menu allows you to add, edit, and manage facility listings, including details, pricing, and images. Facilities can be organized and reordered using drag and drop.
- Activities List: Available in Theme 1 and Theme 3, this menu allows you to add, edit, and manage activity listings, including descriptions, pricing, and images. Activities can be organized and reordered using drag and drop.
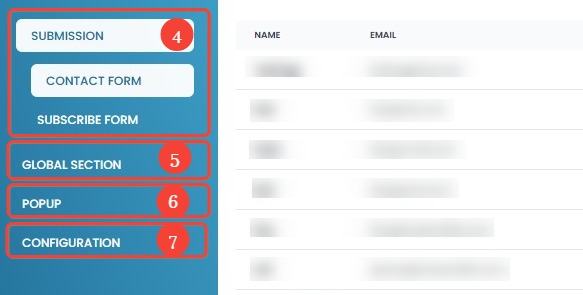
- Submission: Track and manage user interactions.
- Contact Form: View and manage inquiries submitted through your website's contact form. Search for specific submissions.
- Subscribe Form: Monitor and manage newsletter subscribers.
- Global Section: Configure site-wide elements from the "All Pages" panel.
- Main CTA: Set your primary call-to-action (CTA) to encourage desired actions.
- Terms & Conditions: Manage your website terms and conditions.
- Privacy: Manage your website privacy policy.
- Footer Text: Customize the content displayed in your website's footer.
- Popup: Manage promotions displayed as pop-ups on your website. Add, edit, and schedule pop-ups to appear at specific times or based on user behavior.
- Configuration: Adjust essential site settings from the "Update Site" panel.
- Main:
- Site name and Site domain. Once your domain is registered, it can't be changed. If you need a different domain, you'll have to register a new one. To update your website to a new domain, please contact our customer support.
- View preview and live URLs of your website.
- Upload or change your site logo and favicon.
- Enter your business contact details, including address, email, phone number, Google Place business name, and WhatsApp number.
- Add social media links for Facebook, Instagram, TikTok, LinkedIn, and X (formerly Twitter).
- Select and activate a website theme from available options.
- Menus:
- Manage and configure your website's menu items.
- Change the order of menu items using drag and drop.
- Enable or disable menu items.
- Edit menu item titles.
- Integration:
- Integrate third-party services, such as ReviewKu or Google Analytics, with your website.
- Add and manage available services and settings.
- Language:
- Configure the languages available on your website.
- Enable or disable languages to support a multilingual audience.
- Customize (For Developers Only):
- Add custom CSS styles to modify the appearance and feel of your website.
- Add custom CSS styles to modify the appearance and feel of your website.
- Main:
Header Menu (Top Navigation Bar)
The Header Menu is located at the top of the dashboard and provides quick access to essential settings and functionalities.
Date & Time
Displays the current system date and time for your reference.

Site Dropdown
This dropdown menu allows you to switch quickly between your managed sites.
- Click the Site Name in the top-right corner of the dashboard.
- A dropdown menu will appear with a text field.
- You can select a site from the dropdown menu. To quickly find a specific site, use the filter by typing the site name in the search field.

[!NOTE]
Troubleshooting Site Name Selection Issues
- Site Name dropdown is not appearing?
- Refresh the page and try again.
- Ensure you are logged in with an account that has access to multiple sites.
- Unable to select the desired Site Name?
- If typing the Site Name manually, make sure it matches an existing site in the list.
- Try selecting from the dropdown menu instead of typing.
- Typed Site Name is not being recognized?
- Ensure the name is spelled correctly and exists in the available site list.
- If the name does not appear, try refreshing the page and typing again.
- Site Name is missing from the list?
- Ensure the site is registered under your account.
- Contact support for further assistance.
Language Selection
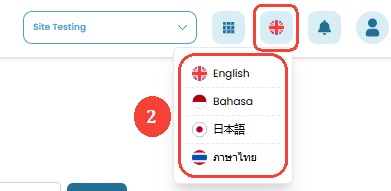
This option allows you to change the dashboard interface to your preferred language. The available languages are English, Bahasa Indonesia, Japanese (日本語), and Thai (ไทย).
How to Change Language
- Click the Language dropdown in the top-right corner of the dashboard.
- Select your preferred language from the list.
- The system will automatically update the interface to the selected language.
[!NOTE]
Troubleshooting Language Change Issues
Language didn’t update?
- Try refreshing the page after selecting a new language.
- If the language is still unchanged, log out and log back in.
- Check your browser settings to ensure it allows language preferences to be saved.
SSO Product Access
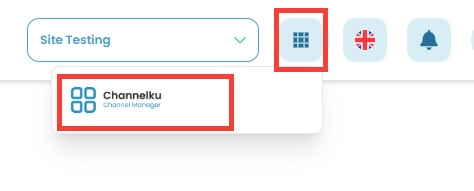
This icon provides quick access to your registered SSO Products (e.g., Channelku, Reviewku).
How to Access SSO Products
- Click the SSO Product icon in the top navigation bar.
- A list of registered SSO Products will appear.
- Click on any product to access it without re-authentication.
[!NOTE]
Troubleshooting SSO Product Access
SSO Product icon not appearing?
- Ensure you have activated the desired SSO products on your SSO website.
Notifications
This icon displays system alerts and important updates.
How to View Notifications
- Click the Notification Bell icon in the top-right corner.
- A dropdown will display recent system alerts.
- Click on a notification to view details.

Manage Your Account
This section allows you to access and manage your profile details easily. You can view your registered name and email, and sign out of the platform.
How to View and Edit Your Profile
- Click your profile name in the top-right corner.
- In the dropdown menu, click Profile.
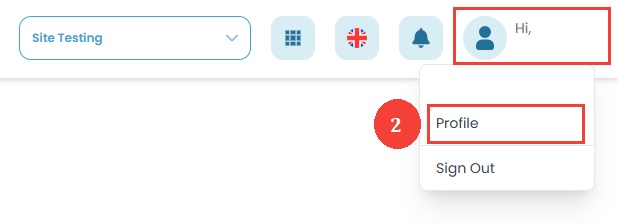
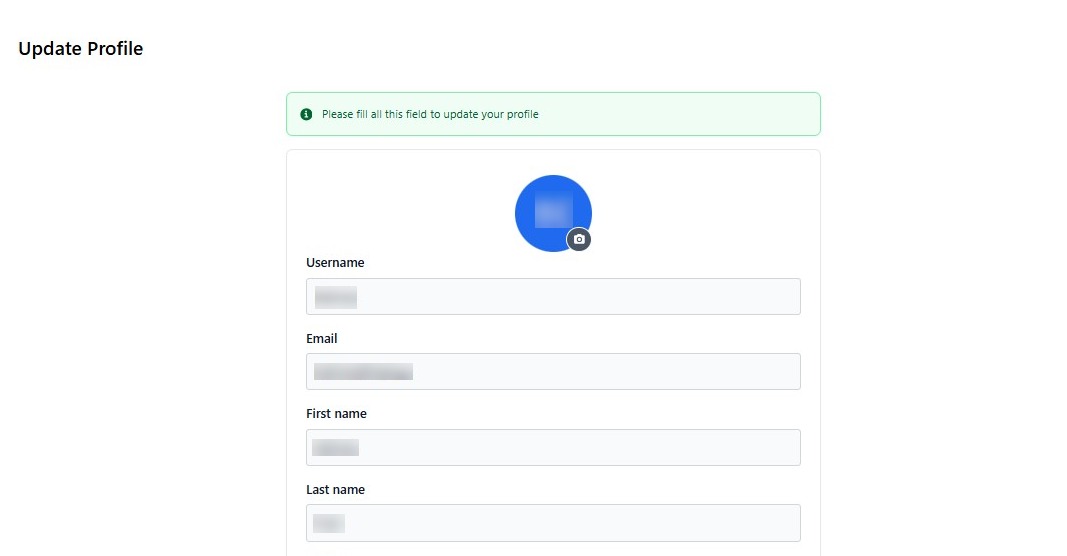
- You will be redirected to the update profile page on the SSO website, where you can view and edit your profile details.
[!NOTE]
Troubleshooting Profile Update Issues
- Make sure that you are connected to the internet.
- Try clearing your browser cache and cookies, then try again.
- If you are still unable to edit your profile, please contact customer support.
How to Sign Out
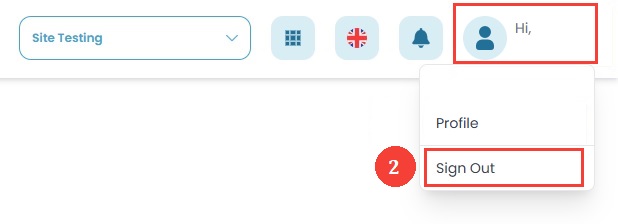
- Click your profile name in the top-right corner.
- In the dropdown menu, click Sign Out.
- You will be logged out and redirected to the login page.
[!NOTE]
Troubleshooting Sign-Out Issues
Having trouble signing out?
- Check your internet connection and try again.
- Clear your browser cache and cookies, then retry.
- If you're frequently logged out automatically, check your browser settings to allow cookies.