Introduction
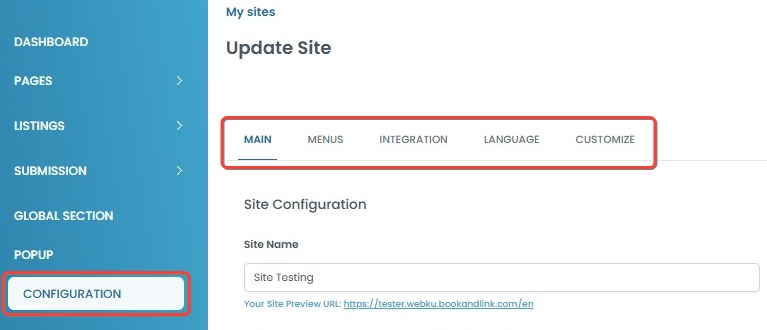
The Configuration section allows you to manage various settings of your website. This section is divided into several tabs, each serving a specific function:
- Main: Configure basic site settings such as the site name and domain.
- Menus: Manage the website’s navigation structure.
- Integration: Connect third-party services such as Google Analytics, Facebook Pixel, and more.
- Language: Enable or disable multiple languages for your website.
- Customize: Add custom styles to modify the appearance of your site.
Each tab provides specific settings to help you optimize your site effectively. By accessing the Configuration panel, you can personalize and optimize your website based on your business needs.
Accessing the Configuration Page
- Click Configuration in the sidebar menu.
- The Configuration page will open, displaying various settings tabs for your website.
Configuration Tab
Main
The Main tab in the Configuration section allows you to set up essential details about your website, including the site name, domain, logo, contact information, and social media links. These settings help personalize and enhance the branding of your website.
Site Configuration
The Site Configuration section in the Main tab allows you to set up essential details for your website, including the Site Name, Site Domain, Logo, and Favicon.
Site Name & Site Domain
- Site Name:
- Enter the name of your website. This name will appear on various parts of the platform.
- Example: "Luxury Stay Bali", "Cozy Homestay", or "Urban Hotel Hub".
- Click Save to apply the changes.
- Clicking on the Site Preview URL will open a new tab displaying a preview of your website.

- Site Domain:
- Configure your primary website domain. This will determine the main address where your website can be accessed.
- Example:
luxurystaybali.com,cozyhomestay.net, orurbanhotelhub.co.id. - Click Save to apply the changes. Once saved, a Site Live URL will be generated.
- Clicking on the Site Live URL will open a new tab displaying the live version of your website.

Site Logo & Favicon
You can upload a logo and favicon to personalize your website’s branding. The Site Logo appears on your website’s header, while the Site Favicon is the small icon displayed on browser tabs.
- Changing the Logo or Favicon
- Click Change under the displayed Site Logo or Site Favicon.
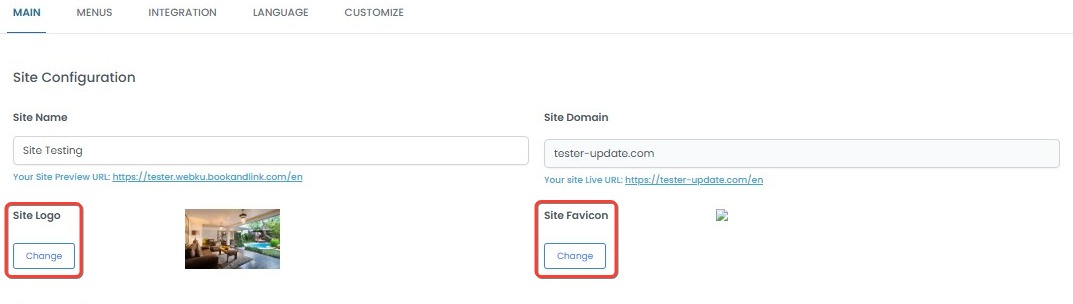
- Drag and drop an image file into the upload area or manually select an image from your device.
- Supported formats: PNG, JPG.
- Maximum file size: 800 KB.
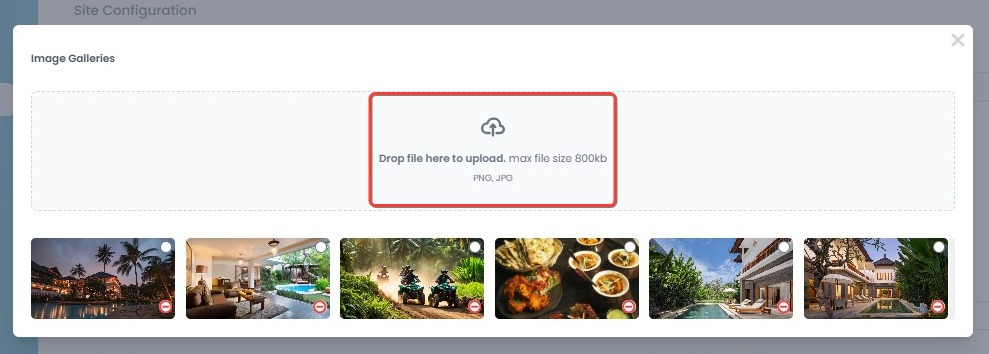
- Select the image and close the Image Galleries, then click Save to apply the changes.

- Click Change under the displayed Site Logo or Site Favicon.
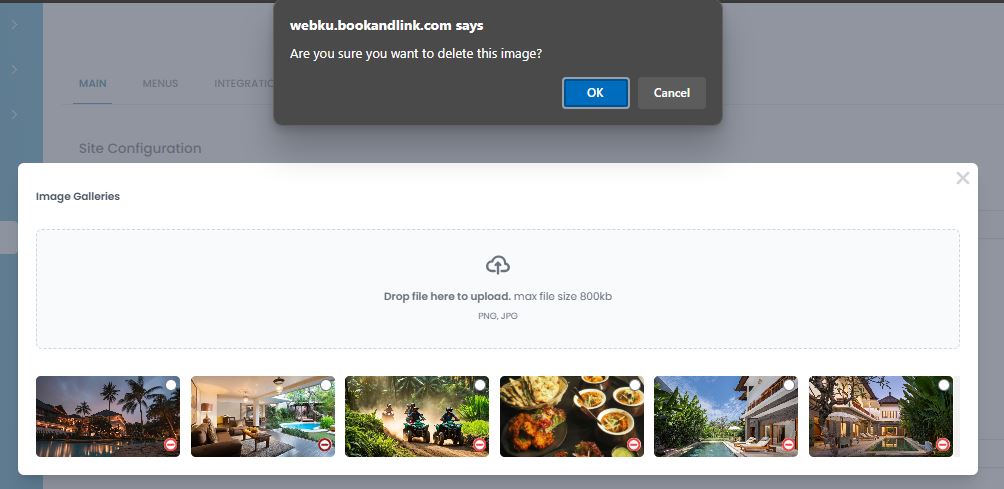
- Deleting and Uploading a New Image
- Click the red icon at the bottom right of the current image in the upload area.
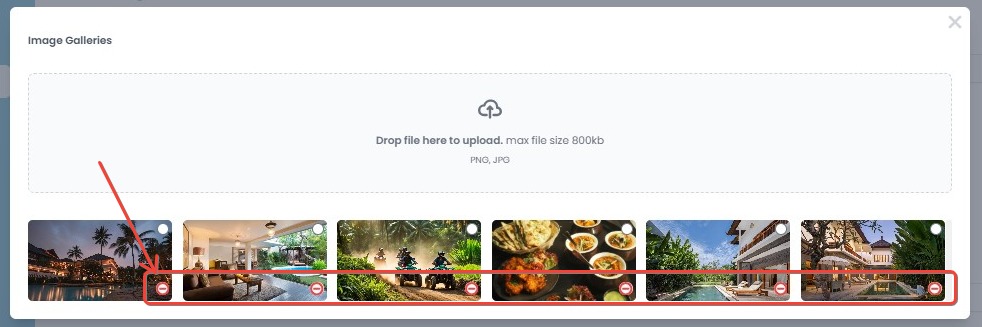
- A confirmation pop-up will appear with two options:
- Click OK to permanently delete the image.
- Click Cancel to keep the existing image.
- Click the red icon at the bottom right of the current image in the upload area.
[!NOTE]
Troubleshooting Site Configuration Issues
If you encounter issues while setting up Site Name, Site Domain, Logo, or Favicon, try the following troubleshooting steps:
Site Name or Site Domain Changes Are Not Saved
- Ensure you have clicked the Save button after making changes.
- Check your internet connection and try again.
- Refresh the page or reopen the platform in incognito mode.
- If the issue persists, try logging out and logging back in before saving the changes.
Site Live URL Does Not Appear After Saving Site Domain
- Ensure the domain you entered is valid and not already in use by another site.
- Refresh the page and check if the Site Live URL has been generated.
- If the issue persists, clear your browser cache or try using a different browser.
Logo or Favicon Does Not Update After Uploading
- Make sure the uploaded file is in PNG or JPG format and does not exceed 800 KB in size.
- Refresh the page and check if the changes have been applied.
- Try logging out, logging back in, and re-uploading the image.
- If the image is still not updated, try deleting the old image first, then upload a new one.
Unable to Delete Logo or Favicon
- Check if the delete button (red icon) appears at the bottom of the image.
- If the delete confirmation does not appear, refresh the page and try again.
- Ensure you click OK in the confirmation popup to permanently remove the image.
- If the issue persists, try clearing your browser cache and repeating the process.
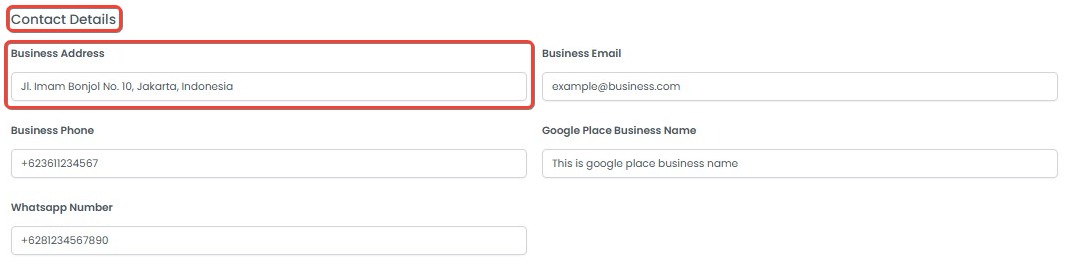
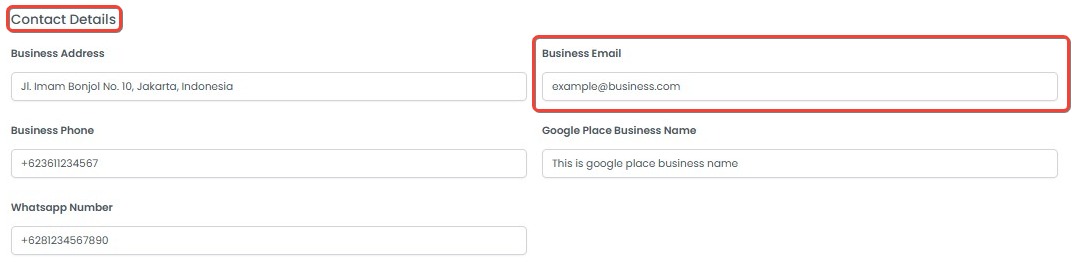
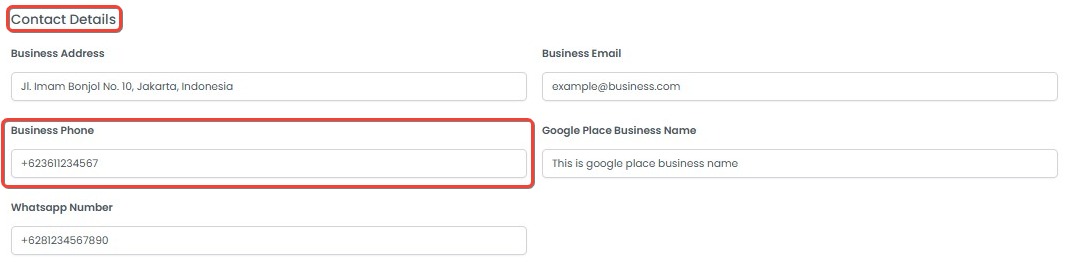
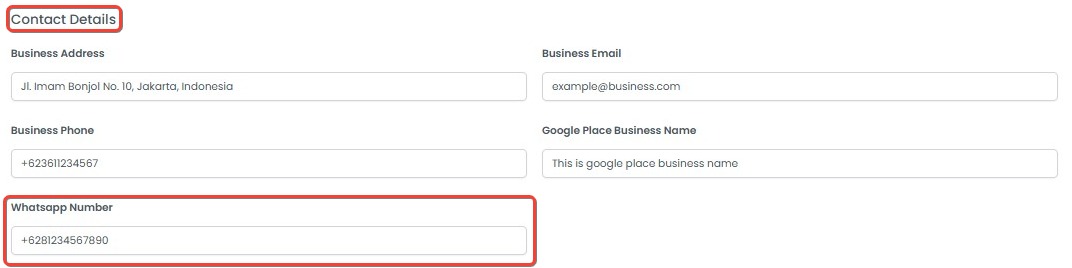
Contact Details
The Contact Details section in the Settings tab allows you to configure essential business contact information, including the Business Address, Email, Phone Number, WhatsApp Number, and Google Place Business Name.
- Set Up Business Address:
- Enter the complete address of your business. This will help customers find your location.
- Example: "Jl. Imam Bonjol No. 10, Jakarta, Indonesia"
- Click Save to apply the changes.
- Set Up Business Email
- Provide a Business Email where customers can send inquiries or support requests.
- Ensure this email is active and regularly monitored.
- Example: info@luxurybaliresort.com
- Click the Save button to apply changes.
- Add Business Phone Number
- Enter a Business Phone Number that customers can call for inquiries or reservations.
- Include the country code to ensure international accessibility.
- Example: +62 361 1234567
- Click the Save button to apply changes.
- Configure Google Place Business Name
- If your business is listed on Google, enter the Google Place Business Name to link it with your website.
- This helps in displaying your business location accurately on maps.
- Example: Luxury Bali Resort
- Click the Save button after entering the details.
- Set Up WhatsApp Number
- Add a WhatsApp Number to enable direct customer communication via WhatsApp.
- Make sure to enter the number correctly, including the country code.
- Example: +62 81234567890
- Click the Save button to apply changes.
[!NOTE]
Troubleshooting Contact Details Issues
If you encounter issues while setting up Business Address, Email, Phone Number, WhatsApp Number, or Google Place Business Name, try the following troubleshooting steps:
Business Address Does Not Save or Update
- Ensure you have clicked the Save button after entering the address.
- Refresh the page and check if the changes have been applied.
- Clear your browser cache or try using a different browser.
- If the issue persists, log out and log back in before attempting to save again.
Business Email Is Not Accepted or Does Not Save
- Verify that the email address is in the correct format (example@domain.com).
- Ensure the email address is valid and active.
- Refresh the page and try entering the email again.
- If the problem continues, try using a different email address to check if the issue is specific to the entered email.
Phone Number or WhatsApp Number Is Not Saving Correctly
- Ensure you have entered the correct country code (e.g., +62 for Indonesia).
- Avoid using spaces or special characters other than
+.- Refresh the page and check if the number has been saved.
- If the issue persists, try logging out and logging back in before saving the details again.
Google Place Business Name Is Not Linking or Displaying Correctly
- Double-check that your business name is correctly listed on Google Places.
- Try entering the exact name as it appears on Google.
- Refresh the page and check if the field has been saved.
- If the issue persists, clear your browser cache or try accessing the platform in an incognito window.
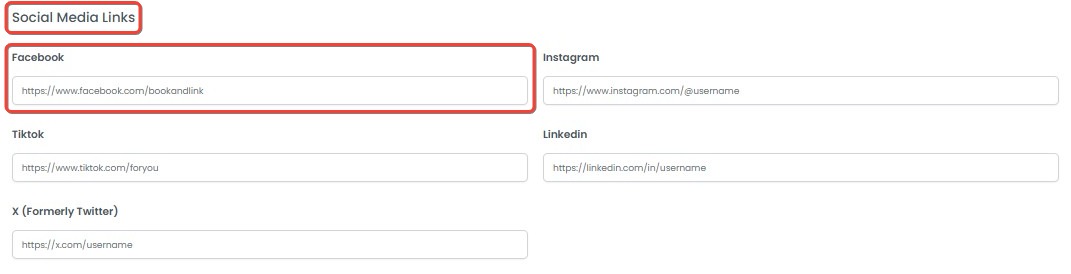
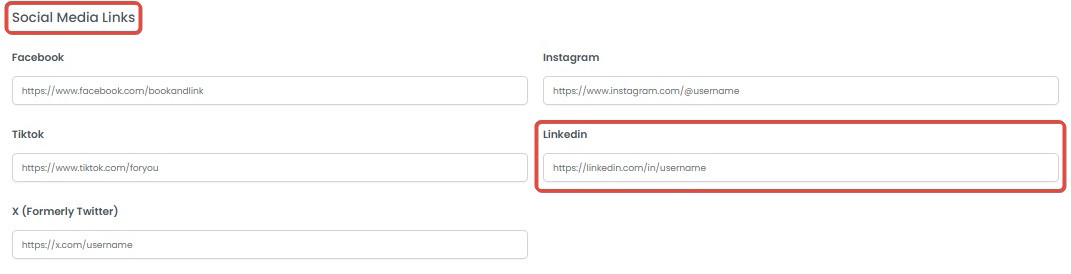
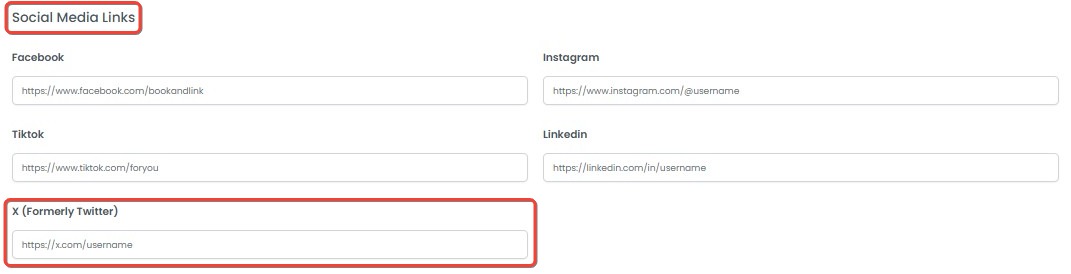
Social Media Links
The Social Media Links section in the Main tab allows you to connect your website with your official social media profiles. Adding these links helps customers easily find and follow your business on various platforms.
- Facebook
- Enter the URL of your official Facebook page.
- Example:
https://www.facebook.com/bookandlink - Click Save to apply the changes.
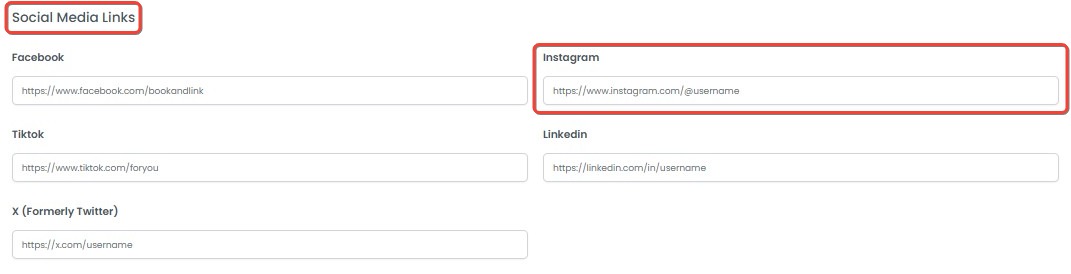
- Instagram
- Provide the link to your Instagram profile.
- Example:
https://www.instagram.com/@username - Click Save to apply the changes.
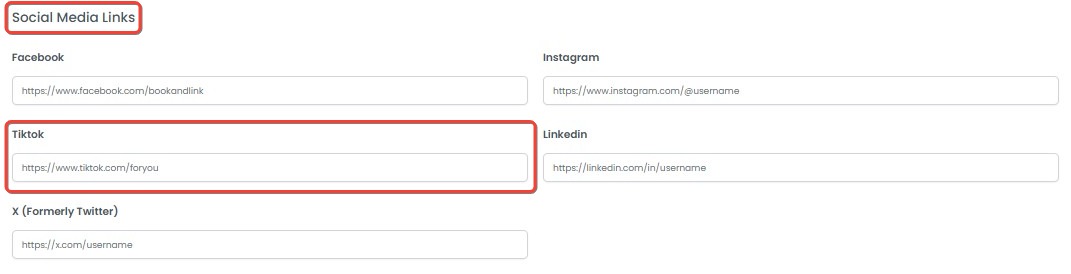
- TikTok
- Enter the URL of your business’s TikTok page.
- Example:
https://www.tiktok.com/@yourbusiness - Click Save to apply the changes.
- LinkedIn
- Add the link to your LinkedIn profile or company page.
- Example:
https://www.linkedin.com/in/username - Click Save to apply the changes.
- X (Formerly Twitter)
- Enter the URL of your X (Twitter) profile.
- Example:
https://x.com/username - Click Save to apply the changes.
[!NOTE]
Troubleshooting Social Media Links Issues
If you encounter issues while adding or saving your social media links, try the following troubleshooting steps:
The Social Media Link Does Not Save
- Ensure the URL follows the correct format (e.g., https://www.facebook.com/bookandlink).
- Double-check that the URL starts with
https://and is not missing any required characters.- Refresh the page and try entering the link again.
- Clear your browser cache or try a different browser.
- Log out and log back in before attempting to save the changes again.
The Social Media Icon Does Not Appear on the Website
- Verify that the link has been saved correctly by refreshing the page.
- Ensure the platform's link is valid and publicly accessible.
- Try adding a different social media link to check if the issue is specific to one platform.
- Clear your browser cache and reload the page.
The Link Opens a Broken or Incorrect Page
- Ensure you have copied and pasted the exact URL from your social media profile.
- Check if the profile is public and accessible.
- Try opening the link in a private/incognito window to verify if it works correctly.
- If the issue persists, remove the link, save the settings, then re-enter and save it again.
Layout
The Layout section in the Main tab allows you to customize the appearance of your website by selecting one of the three available themes: Theme 1, Theme 3, and Theme 7. Each theme has a preview displayed in the Layout section to help you visualize the design before applying it.
How to Change the Website Theme
- Go to the Layout section in the Main tab.
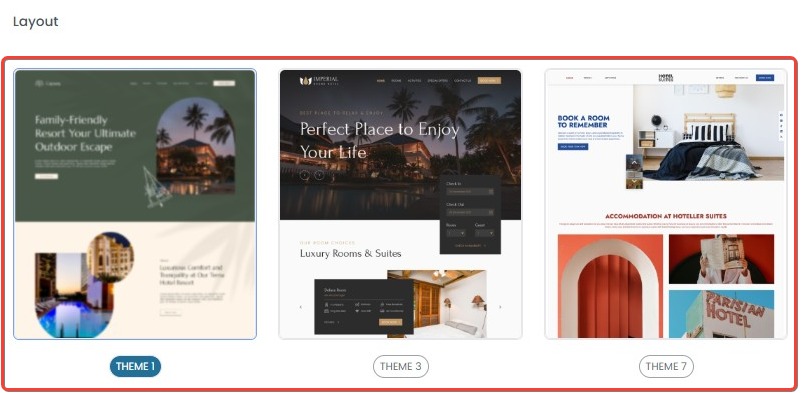
- Select your preferred theme.
- Click Save to apply the new theme.
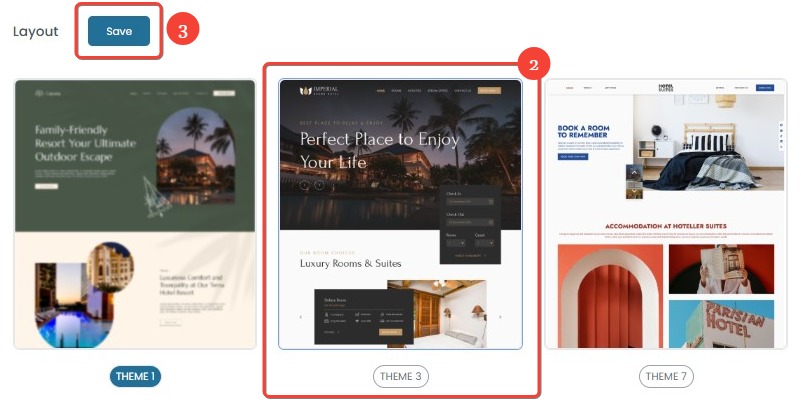
- Refresh the page to see the updated design on your website.
[!NOTE]
Troubleshooting Layout Issues
If you encounter issues while selecting or applying a theme, try the following troubleshooting steps:
The Selected Theme Does Not Apply
- Ensure you have clicked the Save button after selecting the theme.
- Refresh the page and check if the theme has updated.
- Clear your browser cache and try again.
- Log out and log back in before attempting to apply the theme again.
The Layout Preview Does Not Change
- Try selecting a different theme, then reselect your preferred one.
- Refresh the page and check if the preview updates.
- Check your internet connection and try again.
- If the issue persists, try using a different browser.
The Website Appears Broken After Changing the Theme
- Clear your browser cache and reload the website.
- Check if all website elements (such as images and text) are loading properly.
- Try reverting to a previous theme, then switching back to your preferred one.
- If the issue continues, contact support for further assistance.
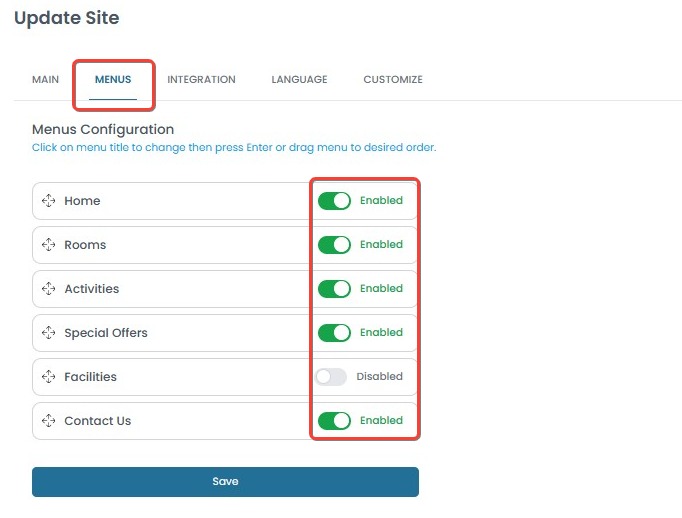
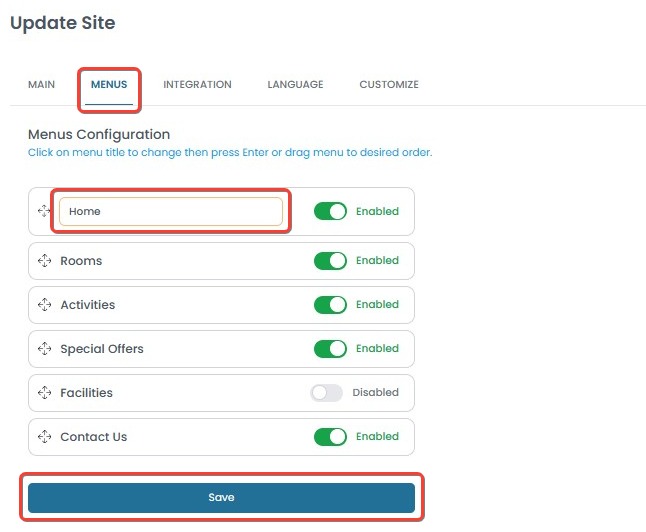
Menus
The Menus tab in the Configuration section allows you to manage your website’s navigation structure. You can enable or disable specific menus and rearrange their order.
How to Manage Navigation Menus
- Enable or Disable a Menu
- Each menu has a toggle switch to enable (Enabled) or disable (Disabled) it.
- To disable a menu, switch the toggle to the left. Disabled menus will not appear in the website navigation.
- To re-enable a menu, switch the toggle to the right.
- Click Save to apply the changes.
- Rearranging Menu Order
- Click and hold the drag icon
 next to the menu name.
 - Drag the menu to the desired position in the list.
- Release to save the new order.
- Click Save to apply the changes.
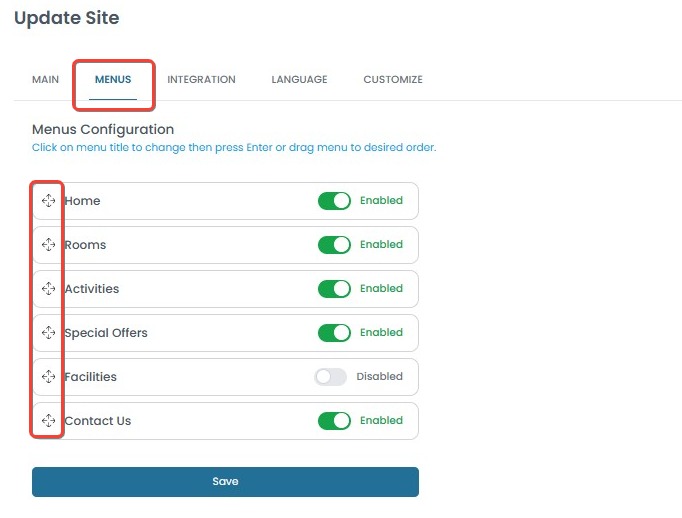
- Click and hold the drag icon
- Editing Menu Names
- Click on the menu name to edit it.
- Type the new name and press Enter.
- Click Save to apply the changes.
[!NOTE]
Troubleshooting Menu Issues
If you encounter issues while managing your website’s menus, try the following troubleshooting steps:
Changes to Menus Are Not Saved
- Ensure you have clicked the Save button after making changes.
- Refresh the page and check if the modifications have been applied.
- Clear your browser cache and try again.
- Log out and log back in before attempting to edit the menus again.
Menu Order Does Not Update
- Drag and drop the menu again, then click Save to confirm the changes.
- Refresh the page to check if the new order has been applied.
Enabled Menus Are Not Visible on the Website
- Make sure the menu is switched to Enabled and the change has been saved.
- Clear your browser cache and reload the website.
- Check if your website is using a cached version; try opening it in an incognito/private window.
- If the issue persists, try disabling and re-enabling the menu before saving again.
Unable to Edit Menu Names
- Ensure you click on the menu name field before typing the new name.
- Press Enter after editing, then click Save to apply the change.
- Refresh the page and try again if the new name does not appear.
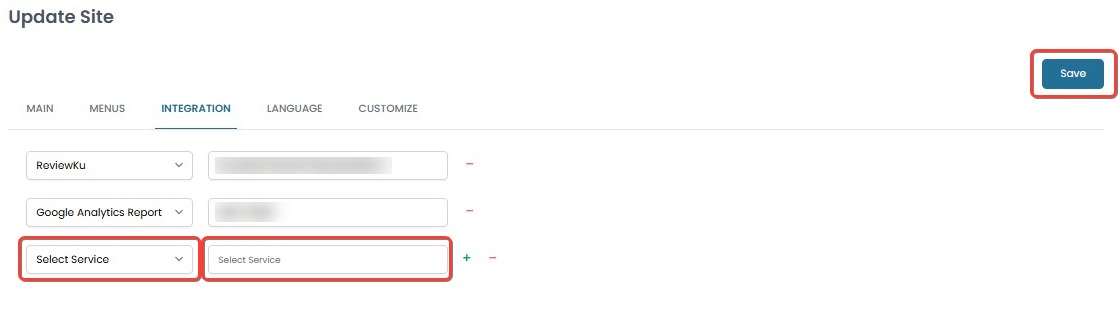
Integration
The Integration tab allows you to connect third-party services to your website for tracking, analytics, and other functionalities.
Adding a New Integration
- Click the plus (+) icon to add a new integration.
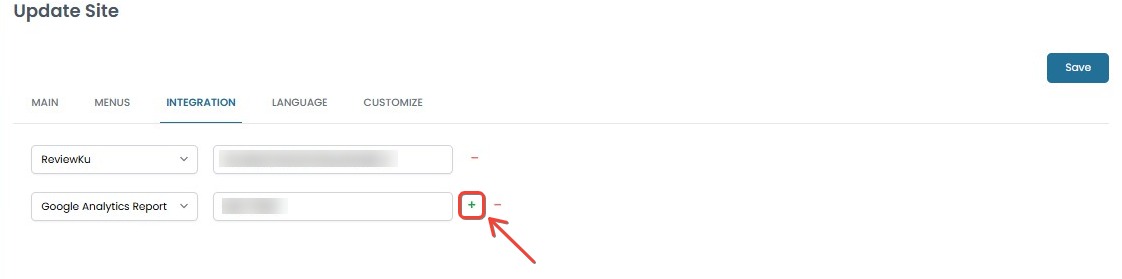
- Select a service from the list (e.g., Booking Engine, Google Analytics, Facebook Pixel).
- Enter the required Integration Parameter (e.g., Widget ID, Booking Engine Property Name) based on the selected service.
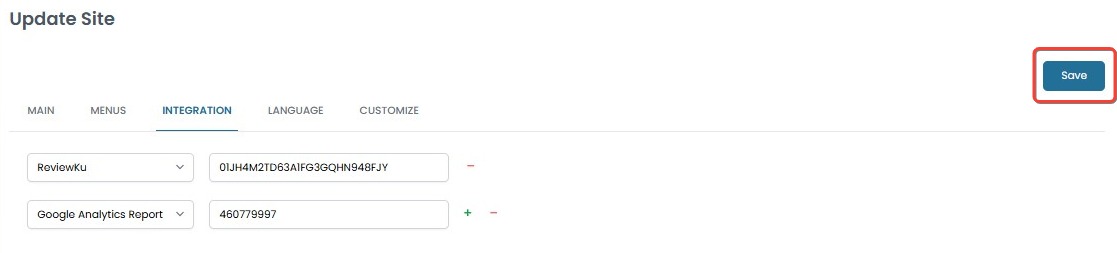
- Click the Save button to apply the settings.
Removing an Integration
- Locate the integration you want to remove.
- Click the minus (-) icon next to it.
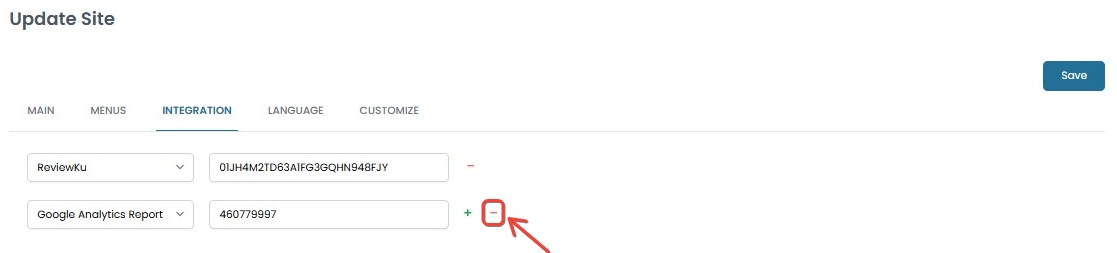
- The integration will be removed from the list.
- Click the Save button to apply the settings.
[!NOTE]
Troubleshooting Integration Issues
If you encounter issues while managing integrations, try the following troubleshooting steps:
Unable to Add a New Integration
- Ensure you have clicked the plus (+) icon to add a new integration.
- Check if you have selected a valid service from the list.
- Verify that all required Integration Parameters are correctly entered.
- Refresh the page and try adding the integration again.
- Clear your browser cache and log in again before attempting to add a new integration.
Integration Settings Are Not Saved
- Ensure you have clicked the Save button after making changes.
- Refresh the page and check if the integration appears in the list.
- Try removing and re-adding the integration before saving again.
- Log out and log back in, then attempt to save the integration settings.
The Integration Is Not Functioning Properly
- Confirm that the Integration Parameter (e.g., Widget ID, Tracking Code) is entered correctly.
- Check if the third-party service requires additional setup or authentication.
- Try testing the integration on a different browser or device.
- Contact the third-party service provider to verify if their system is operational.
Unable to Remove an Integration
- Ensure you have clicked the minus (-) icon to delete the integration.
- Click Save after removing the integration to apply the changes.
- Refresh the page and check if the integration has been removed.
- If the issue persists, try logging out and back in before attempting to remove it again.
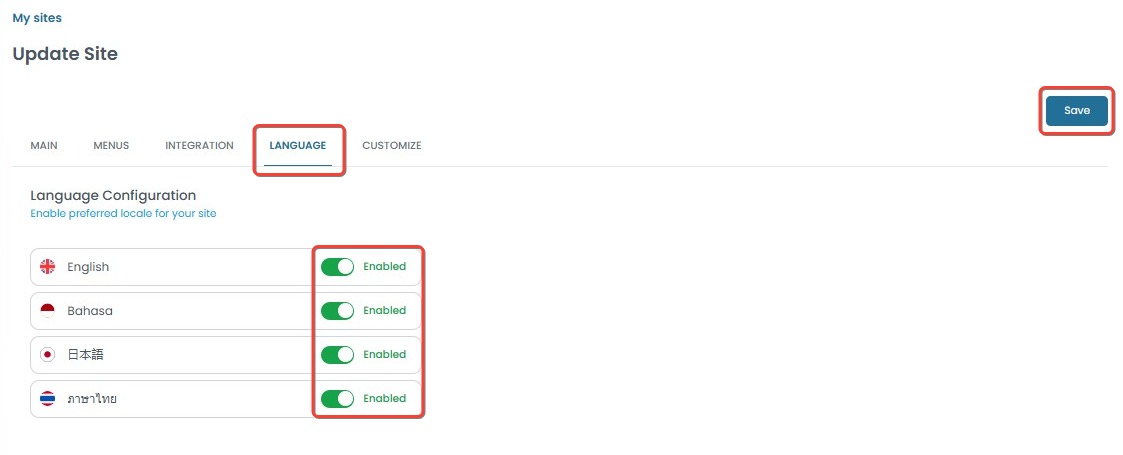
Language
The Language tab in the Configuration section allows you to manage the available languages for your website. You can enable or disable specific languages based on your preferences.
How to Manage Language Settings
- Enabling or Disabling a Language
- Each language has a toggle switch: enabled (green) or disabled (gray).
- To disable a language, switch the toggle to the left. Disabled languages will no longer be available.
- To enable a language, switch the toggle to the right (green).
- Saving Changes
- After making adjustments, click the Save button to apply the settings.
- After making adjustments, click the Save button to apply the settings.
[!NOTE]
Troubleshooting Language Issues
If you encounter issues while managing language settings, try the following troubleshooting steps:
Unable to Enable or Disable a Language
- Ensure you have toggled the language switch correctly (green for enabled, gray for disabled).
- Refresh the page and try again.
- Clear your browser cache and log in again before attempting to change the language settings.
- If the issue persists, try using a different browser or device.
Language Settings Are Not Saved
- Make sure you have clicked the Save button after making changes.
- Refresh the page and check if the changes were applied successfully.
- Try disabling and enabling the language again before saving.
- Log out and log back in, then attempt to save the language settings once more.
The Enabled Language Is Not Displayed on the Website
- Confirm that the selected language is supported by your website’s theme and content.
- Clear your browser cache and refresh the website to see the updated language options.
- Try accessing the website from a different browser or device to verify if the issue is browser-specific.
- Check if your website’s content is translated into the enabled language; if not, add the necessary translations.
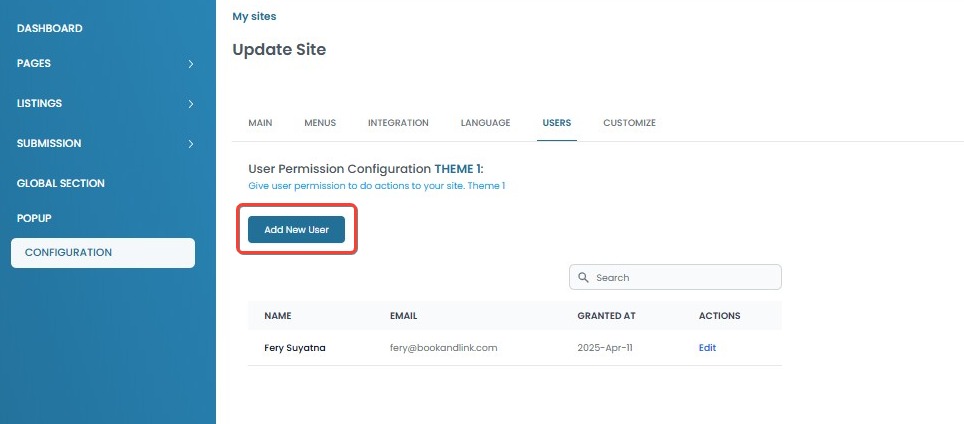
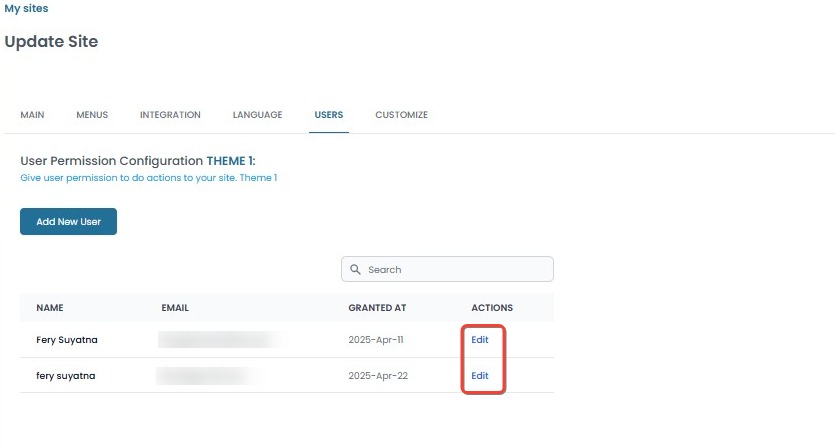
Users
The Users tab in the Configuration section allows you to add new users and manage their access permissions to the website. You can control which users are allowed to read, create, update, or delete content based on specific modules such as Rooms, Facilities, Activities, and more.
How to Add Sub Users
- Click the Add New User button.
- Fill in the following information in the form:
- Input First Name and Last Name
- Input Email Address
- Make sure the email address has not been registered before.
- Click Register button.
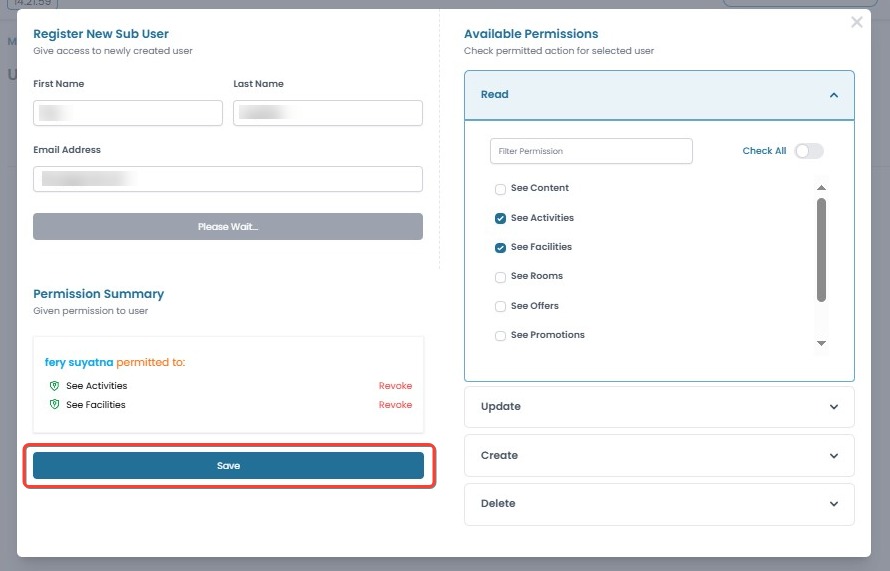
- The system will automatically verify if the email already exists.
- If the email is already taken, the following message will appear:
- "This email has been taken", and you will not be able to proceed.

- "This email has been taken", and you will not be able to proceed.
- Click the arrow icon next to each category to expand or collapse the permission list.
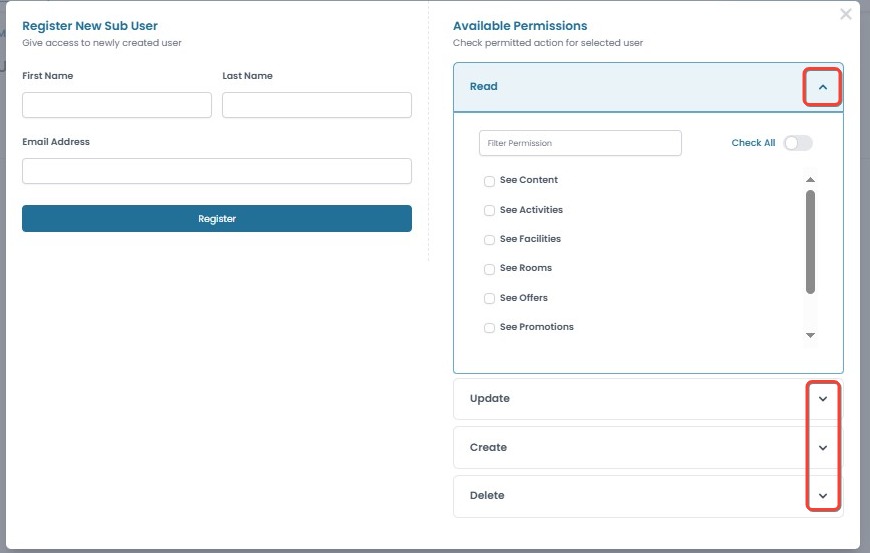
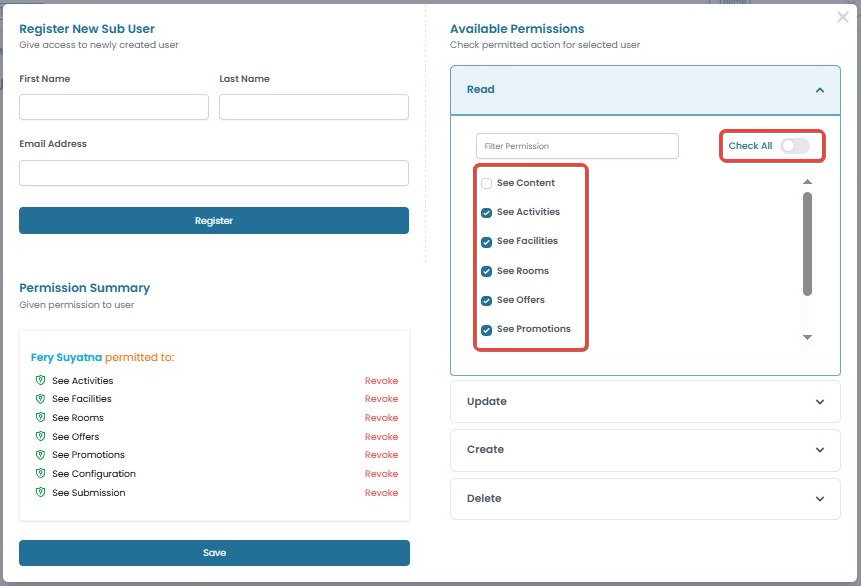
- Check the permissions based on the user's role.
- Use the Check All option to select all permissions within a category at once.
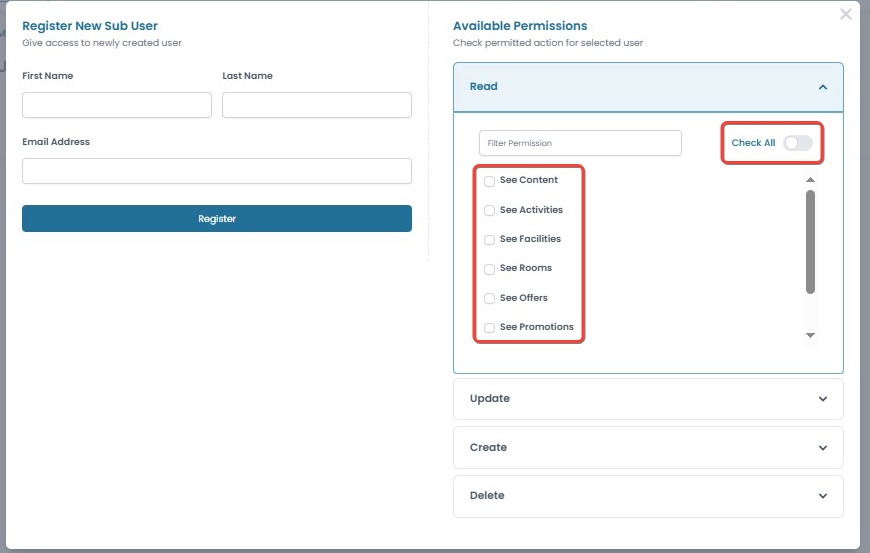
- Use the Check All option to select all permissions within a category at once.
- Once finished, click Save to add the user to the system.
[!NOTE]
Troubleshooting Sub User Registration Issues
"This email has been taken" message appears
- The email address is already registered in the system.
- Use a different email address that hasn’t been used before.
Permissions section does not appear after entering a valid email
- Wait a few moments for the system to validate the email.
- Refresh the page and try again.
- Ensure your internet connection is stable.
Cannot proceed after filling out the form
- Make sure all required fields (First Name, Last Name, and Email) are filled out correctly.
- Double-check for any error messages or missing fields.
Register button is unresponsive
- Refresh the page and try filling out the form again.
- Clear your browser cache or switch to a different browser.
"Check All" does not apply all permissions
- Make sure the permission category (e.g., Read, Create) is expanded before clicking Check All.
- If it doesn’t work right away, try unchecking and checking the box again.
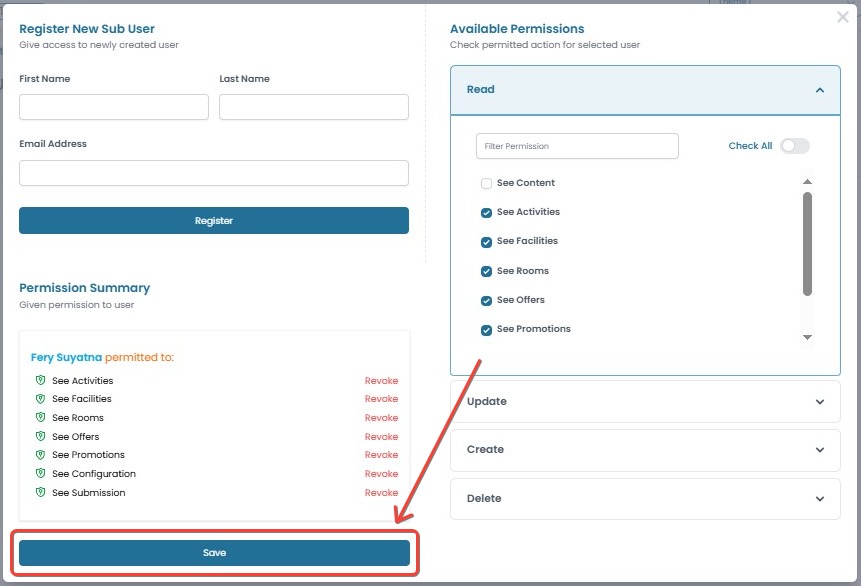
How to Edit Sub Users
- Click the Edit button in the Actions column of the user you want to modify.
- The edit page will display two main sections:
- Permission Summary: Shows a summary of the current permissions assigned to the user.
- Available Permissions: Allows you to update the user’s access.
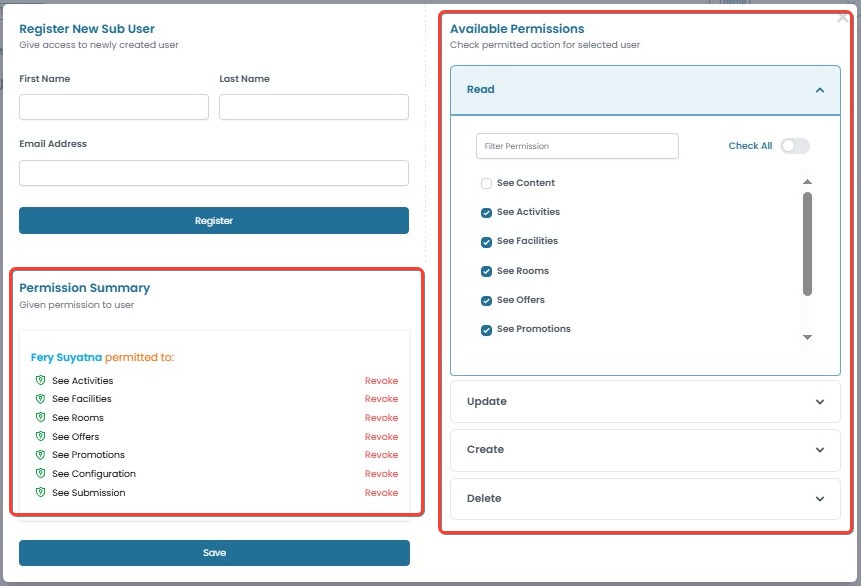
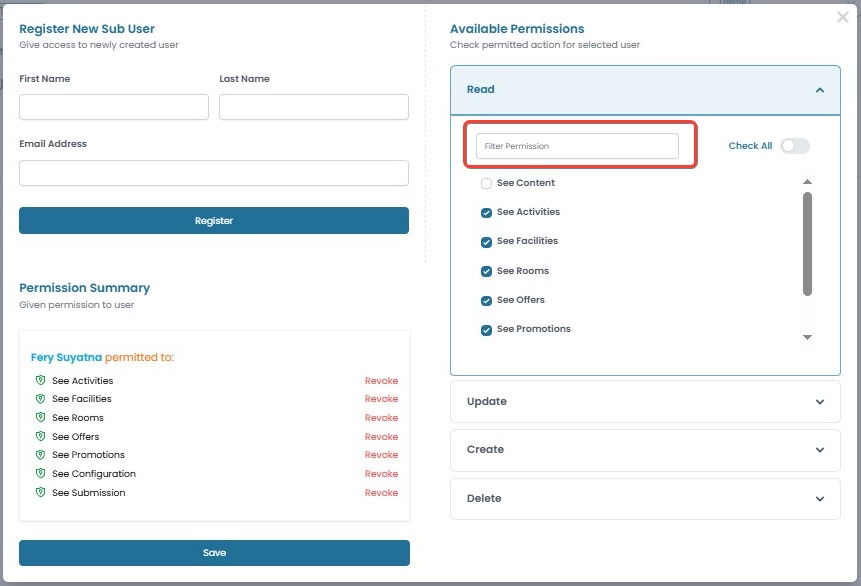
- In the Available Permissions section:
- Click the arrow icon on each category (Read, Create, Update, or Delete) to expand or collapse the permission list.
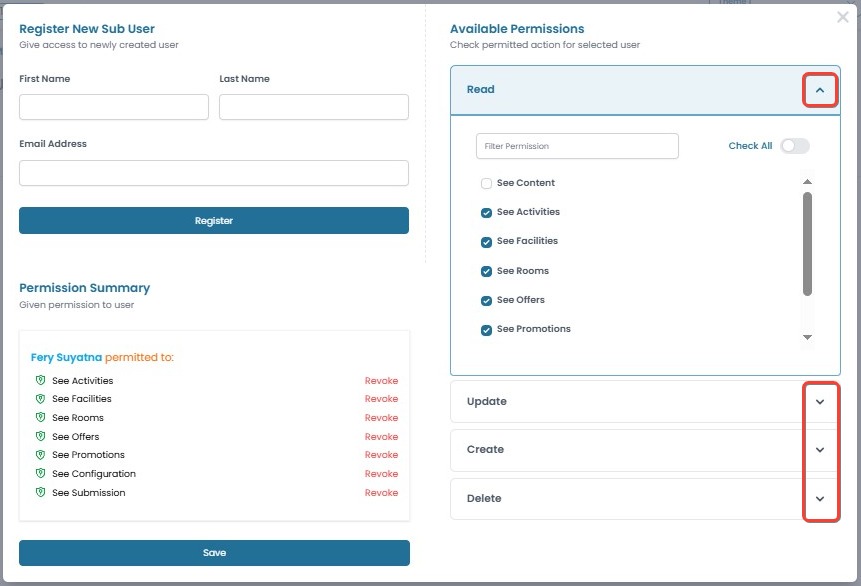
- Check or uncheck sub-features as needed, or click Check All to select all items within a category.
- Use the Revoke button to remove all permissions in a specific category.
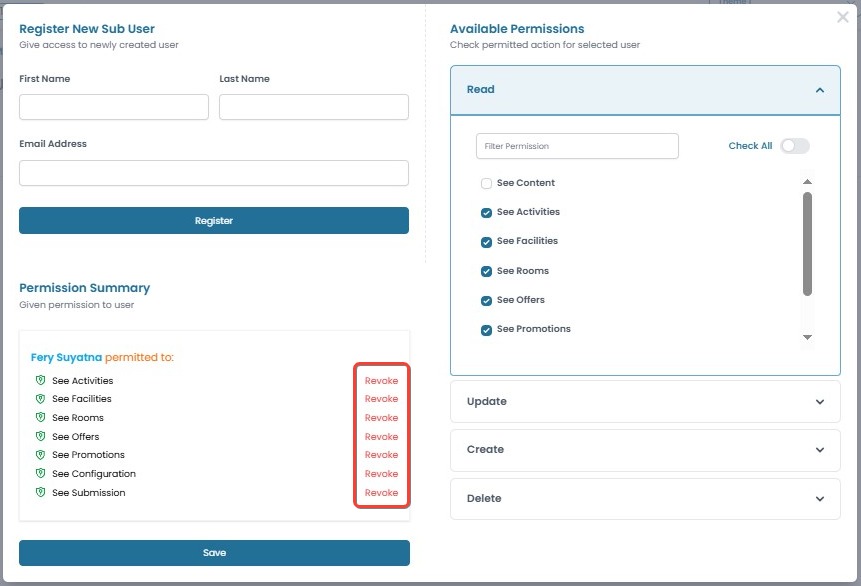
- Use the search bar to filter specific sub-features.
- Click the arrow icon on each category (Read, Create, Update, or Delete) to expand or collapse the permission list.
- After making the changes, click Save to apply the updates.
[!NOTE]
Troubleshooting Sub User Editing Issues
Changes to permissions are not saved
- Make sure you clicked the Save button after making changes.
- Refresh the page and check if the updates were applied.
- Try logging out and back in before editing the user again.
Revoke button does not remove permissions
- The Revoke button only clears permissions within the selected category (e.g., Read, Create).
- Ensure the category is expanded before using Revoke.
Updated permissions are not applied immediately
- Refresh the page or clear your browser cache.
- Try opening the page in an incognito/private window to rule out caching issues.
Permission Summary does not update after saving
- Refresh the page to load the latest summary.
- If it remains outdated, try re-editing the user to confirm the updates.
Search bar in Available Permissions does not work
- Make sure the permission category is expanded before using the search.
- Clear the search input or retype the keyword to try again.
Customize
The Customize tab allows users to add custom styles using CSS. This section is intended for users familiar with CSS basics.
How to Add Custom Styles
- Enter the desired CSS code in the Custom Styles field.
- Click the Save button to apply the changes.
[!NOTE]
- Errors in CSS code may affect the site’s appearance.
[!NOTE]
Troubleshooting Customization Issues
If you encounter issues while adding custom styles, try the following troubleshooting steps:
CSS Changes Are Not Applied
- Ensure you have clicked the Save button after adding the custom styles.
- Refresh the page and check if the changes take effect.
- Try clearing your browser cache before reloading the website.
- Verify that your CSS syntax is correct and does not contain errors.
Website Layout or Appearance Becomes Distorted
- Review your custom CSS to identify potential conflicts with the default theme styles.
- Try removing the latest CSS changes and apply them step by step to identify the issue.
- Use the browser’s Developer Tools (F12) to inspect the applied styles and adjust accordingly.
Customization Field Does Not Accept CSS Input
- Ensure your browser is up to date and supports the website’s customization feature.
- Try accessing the customization tab from a different browser or device.
- If the issue persists, log out and log back in before attempting again.