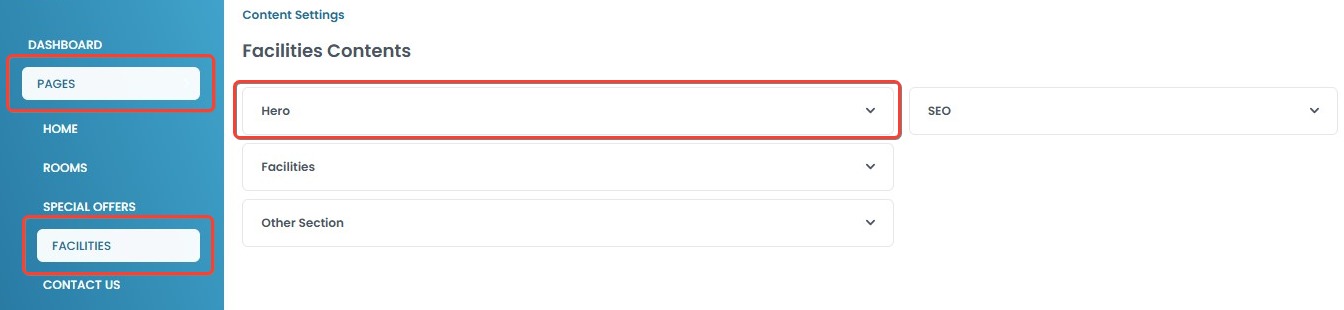
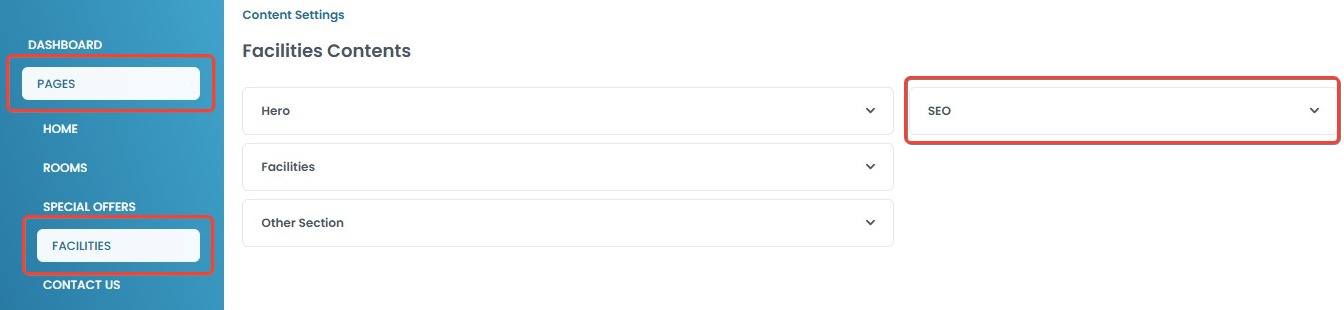
Facilities
The Facilities page is a dedicated section of your website that showcases the amenities available to guests. It provides essential details to help visitors explore and understand the facilities offered. This page consists of multiple sections, including Hero, Facilities, Other Section, and SEO.
[!NOTE] The availability of the Facilities page depends on the selected theme. Some themes may not include this page by default. If you do not see the Facilities page on your website, check whether your chosen theme supports it. If not, consider switching to a theme that includes this feature.
Hero
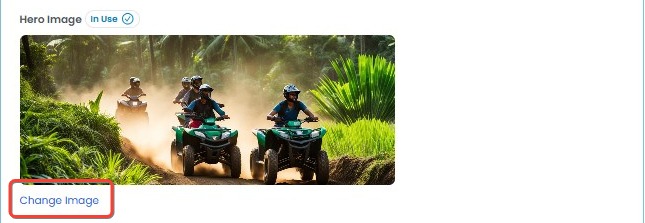
The Hero section allows you to set a prominent image at the top of the Facilities page, creating a visually appealing introduction. You can upload an Hero Image that represents your facility offerings to enhance user engagement.
How to Configure the Hero Section
- Navigate to Pages > Facilities > Hero Section.
- Enable or Disable the Hero Section
- The Status toggle switch is at the top of the section.
- If enabled (green toggle), the Hero Section will be visible on the Facilities page.
- If disabled (gray toggle), the Hero Section will be hidden.

- Change a Hero Image
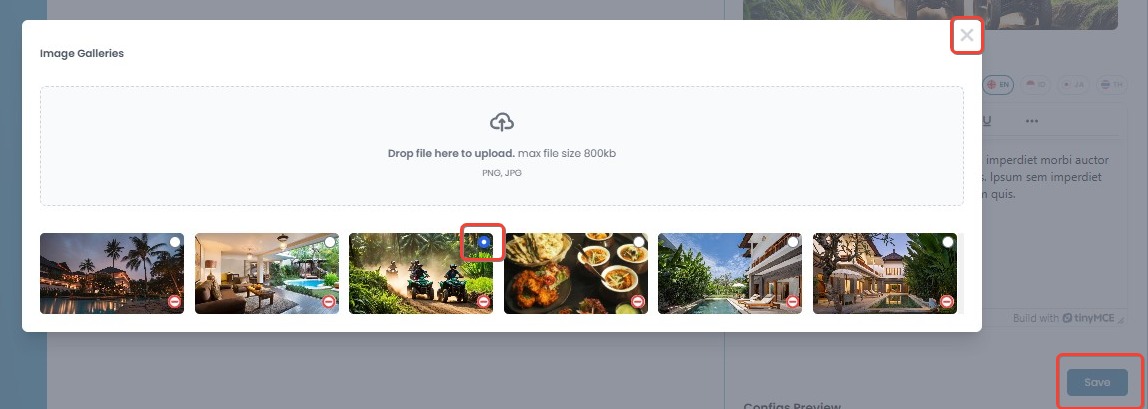
- Click Change Image below the displayed Hero Image.
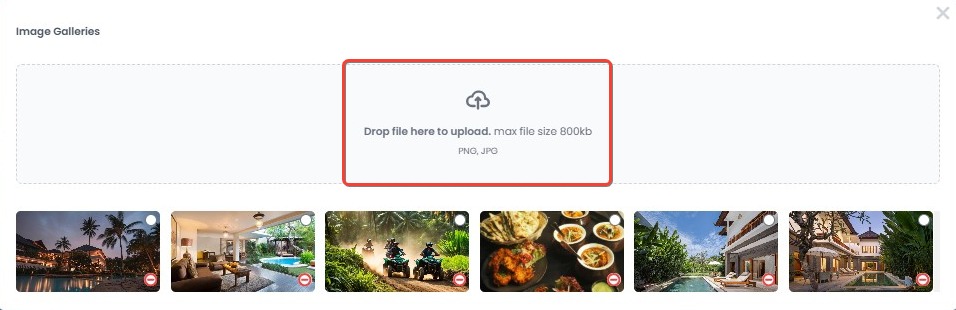
- Drag and drop an image file into the upload area.
- Supported formats: PNG, JPG.
- Maximum file size: 800 KB.
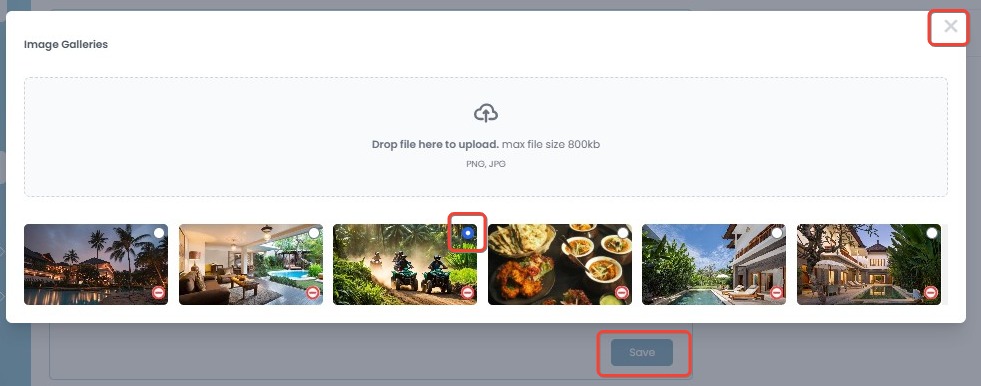
- Select the image and close the Image Galleries, then click the Save button.
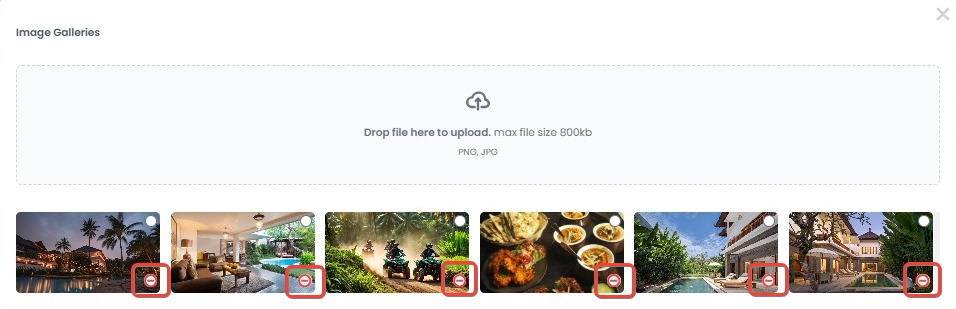
- If you want to delete an image and upload a new one, follow these steps:
- In the upload area, click the red icon at the bottom right of the image.
- A confirmation pop-up will appear, asking you to confirm the deletion. You have two options:
- Click OK to confirm and permanently delete the image, or click Cancel to keep it.
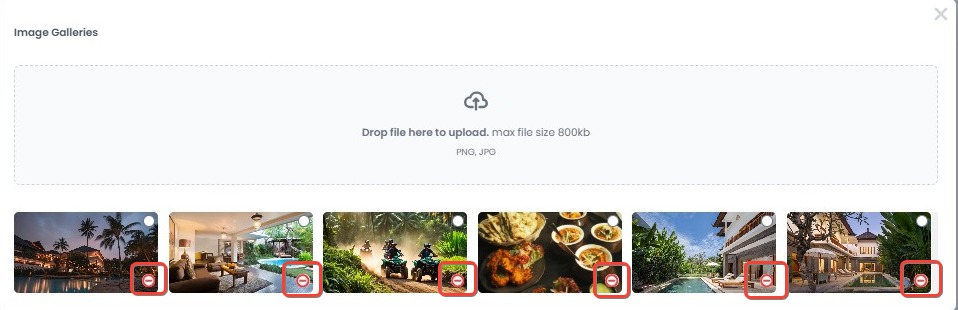
- Click OK to confirm and permanently delete the image, or click Cancel to keep it.
- Click Change Image below the displayed Hero Image.
[!NOTE]
Troubleshooting Hero Section Issues
If you encounter any issues while configuring the Hero section, try the following troubleshooting steps:
Hero section not visible on the facilities page?
- Ensure that the Status toggle switch is enabled (green).
- Clear your browser cache and refresh the page.
- Check if your website theme supports the Hero section.
Unable to upload a Hero Image
- Ensure that the image format is PNG or JPG and does not exceed 800 KB.
- Try uploading from a different browser or device.
- Clear your browser cache and attempt the upload again.
Changes are not saving
- Make sure to click the Save button after editing, so the changes are saved.
- Check your internet connection and try again.
- Log out and log back in, then attempt to make changes again.
- Try reloading the page and re-entering the information.
- Clear your browser cache and retry the update.
- If the issue persists, contact support for further assistance.
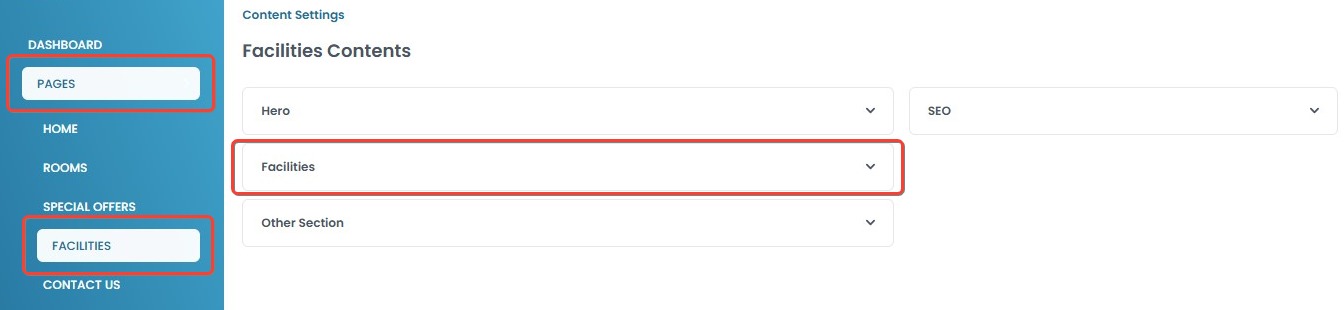
Facilities
The Facilities section allows you to display key features and amenities available on your website. This section may include a Title and Short Description to provide a brief overview of the facilities offered.
How to Configure the Facilities Section
- Navigate to Pages > Facilities > Facilities Section
- Enable or Disable the Facilities Section
- Use the Status toggle switch at the top.
- If enabled (green toggle), the Facilities section will be visible on your website.
- If disabled (gray toggle), the section will be hidden.

- Edit the Title
- Click the Title field and enter a new heading.
- Choose the language tab (EN, ID, JA, TH) to set different titles for each language.
- If a language tab is selected but no content is entered, the field will be empty.
- Example:
- English: "Our Facilities"
- Indonesian: "Fasilitas Kami"
- Click the Save button to save changes.

- Edit the Short Description
- Modify the text in the Short Desc field to provide a brief introduction to the facilities.
- Each language has a separate input field.
- Example:
- English: "Discover a world of comfort, luxury, and unparalleled hospitality at Hoteller."
- Indonesian: "Temukan dunia kenyamanan, kemewahan, dan keramahan terbaik di Hoteller."
- Click the Save button to save changes.

[!NOTE]
Troubleshooting Facilities Section Issues
If you encounter any issues while configuring the Facilities section, try the following troubleshooting steps:
Facilities section not visible on the homepage?
- Ensure that the Status toggle switch is enabled (green).
- Clear your browser cache and refresh the page.
- Check if your website theme supports the Facilities section.
Title or Short Description is not updating
- Verify that you have selected the correct language tab before editing.
- Save changes and refresh the page to see the updates.
- Try editing in an incognito browser window to rule out cache issues.
Text is missing in some languages
- Make sure each language tab (EN, ID, JA, TH) has content filled in.
- If a language is missing content, the field may appear empty.
Changes are not saving
- Make sure to click the Save button after editing, so the changes are saved.
- Check your internet connection and try again.
- Log out and log back in, then attempt to make changes again.
- Try reloading the page and re-entering the information.
- Clear your browser cache and retry the update.
- If the issue persists, contact support for further assistance.
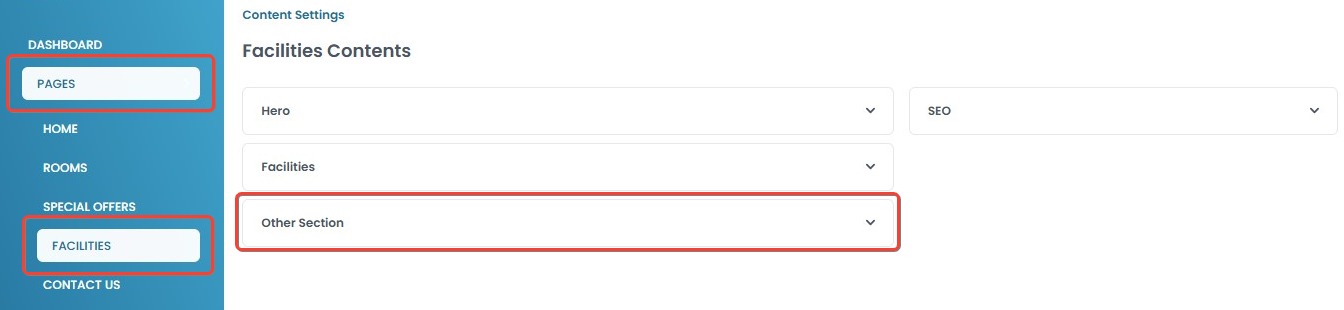
Other Section
The Other Section allows you to provide additional information about the facilities on your website. This section can include a Title and Short Description, which can be customized in multiple languages.
How to Configure the Other Section
- Navigate to Pages > Facilities > Other Section
- Enable or Disable the Other Section
- The Status toggle switch is at the top of the section.
- If enabled (green toggle), the Other Section will be visible on the Facilities page.
- If disabled (gray toggle), the Other section will be hidden.

- Edit the Title
- Click the Title field and enter a new heading.
- Choose the language tab (EN, ID, JA, TH) to set different titles for each language.
- If a language tab is selected but no content is entered, the field will be empty.
- Example:
- English: "Checkout our other facilities"
- Indonesian: "Lihat fasilitas lainnya"
- Click the Save button to save changes.

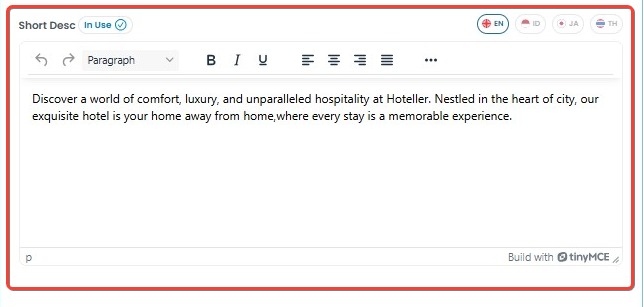
- Edit the Short Description
- Modify the text in the Short Desc field to provide a brief overview of the additional facilities.
- You can format the text using the editor's formatting options (bold, italics, lists, alignment, etc.).
- Each language has a separate input field.
- Example:
- English: "Discover a world of comfort, luxury, and unparalleled hospitality at Hoteller. Nestled in the heart of the city, our exquisite hotel is your home away from home, where every stay is a memorable experience."
- Indonesian: "Temukan dunia kenyamanan, kemewahan, dan keramahan terbaik di Hoteller. Terletak di jantung kota, hotel kami adalah rumah kedua Anda, di mana setiap kunjungan menjadi pengalaman yang berkesan."
- Click the Save button to apply the changes.
[!NOTE]
Troubleshooting Other Section Issues
If you encounter any issues while configuring the Other section, try the following troubleshooting steps:
Other Section is not visible on the website?
- Ensure that the Status toggle switch is enabled (green).
- Clear your browser cache and refresh the page.
- Verify if your website theme supports the Other Section feature.
Title or Short Description is not updating?
- Double-check that you have selected the correct language tab before editing.
- Save changes and refresh the page to view updates.
- Try editing in an incognito browser window to bypass cache issues.
Text is missing in some languages?
- Make sure that each language tab (EN, ID, JA, TH) contains the necessary content.
- If a language is missing content, the field may appear empty.
Changes are not saving?
- Click the Save button after editing to ensure the changes are applied.
- Check your internet connection and try again.
- Log out and log back in before attempting another update.
- Reload the page and re-enter the information.
- Clear your browser cache and retry the update.
- If the issue persists, contact support for assistance.
SEO
The SEO allows you to optimize your page for search engines and social media by configuring Metadata, Keywords, a Thumbnail Image and Description. Proper SEO boosts the Facilities section's visibility, attracting more guests with a compelling preview of your amenities.
How to Configure the SEO Section
- Navigate to Pages > Home > SEO
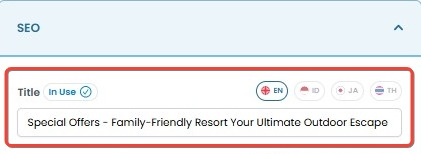
- Enter the Title
- In the Title field, provide a concise and descriptive title for your page. This title will be displayed in search engine results.
- Each language can have a different Title. Choose the language tab (e.g., EN, ID, JA, TH) to set different titles per language.
- If no content is entered in a selected language, the field will appear empty.
- Example:
- English: "Family-Friendly Resort Your Ultimate Outdoor Escape"
- Indonesian: "Resor Ramah Keluarga, Outdoor Terbaik Untuk Anda"
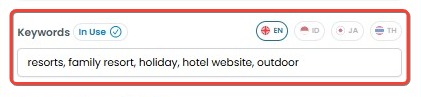
- Add Keywords
- In the Keywords field, enter relevant keywords separated by commas (e.g., "resorts, family resort, holiday, hotel website, outdoor").
- Each language can have a different Keywords. Choose the language tab (e.g., EN, ID, JA, TH) to set different keywords per language.
- If no content is entered in a selected language, the field will appear empty.
- Example:
- English: "resorts, family resort, holiday, hotel website, outdoor."
- Indonesian: "villa, villa keluarga, liburan, website hotel."
- Change a Thumbnail Image
- Click Change Image to upload a thumbnail image that represents your page when shared on social media.
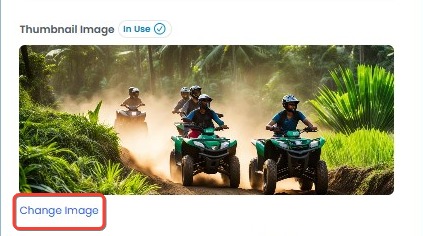
- Drag and drop an image file into the upload area.
- Supported formats: PNG, JPG.
- Maximum file size: 800 KB.

- Select the image and close the Image Galleries, then click the Save button.
- If you want to delete an image and upload a new one, follow these steps:
- In the upload area, click the red icon at the bottom right of the image.
- A confirmation pop-up will appear, asking you to confirm the deletion. You have two options:
- Click OK to confirm and permanently delete the image, or click Cancel to keep it.
- Click OK to confirm and permanently delete the image, or click Cancel to keep it.
- Click Change Image to upload a thumbnail image that represents your page when shared on social media.
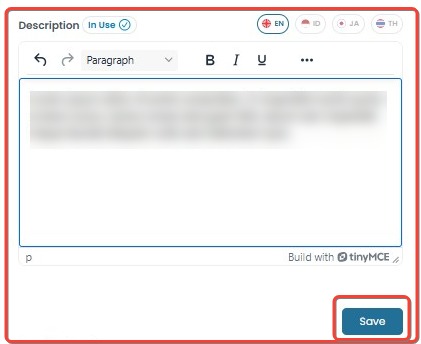
- Enter the Description
- In the Description field, write a brief summary of your page. This text will appear in search results below the title.
- Use clear and engaging language to attract visitors.
- Click the Save button to apply your SEO settings.
- Preview how the page will appear on search engines and social media in the Configs Preview section.

[!NOTE]
Troubleshooting SEO Section Issues
If you encounter any issues while configuring the SEO section, try the following troubleshooting steps:
Title, Keywords or Description is not updating
- Verify that you have selected the correct language tab before editing.
- Save changes and refresh the page to see the updates.
- Try editing in an incognito browser window to rule out cache issues.
Text is missing in some languages
- Make sure each language tab (EN, ID, JA, TH) has content filled in.
- If a language is missing content, the field may appear empty.
Unable to upload a Thumbnail Image
- Ensure that the image format is PNG or JPG and does not exceed 800 KB.
- Try uploading from a different browser or device.
- Clear your browser cache and attempt the upload again.
SEO preview not displaying correctly?
- Ensure all required fields (Title, Keywords, Thumbnail, Description) are filled.
- Refresh the page to reload the preview.
- If changes do not reflect, clear your browser cache and try again.
Changes are not saving
- Make sure to click the Save button after editing, so the changes are saved.
- Check your internet connection and try again.
- Log out and log back in, then attempt to make changes again.
- If the issue persists, contact support for further assistance.