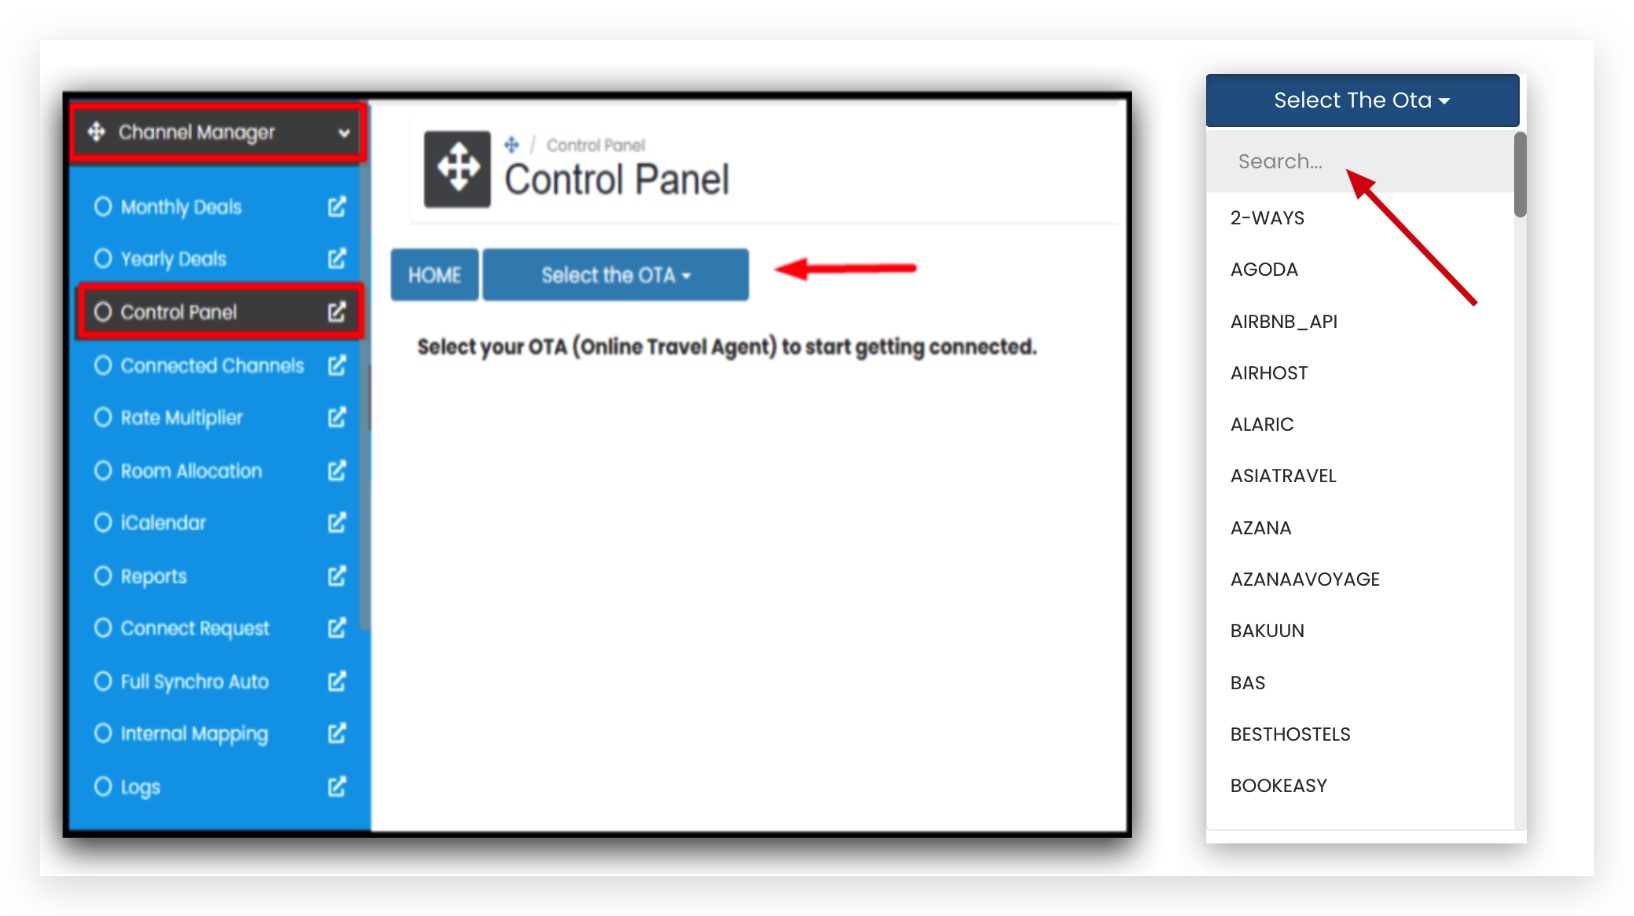
Introduction
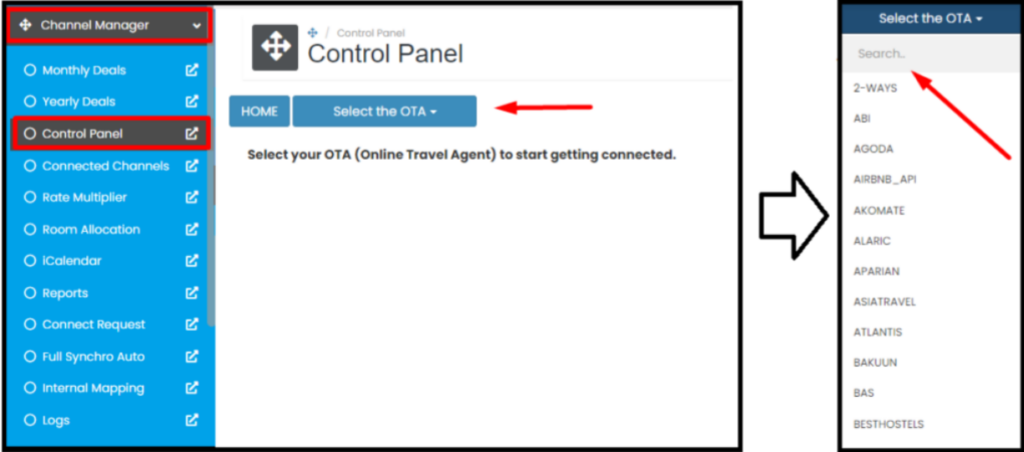
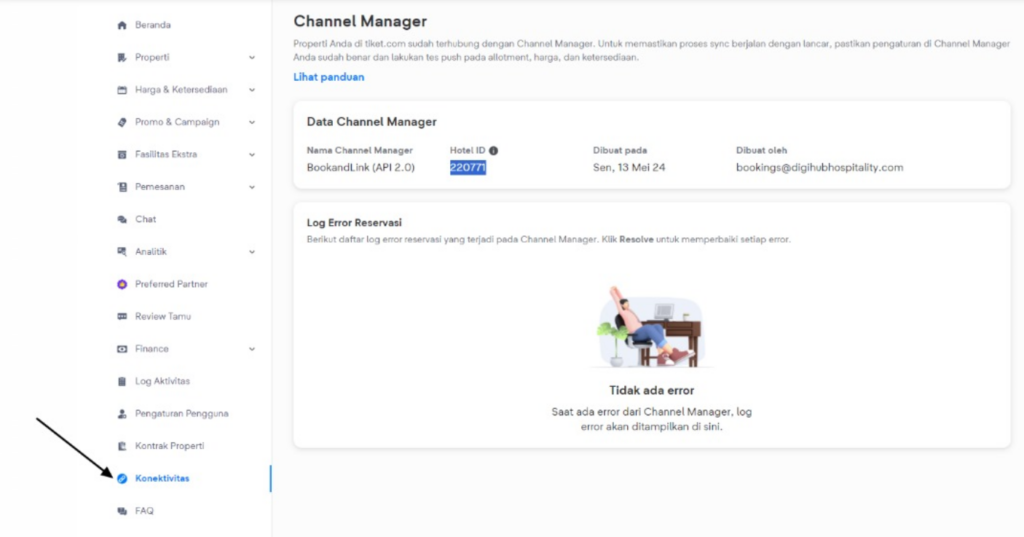
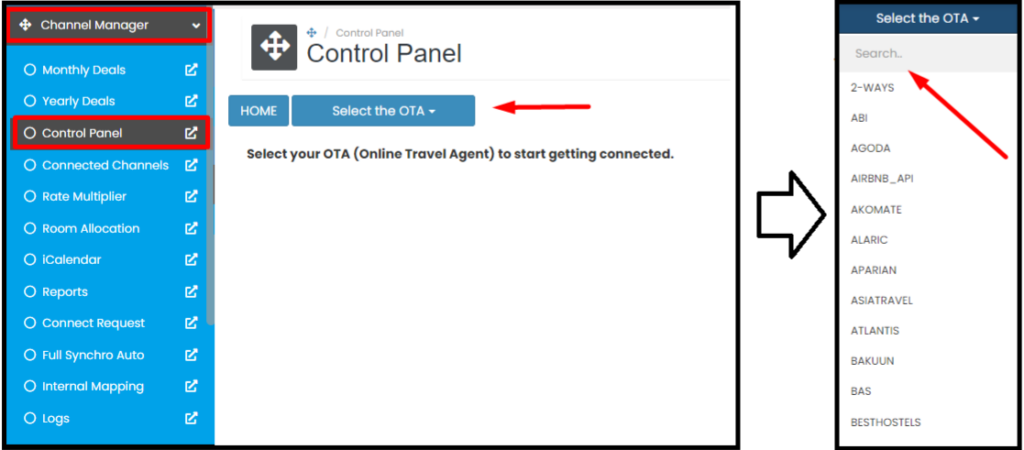
Control Panel is the central dashboard within the Channel Manager where users can manage OTA connections, configure channel credentials, perform room and rate mapping, and access essential logs.
Through the Control Panel, you can search and select OTA channels, input connection details, import rate plans, map internal and OTA rate plans, and verify configuration updates. It serves as the starting point for all integration and mapping activities, ensuring smooth communication between your property system and OTA platforms.
Airbnb
This section guides you through the steps to connect your Airbnb account with the Channel Manager.
How to Connect Airbnb
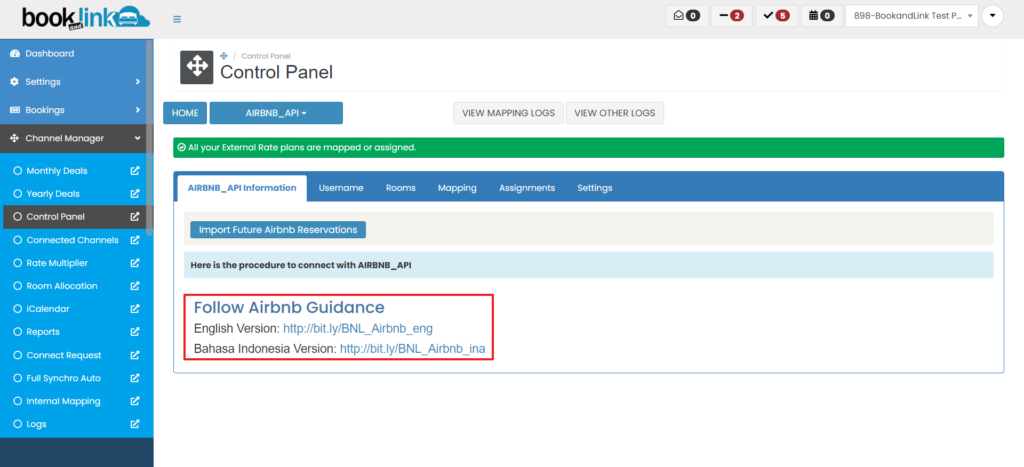
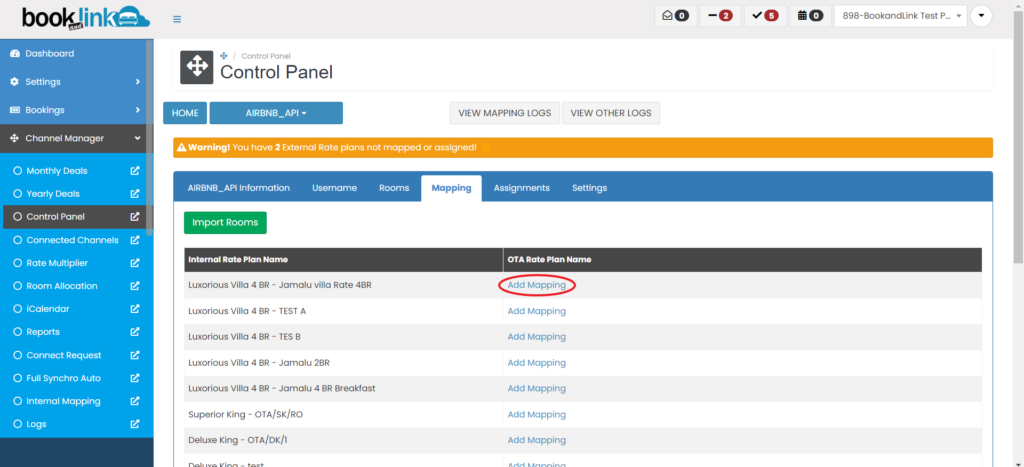
- Go to the Control Panel, then select Airbnb_API.
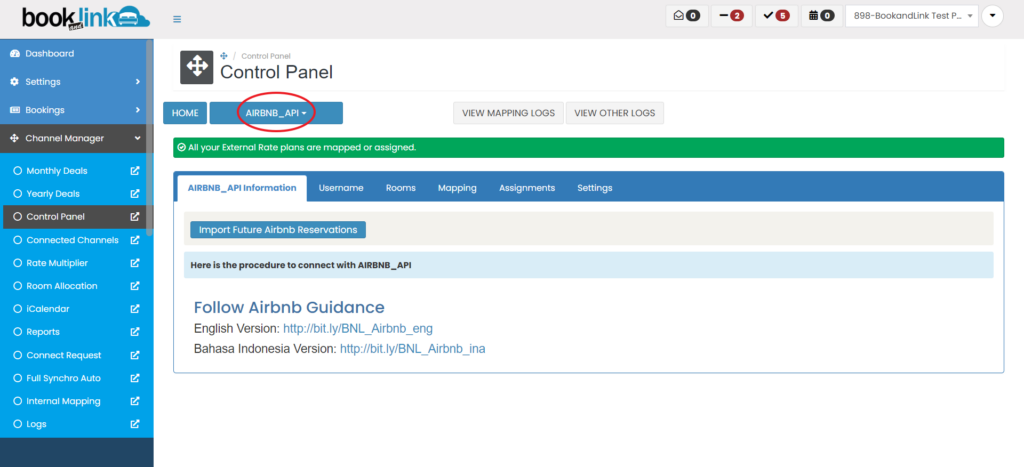
- Follow the instructions provided in the Airbnb Guidance.
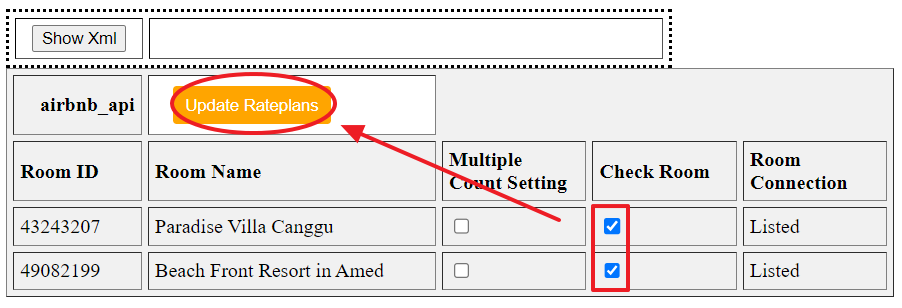
- Once the connection is successful, go to the Mapping section and click Import Room. A new tab will open showing your Airbnb listings.
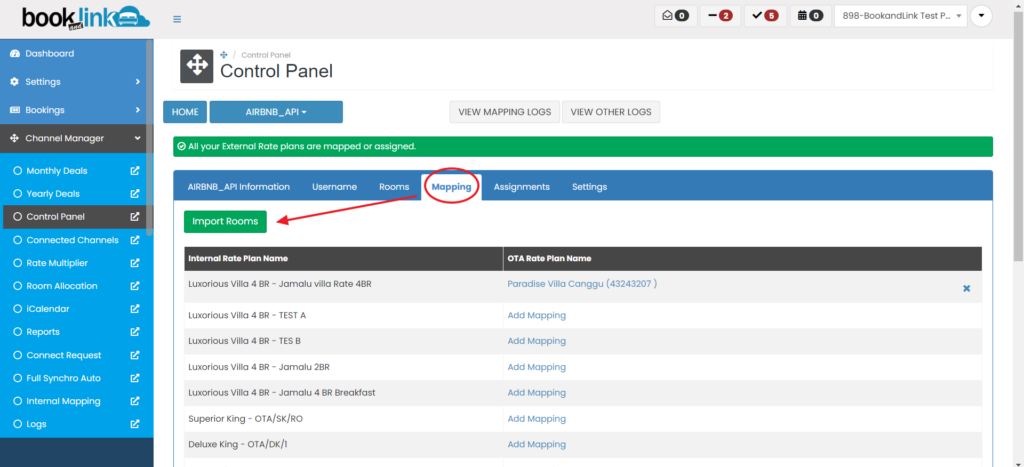
- Tick the Check Room box on the listing(s) you want to connect to the Channel Manager, then click Update Rateplan.
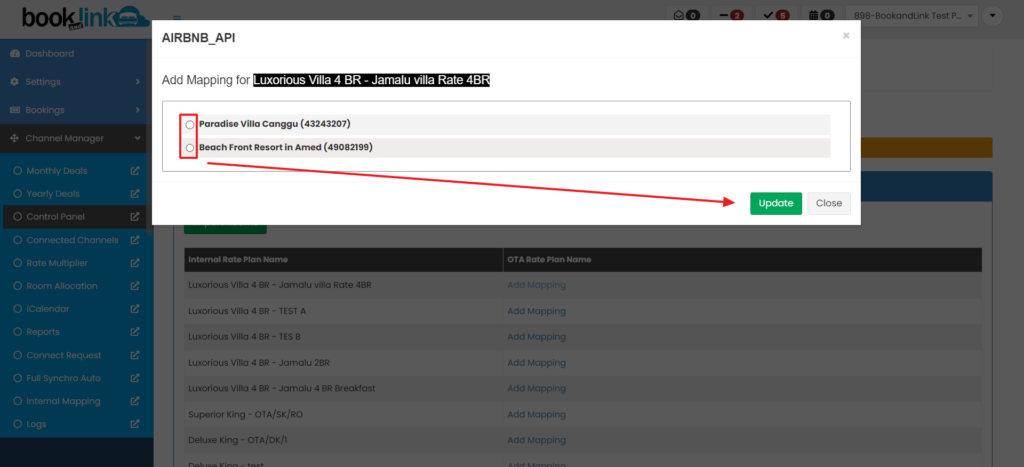
- Click Add Mapping.
- Choose the listing you want to connect and click Update.
- Once mapping is added, the notification will disappear and the connected listings will appear in the mapping table.
Note: Please refresh the page after adding a mapping to reflect the changes.
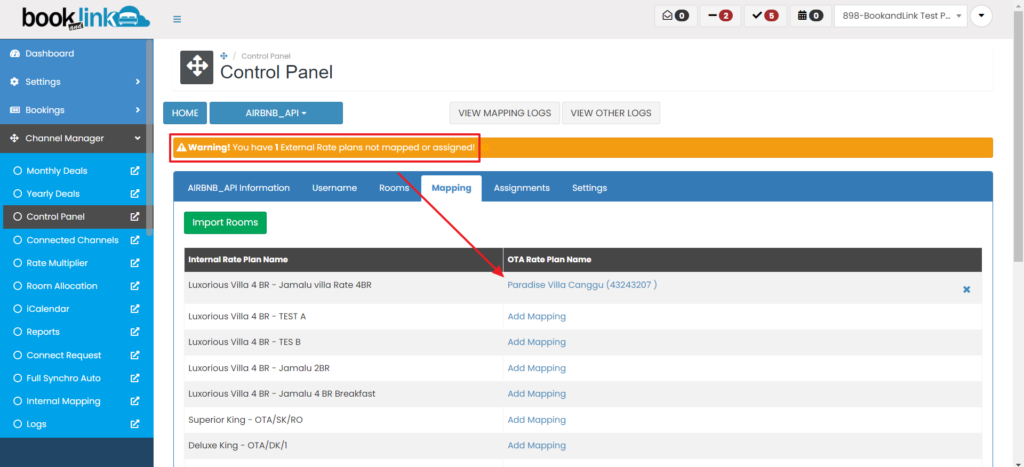
- After add mapping, it will reduce the notification and will show on the mapping.
- Go to the Settings section and ensure that the Enable button is turned on.
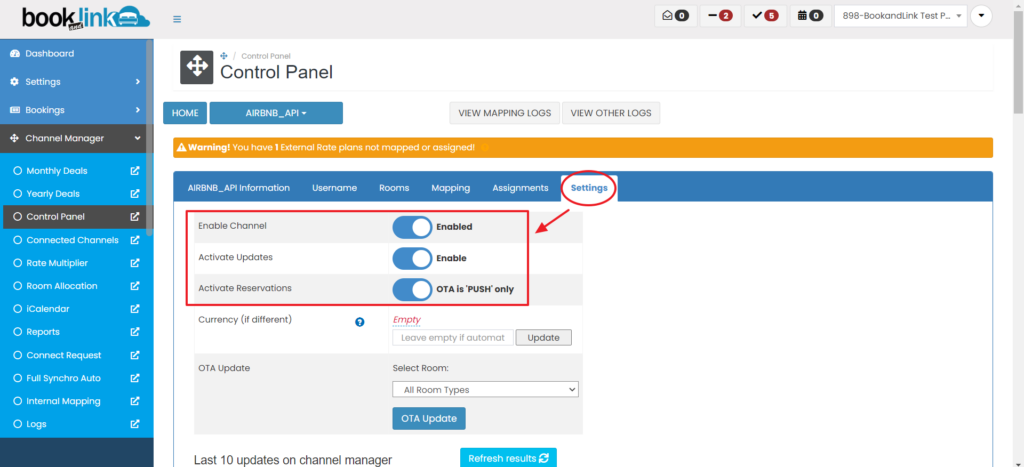
- As a final step, perform an OTA Update via Monthly Deals or Yearly Deals to push data to Airbnb.
[!NOTE]
Troubleshooting Airbnb Connection Issues
Airbnb_API is not visible in the Control Panel
- Ensure that the Airbnb channel has been activated for your property.
- Contact Bookandlink support if you cannot find the Airbnb_API option.
"Import Room" button does not trigger a new tab
- Check if your browser is blocking pop-ups.
- Allow pop-ups for the Bookandlink website and try again.
No listings appear after clicking “Import Room”
- Make sure your Airbnb listing is active and published.
- Check that your Airbnb account is correctly connected.
Cannot click “Add Mapping” after selecting listing
- Confirm that you have checked the Check Room box.
- Ensure you have clicked Update Rateplan before proceeding.
Mapping changes are not visible after saving
- Refresh the page after completing the mapping process.
- Try clearing your browser cache if the problem persists.
“Enable” button is greyed out in the Settings tab
- Make sure at least one listing has been successfully mapped.
- Complete all mapping steps before enabling the connection.
OTA Update does not reflect on Airbnb
- Repeat the OTA Update from Monthly Deals or Yearly Deals.
- Check the update log and verify changes on the Airbnb extranet.
Booking.com
Before starting the connection, make sure you have submitted a connection request through the Booking.com extranet.
To do this, go to Account > Connectivity Provider, then search and select Bookandlink as the Channel Manager.
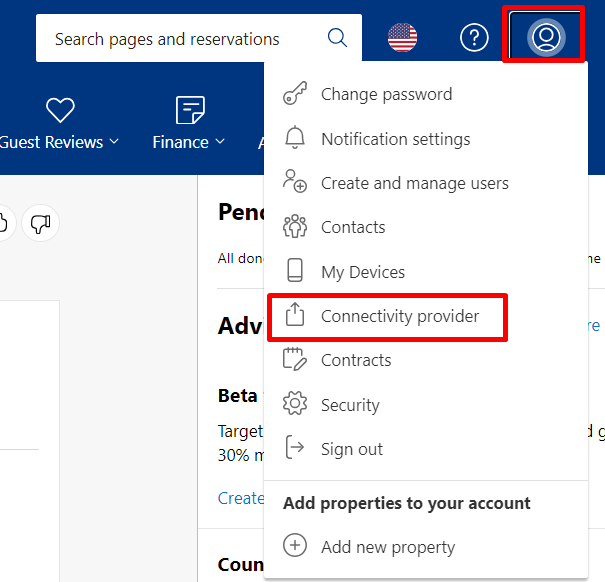
[!NOTE] Note: After submitting the connection request, please contact our support team. We will assist in approving the connection from our side.
How to Connect and Map Booking.com
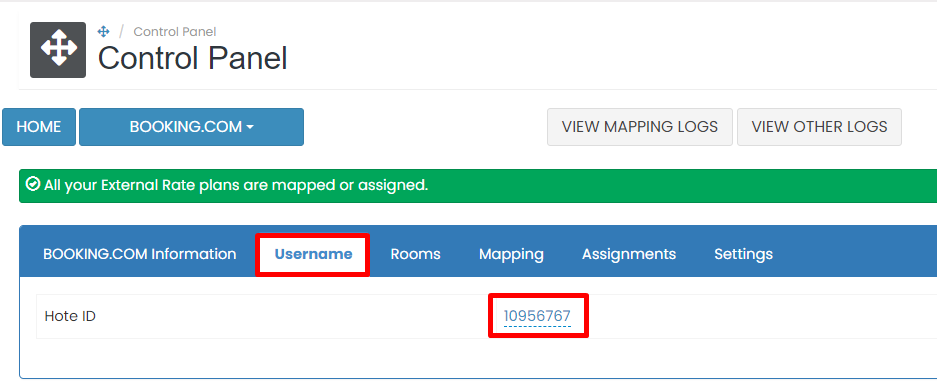
- Go to the Control Panel, then select Booking.com.
- Open the Username tab and enter your Hotel ID (property ID registered on the Booking.com extranet).
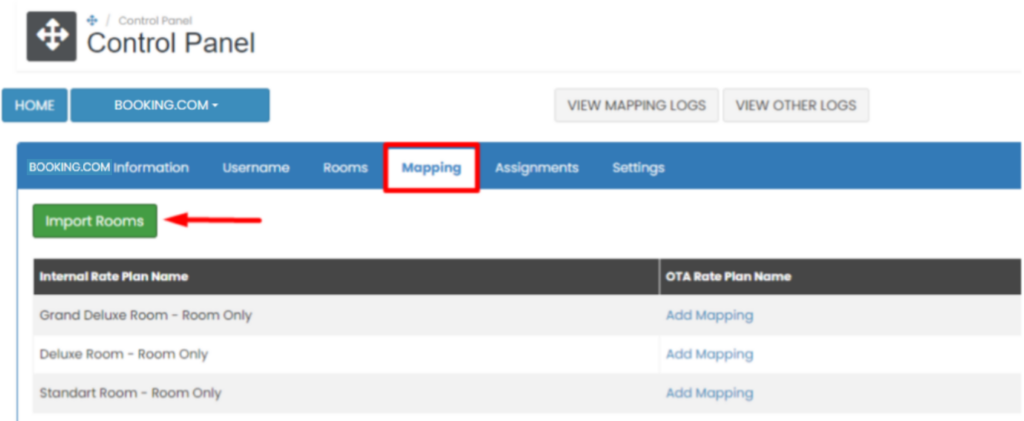
- Go to the Mapping tab and click Import Room to load rate plans from the OTA extranet.
Note:
- Make sure the rate plan is active in the OTA extranet.
- Importing rooms allows the Channel Manager to retrieve rate plans available in Booking.com.
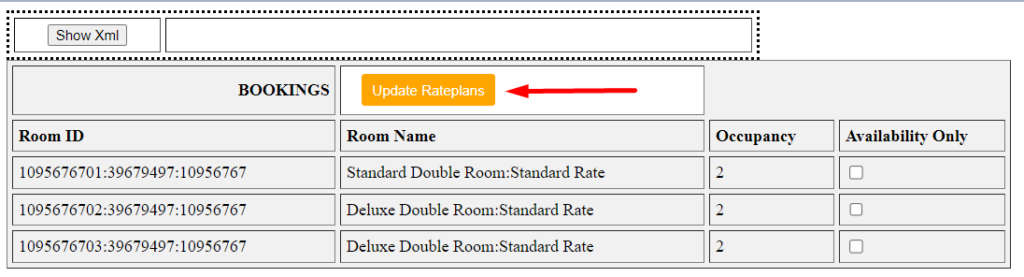
- A popup will appear showing the available rate plans. Click Update Rateplans.
Note:
- You can define how the Channel Manager will push updates:
- If Availability Only is checked, only inventory will be pushed.
- If Availability Only is not checked, inventory, rates, and restrictions will be pushed.
- You can define how the Channel Manager will push updates:
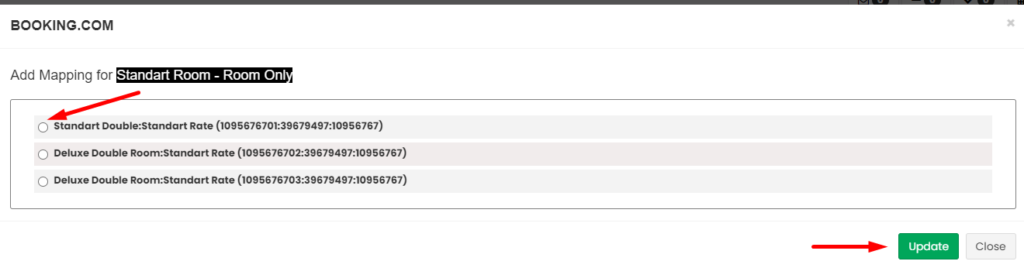
- A warning message will appear confirming the import. Click Add Mapping to begin the mapping process.
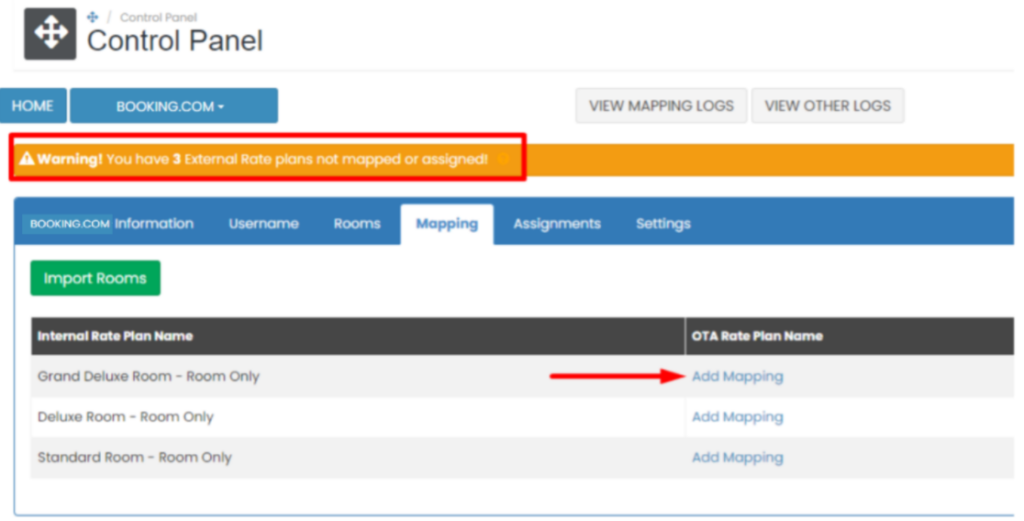
- Match the OTA rateplan with the corresponding Internal rateplan, then click Update.
Note: Ensure all OTA rate plans are mapped. Missing mappings may result in errors when new reservations are received.
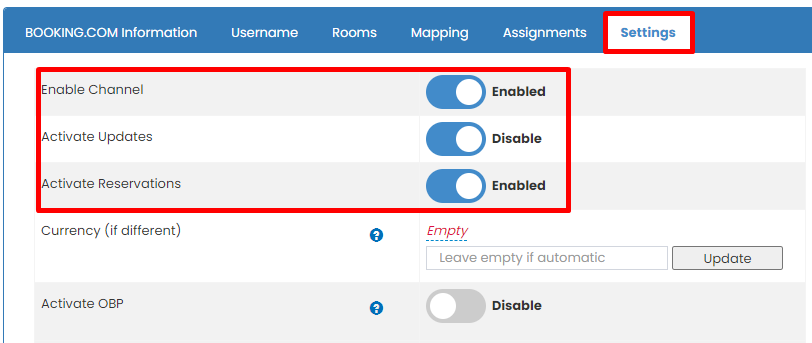
- Go to the Settings tab and make sure the toggle is Enabled.
- Perform an OTA Update using either Monthly Deals or Yearly Deals to push data to Booking.com.
- Finally, double-check the Update Log and the OTA extranet to confirm data has been successfully pushed.
[!NOTE]
Troubleshooting Booking.com Connection Issues
Booking.com channel is not visible in the Control Panel
- Ensure the connection request has been submitted via the Booking.com extranet.
- Make sure you selected Bookandlink as the connectivity provider.
- Contact Bookandlink support if the channel still doesn’t appear.
Hotel ID is not accepted or shows an error
- Confirm you have entered the correct Hotel ID from the Booking.com extranet.
- Avoid adding extra spaces or characters when inputting the ID.
- Try reloading the page and re-entering the ID.
Import Room does not retrieve any rate plans
- Check that there is at least one active rate plan on the Booking.com extranet.
- Ensure your connection request has been approved by both sides (Booking.com and Bookandlink).
- Refresh the page and try importing again.
Update Rateplans button does not respond
- Allow pop-ups in your browser to ensure the window appears properly.
- Try using a different browser if the issue persists.
- Clear your browser cache and reload the page.
Add Mapping does not show after import
- Confirm that at least one rate plan was successfully imported.
- Refresh the page or navigate to another tab and back to Mapping.
Unable to enable the connection in the Settings tab
- Make sure all active rate plans have been mapped correctly.
- The toggle will only be enabled if the mapping process is complete.
OTA Update does not reflect changes on Booking.com
- Perform the OTA Update again via Monthly Deals or Yearly Deals.
- Check the Update Log to see if the update was sent successfully.
- Verify changes directly on the Booking.com extranet.
Dida Travel
Please make sure you have already requested a connection through the Dida Travel Market Manager.
How to Connect and Map Dida Travel Channel
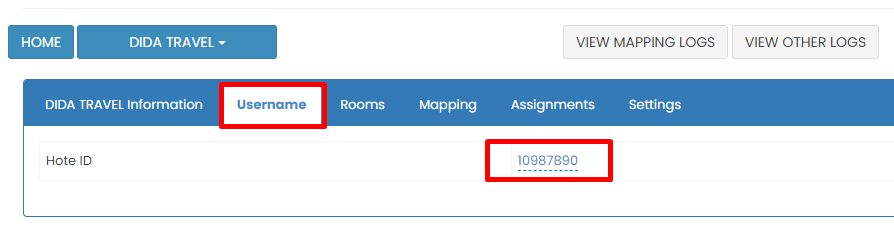
- Navigate to the Control Panel, then select Dida Travel.

- Go to the Username tab and enter the Hotel ID.
Note: Hotel ID refers to the property ID registered on the Dida Travel extranet.
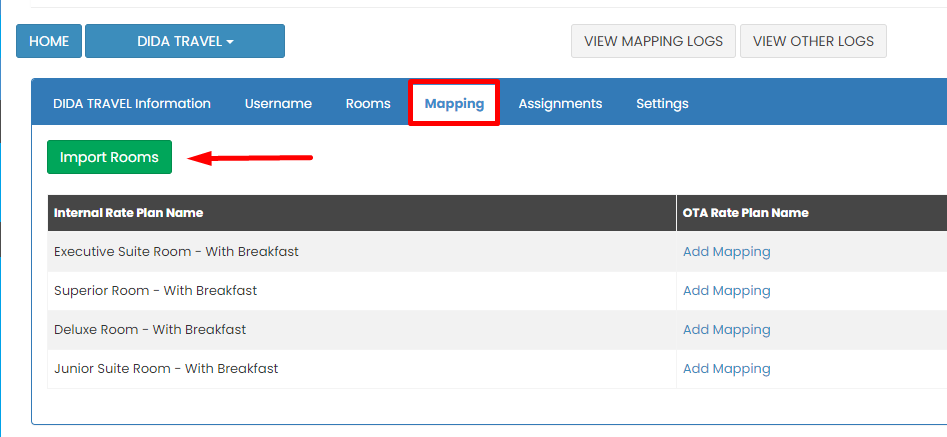
- Go to the Mapping tab and click Import Room.
Note:
- This action will pull the available rate plans from the OTA extranet.
- Please make sure there is at least one active rate plan on the OTA extranet.
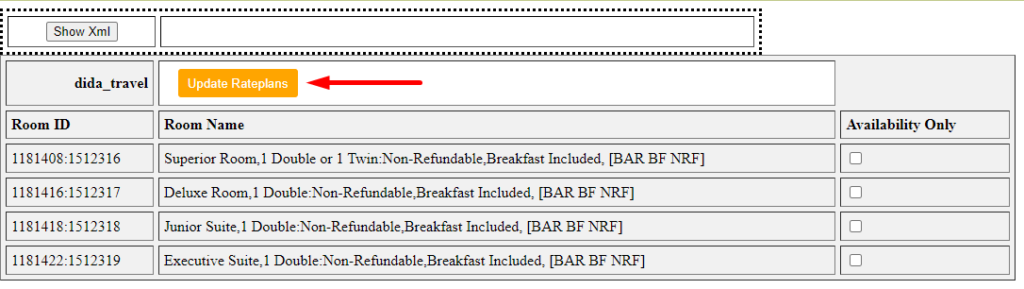
- A popup will appear displaying the active rate plans. Click Update Rateplans to import the data into the channel manager.
Note:
- You can also choose how the channel manager pushes updates to the OTA.
- If Availability Only is checked, only inventory will be pushed.
- If Availability Only is not checked, the system will push inventory, prices, and restrictions.
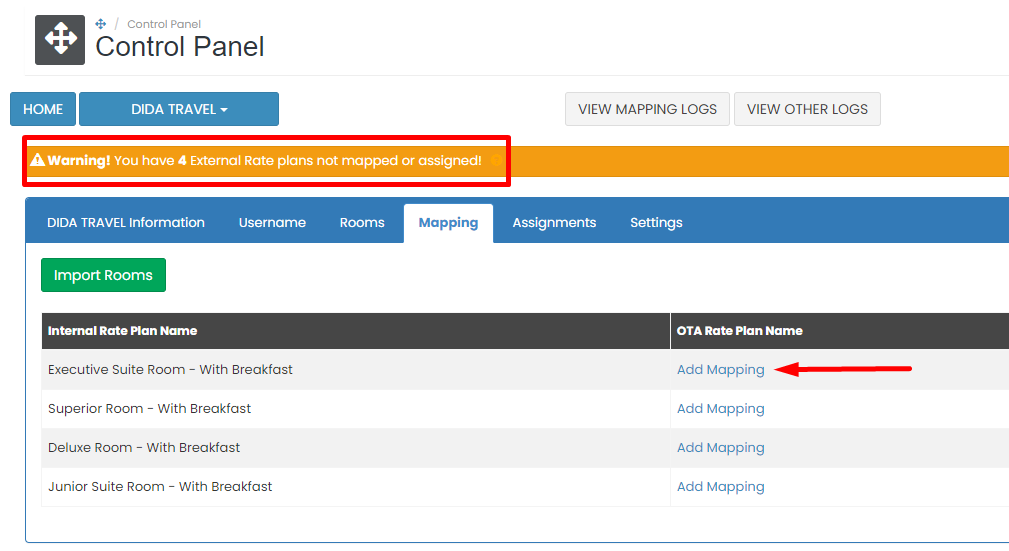
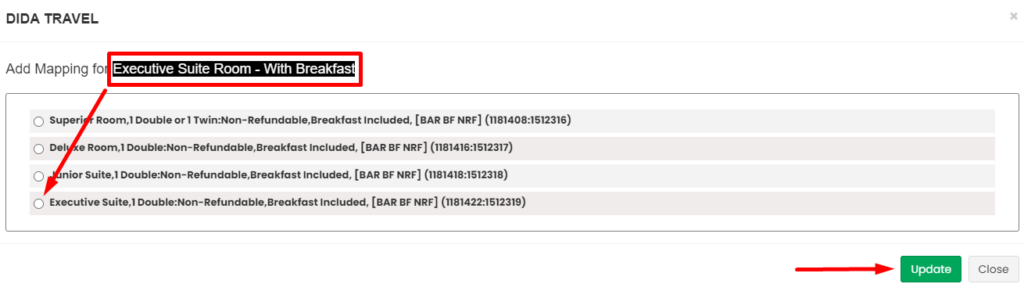
- After a successful import, a Warning notification will appear. Click Add Mapping to start the mapping process.
- Choose the appropriate OTA rate plan that matches the internal rate plan, then click Update.
Note:
- Ensure that all OTA rate plans are mapped.
- Any unmapped or unassigned rate plans may result in reservation errors.
- Go to the Settings tab and ensure the button is enabled.
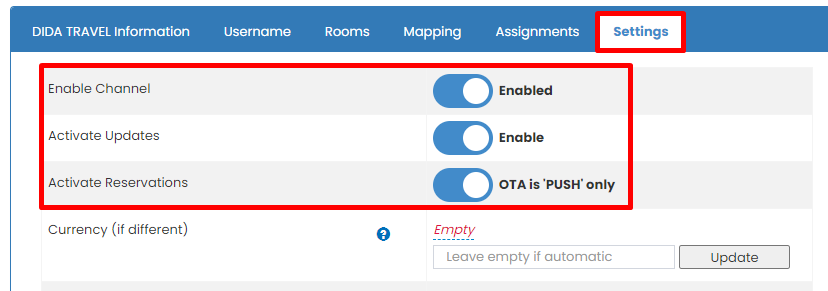
- Perform an OTA Update from either Monthly Deals or Yearly Deals.
- Confirm the update status by checking the log update and verifying on the OTA extranet.
[!NOTE]
Troubleshooting Dida Travel Connection Issues
Dida Travel channel is not visible in the Control Panel
- Confirm that the connection request has been submitted via the Dida Travel Market Manager.
- Ensure the channel manager has received confirmation of the request.
- Contact support if the Dida Travel option is still not available.
Hotel ID is not accepted or shows an error
- Make sure the Hotel ID matches the one provided in the Dida Travel extranet.
- Avoid unnecessary spaces or special characters when entering the ID.
- Try refreshing the page and re-entering the correct ID.
Import Room does not display any rate plans
- Verify that there is at least one active rate plan set up in the Dida Travel extranet.
- Confirm that the channel connection has been activated on both the OTA and channel manager sides.
- Reload the page and try the import process again.
Popup for Update Rateplans does not appear
- Check that pop-ups are not being blocked by your browser.
- Use an alternative browser or clear your cache if the problem persists.
- Ensure your internet connection is stable during the import process.
Warning message appears but Add Mapping does not function
- Confirm that the imported rate plans are valid and not empty.
- Try returning to the Mapping tab and clicking Add Mapping again after refreshing.
- If the issue continues, contact the support team for technical assistance.
Mapped rate plans do not show in the mapping table
- Double-check that you clicked Update after selecting the internal rate plan.
- Make sure all required fields were selected during the mapping step.
- Refresh the page to allow the system to load the updated mapping.
Unable to enable the Settings toggle
- Ensure that the rate plan mapping process has been completed successfully.
- The toggle will remain disabled if there are missing or invalid mappings.
- Revisit the Mapping tab to confirm all required mappings are done.
OTA Update does not reflect on Dida Travel extranet
- Perform the OTA Update again using Monthly Deals or Yearly Deals.
- Check the log update section for confirmation of a successful push.
- Log in to the Dida Travel extranet to verify if the changes have taken effect.
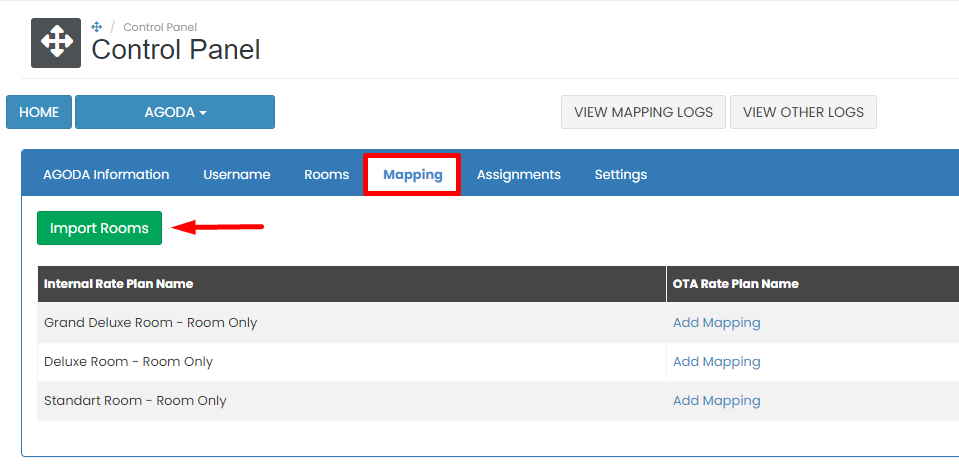
Agoda
Please make sure you have already requested a connection through the Agoda YCS extranet.
How to Request Connect
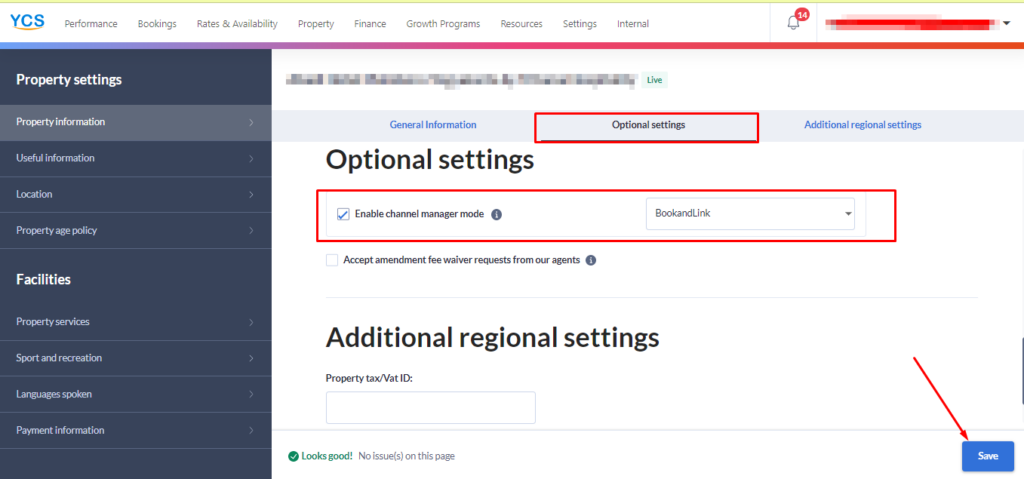
- Go to the Property menu, then select Property Setting.
- In the Optional Setting section, enable Channel Manager mode.
- Search and choose Bookandlink for the channel manager.
- Save the settings.
[!NOTE]
- After making a connection request, please wait 30 - 60 minutes for the servers to connect. After that, you can proceed with import room for mapping.
- This method only applies to Agoda connect requests using the Agoda YCS extranet. If you are using Agoda Homes, please make the connection request via the channel manager.
(Click here for the request connect article)
How to Map Agoda Channel
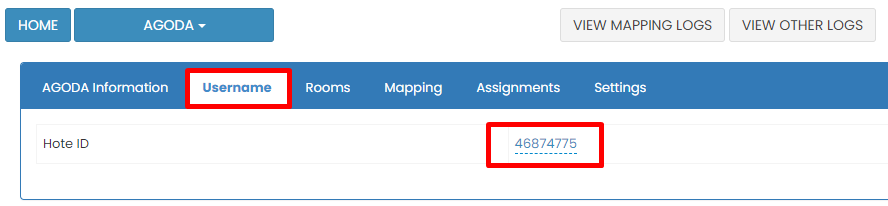
- Search and choose Agoda on the Control Panel.

- Go to the Username tab and enter the Hotel ID.
Note: The Hotel ID refers to the property ID registered on the Agoda YCS extranet.
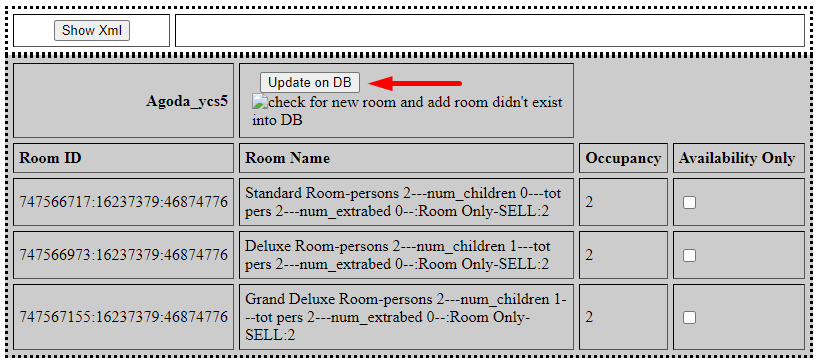
- Go to the Mapping tab and click Import Room.
Note:- Clicking Import Room will pull the rate plans from the OTA extranet so they can be mapped to the channel manager.
- Make sure there is an active rate plan on the OTA extranet.
- A popup will appear displaying the active rate plans. Click Update Rateplans to import the rate plans into the channel manager.
Note:- You can also choose how the channel manager will push updates to the OTA.
- If the Availability Only option is checked, the channel manager will only push inventory.
- If Availability Only is unchecked, the channel manager will push inventory, prices, and restrictions.
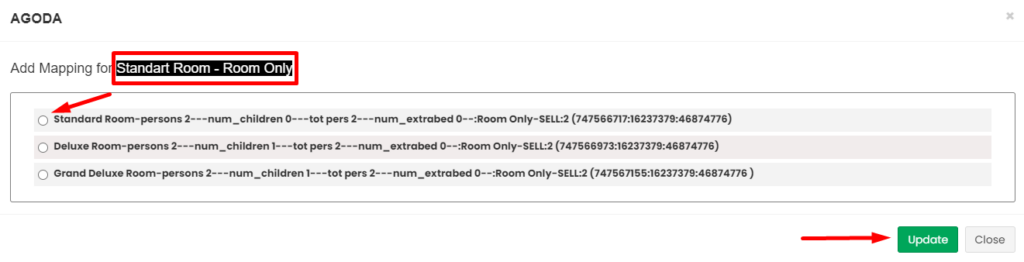
- After the successful import, a Warning notification will appear. Click Add Mapping to start mapping.

- Choose the appropriate OTA rate plan that matches the internal rate plan, then click Update.
Note:- Ensure all OTA rate plans are mapped.
- Any unmapped or unassigned rate plans may cause errors with upcoming reservations.
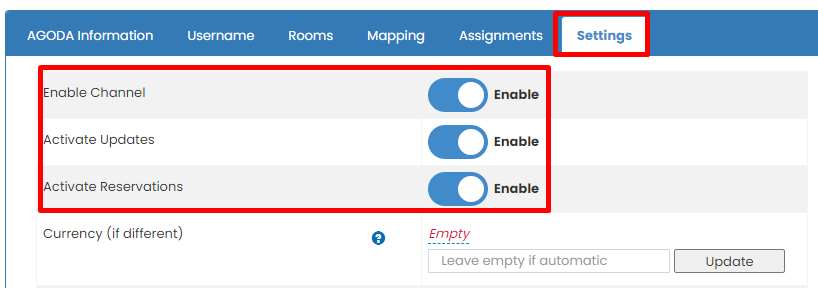
- Go to the Settings tab and ensure the button is enabled.
- Perform an OTA Update from either Monthly Deals or Yearly Deals.
- Double-check the log update and verify the changes on the OTA extranet.
[!NOTE]
Troubleshooting Agoda Connection Issues
Agoda is not showing in the Control Panel
- Make sure the connection request has been submitted via the Agoda YCS extranet.
- Confirm that Channel Manager mode is enabled under Property Setting > Optional Setting in Agoda YCS.
- Wait at least 30–60 minutes after submitting the request before accessing Agoda from the Control Panel.
Hotel ID is not accepted
- Ensure that you are entering the correct Hotel ID as listed in Agoda YCS.
- Double-check for typos or extra spaces when inputting the Hotel ID.
- Refresh the page and try again.
No rate plans appear when importing rooms
- Verify that there is at least one active rate plan on the Agoda YCS extranet.
- Ensure the Agoda–Bookandlink connection has been successfully established.
- Try refreshing the Mapping tab and clicking Import Room again.
Popup for Update Rateplans does not appear
- Check if your browser is blocking pop-ups; disable the blocker temporarily.
- Clear your browser cache or switch to another browser.
- Ensure a stable internet connection during the import process.
Clicking Add Mapping does not work after import
- Confirm that the rate plans have been successfully imported.
- Refresh the Mapping tab and try again.
- If the issue continues, contact our support team.
Rate plans do not appear in the mapping table after update
- Double-check that you clicked Update after selecting the internal rate plan.
- Make sure no fields were left blank during the mapping process.
- Reload the page to view the updated mapping.
Settings toggle is disabled
- The toggle remains disabled if the mapping process was incomplete.
- Return to the Mapping tab and ensure all OTA rate plans are mapped properly.
- Complete all required steps, then check the Settings tab again.
OTA Update does not reflect on Agoda extranet
- Perform another OTA Update using Monthly Deals or Yearly Deals.
- Review the log update for confirmation that the push was successful.
- Log in to Agoda YCS to verify that the updates have been applied.
Expedia
Please make sure you have already requested a connection through the Expedia extranet.
How to Request Connect
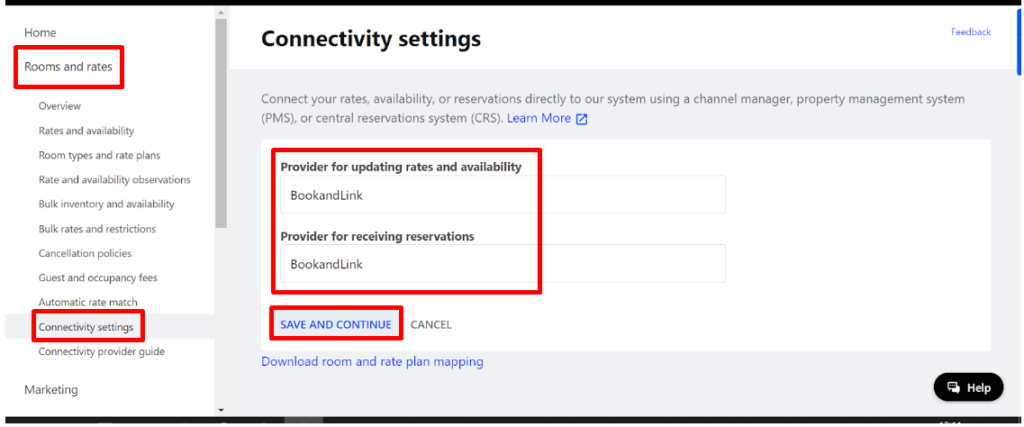
- Go to the Room and Rates menu, then select Connectivity Setting.
- Search and choose Bookandlink for the channel manager.
- Save the settings.
How to Map Expedia Channel
- Search and choose Expedia on the Control Panel.

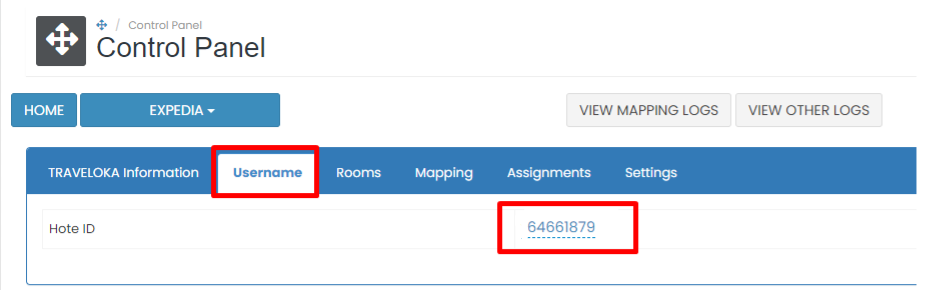
- Go to the Username tab and enter the Hotel ID.
Note: The Hotel ID refers to the property ID registered on the Expedia extranet.
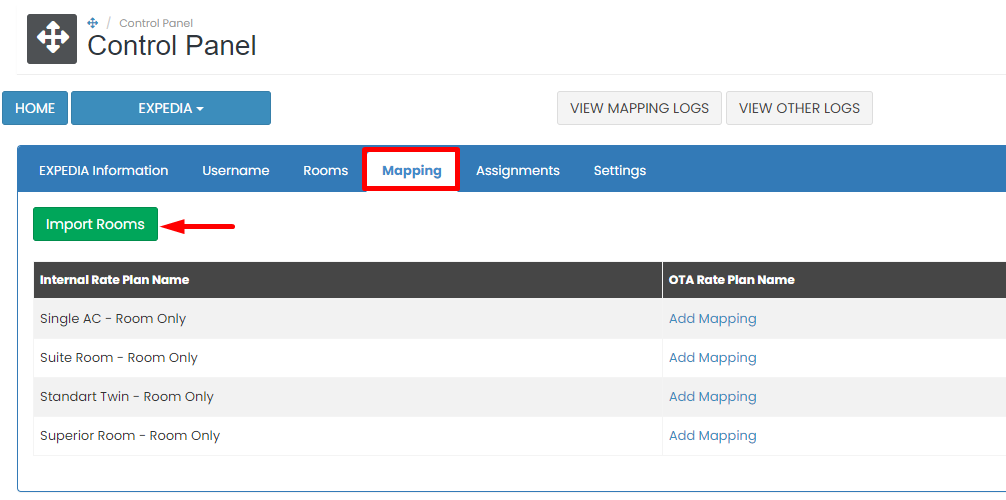
- Go to the Mapping tab and click Import Room.
Note:
- Clicking Import Room will pull the rate plans from the OTA extranet so they can be mapped to the channel manager.
- Make sure there is an active rate plan on the OTA extranet.
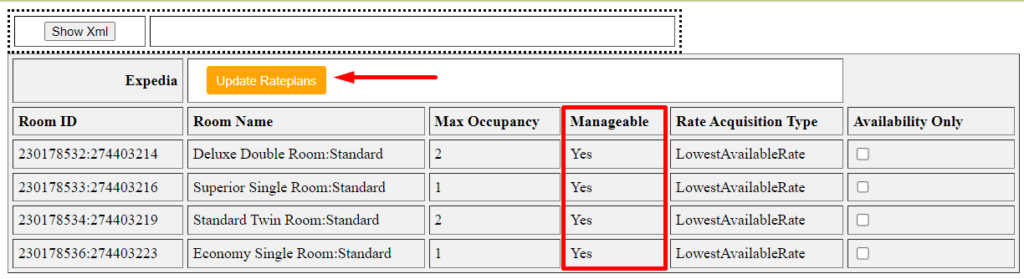
- A popup will appear displaying the active rate plans. Click Update Rateplans to import the rate plans into the channel manager.
Note:- You can also choose how the channel manager will push updates to the OTA.
- If the Availability Only option is checked, the channel manager will only push inventory.
- If Availability Only is unchecked, the channel manager will push inventory, prices, and restrictions.
- Only rate plans with Manageable "Yes" will be shown in the Mapping tab. If you find rate plans with Manageable "No" (depending on your rate plan settings on the Expedia extranet), please assign those to the Assignment tab.
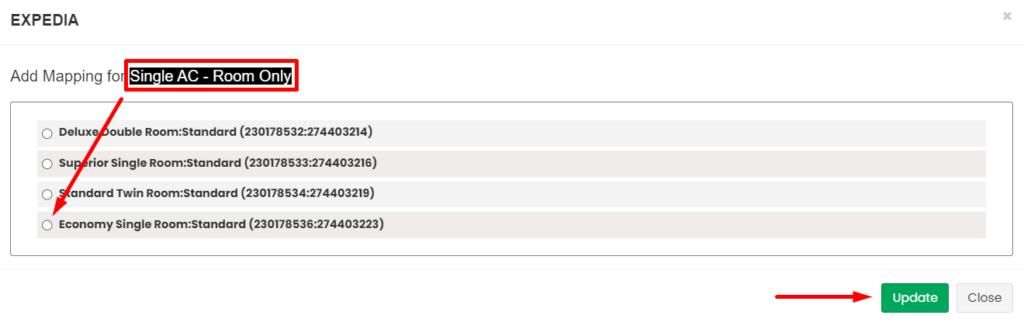
- After the successful import, a Warning notification will appear. Click Add Mapping to start mapping.
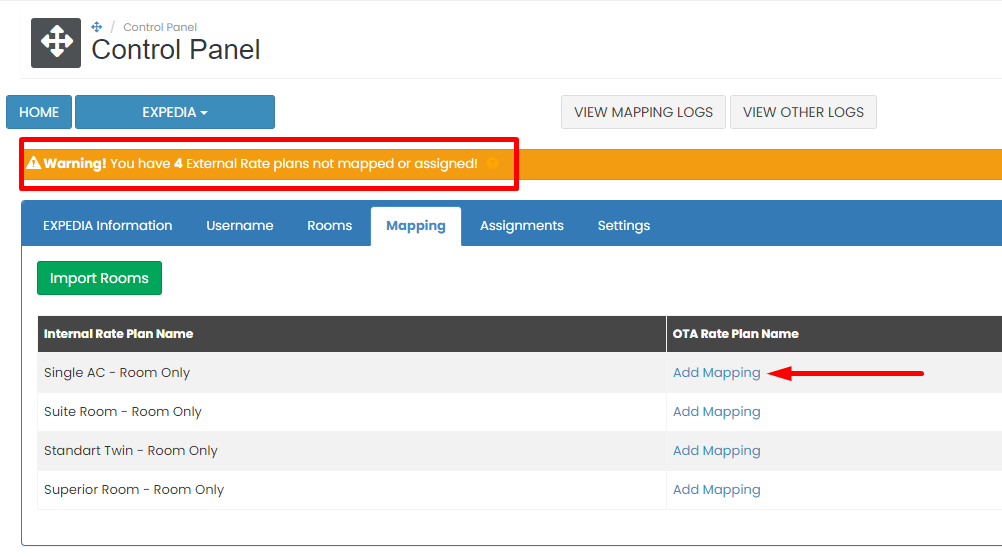
- Choose the appropriate OTA rate plan that matches the internal rate plan, then click Update.
Note:- Ensure all OTA rate plans are mapped.
- Any unmapped or unassigned rate plans may cause errors with upcoming reservations.
- Go to the Settings tab and ensure the button is enabled.
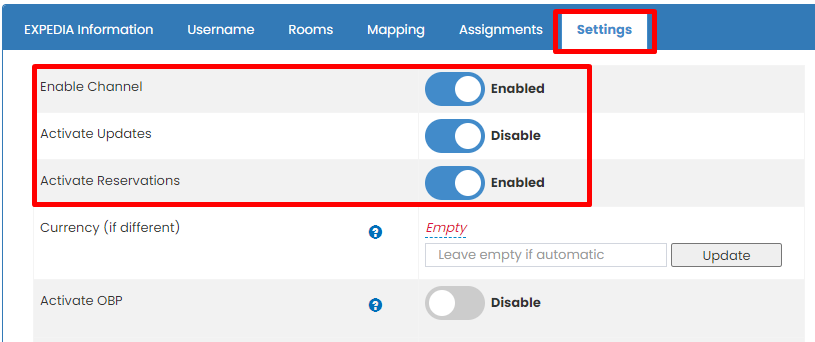
- Perform an OTA Update from either Monthly Deals or Yearly Deals.
- Double-check the log update and verify the changes on the OTA extranet.
[!NOTE]
Troubleshooting Expedia Connection Issues
Expedia is not available on the Control Panel
- Make sure the connection request has been submitted through the Expedia extranet.
- Confirm that Bookandlink is selected as the channel manager in Room and Rates > Connectivity Setting.
- Wait a few minutes after saving the settings before accessing Expedia in the Control Panel.
Hotel ID is not accepted
- Double-check that the Hotel ID entered matches the property ID from the Expedia extranet.
- Ensure there are no spaces or typos.
- Try refreshing the page and re-entering the Hotel ID.
No rate plans appear when importing rooms
- Verify that there is at least one active rate plan in the Expedia extranet.
- Confirm that the rate plans are set to Manageable = Yes.
- If the rate plans are marked Manageable = No, you must assign them in the Assignment tab instead.
Popup for Update Rateplans does not appear
- Disable any browser pop-up blockers temporarily.
- Clear your browser cache or try using a different browser.
- Ensure a stable internet connection during the process.
Unable to proceed after clicking Add Mapping
- Check that rate plans have been successfully imported.
- Refresh the Mapping tab and try again.
- If the issue persists, contact support.
Mapped rate plans are not appearing
- Confirm that you clicked Update after assigning the correct internal rate plan.
- Make sure all required fields are completed during the mapping process.
- Reload the Mapping tab to verify updates.
Settings toggle cannot be enabled
- This occurs when the mapping process is incomplete.
- Return to the Mapping tab and ensure all rate plans are properly mapped.
- Retry enabling the settings toggle once mapping is complete.
OTA Update not reflected in Expedia extranet
- Perform the OTA Update again from either Monthly Deals or Yearly Deals.
- Check the log update to ensure the push was successful.
- Log in to Expedia extranet to confirm that the changes have been applied.
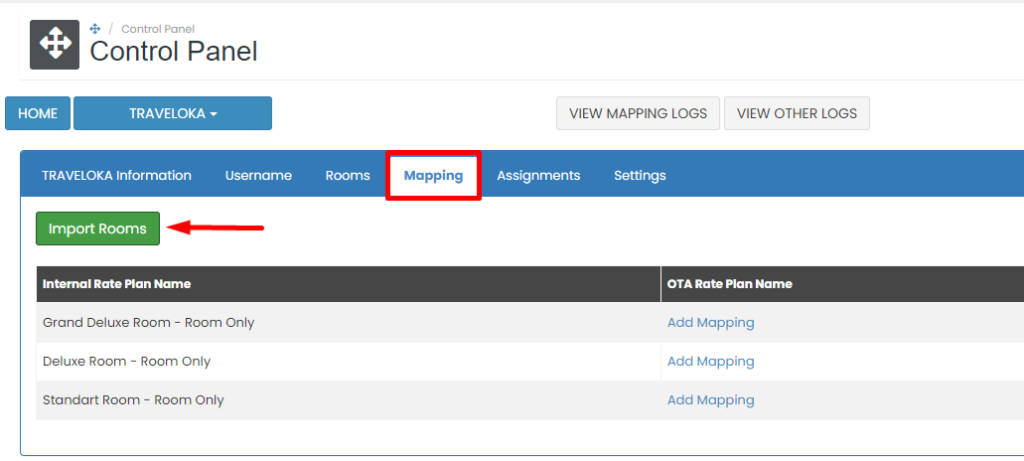
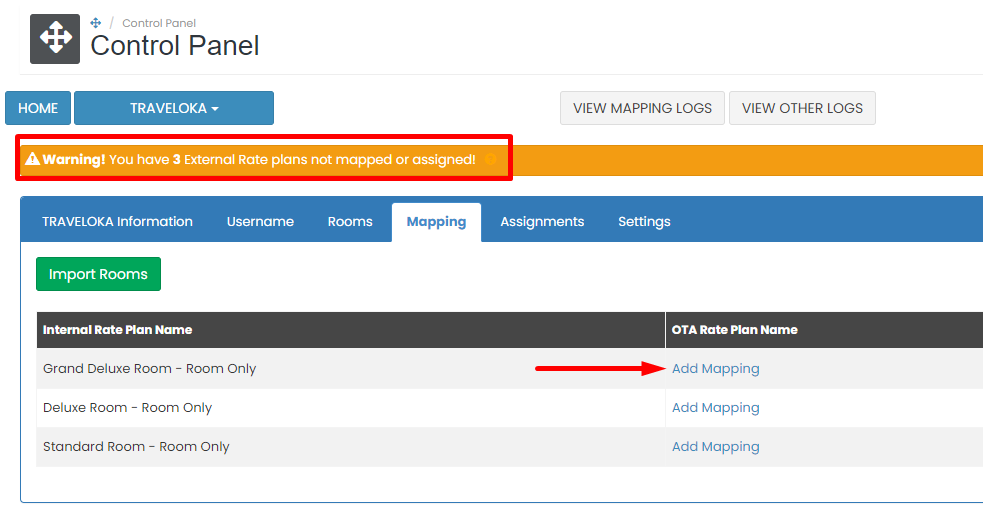
Traveloka
How to Map Traveloka Channel
- Search and choose Traveloka on the Control Panel.

- Go to the Username tab and input the Hotel ID.
Note: Traveloka username is unique code/connection code that obtained from Traveloka after sent connect request _(click here for sent connect request article)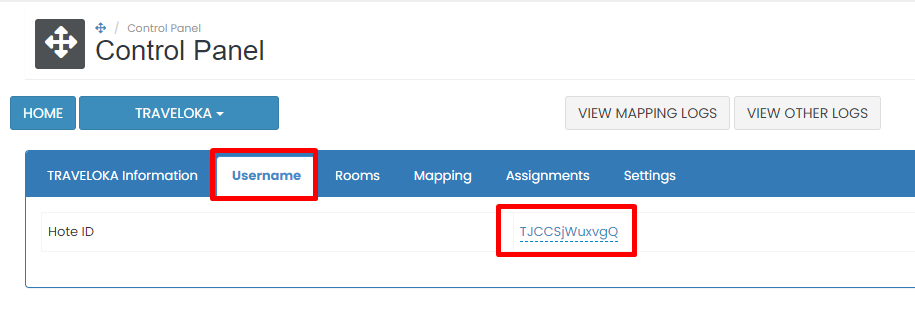
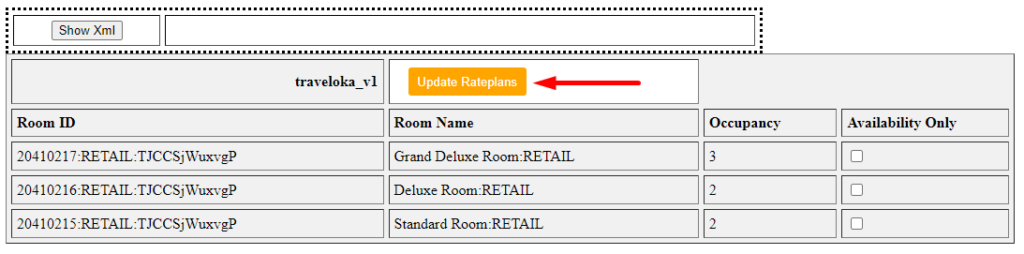
- Go to the Mapping tab and click Import Room.
Note:- Clicking Import Room will pull the rate plans from the OTA extranet so they can be mapped to the channel manager.
- Ensure there is at least one active rate plan on the OTA extranet.
- A popup will appear showing the active rate plans. Click Update Rateplans to import the rate plans into the channel manager.
Note:- At this stage, you can choose how the channel manager will push updates to the relevant OTA.
- If the Availability Only section is Checked, the channel manager will only push inventory.
- If the Availability Only section is Not Checked, the channel manager will push inventory, prices, and restrictions.
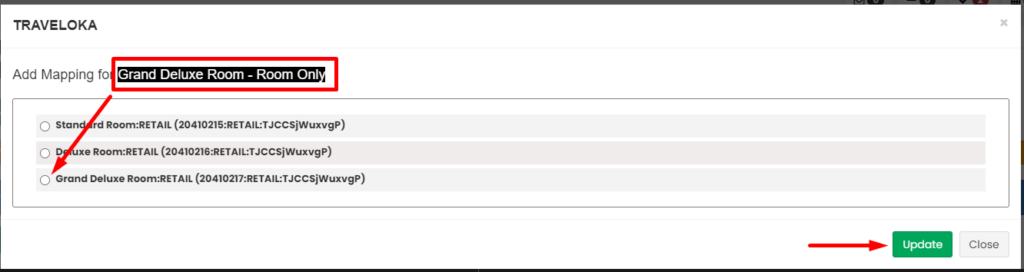
- After a successful import, a Warning notification will appear. Click Add Mapping to begin mapping.
- Choose the appropriate OTA rate plan that corresponds with the internal rate plan, then click Update.
Note:- Only rate plans with the Retail code are mapped in the mapping section.
- Any rate plans with codes like Private Sale, Mobile, Insight, etc., should be added to the Assignment tab.
- Ensure all OTA rate plans are mapped or assigned. Any unmapped or unassigned rate plans may cause errors with upcoming reservations.
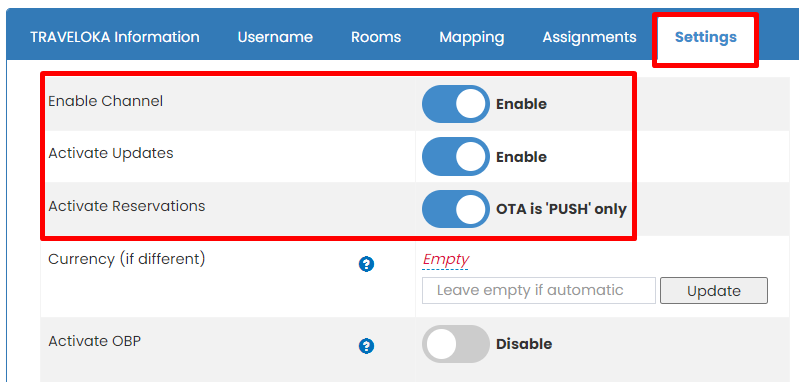
- Go to the Settings tab and ensure the button is enabled.
- Perform an OTA Update from either Monthly Deals or Yearly Deals.
- Double-check the log update and verify the changes on the OTA extranet.
[!NOTE]
Troubleshooting Traveloka Connection Issues
Traveloka is not available on the Control Panel
- Make sure you have submitted a connect request to Traveloka.
- Wait until you receive a unique code/connection code from Traveloka before attempting to map the channel.
- Check the article linked in the Username tab for the correct connect request steps.
Hotel ID/Username is not accepted
- Ensure the code entered is the unique code/connection code provided by Traveloka.
- Avoid any typos or spaces when inputting the code.
- Refresh the page and try again if the error persists.
No rate plans appear when importing rooms
- Confirm that there is at least one active rate plan on the Traveloka extranet.
- Check if the rate plans are properly configured and visible on the extranet side.
Rate plans are missing after clicking Update Rateplans
- Only Retail rate plans will appear in the Mapping tab.
- Rate plans labeled as Private Sale, Mobile, or Insight must be assigned in the Assignment tab.
- Double-check your rate plan types in the Traveloka extranet.
Add Mapping button does not function
- Ensure rate plans have been successfully imported before proceeding.
- Try refreshing the Mapping tab or reloading the page if the button remains inactive.
Mapped rate plans are not saved
- Confirm you clicked Update after selecting the corresponding internal rate plan.
- Make sure there are no empty fields during the mapping process.
- Try removing and re-adding the mapping if necessary.
Settings toggle cannot be enabled
- This issue typically occurs when rate plans have not been fully mapped or assigned.
- Return to the Mapping and Assignment tabs and complete the necessary setup before retrying.
OTA Update not reflected in Traveloka extranet
- Perform the OTA Update again from Monthly Deals or Yearly Deals.
- Review the log update for confirmation of a successful push.
- Log in to the Traveloka extranet to verify the applied updates.
Tiket.com
Make sure you have already requested a connection through Tiket.com extranet.
How to Request Connect
- Go to the Connectivity menu on your Tiket.com extranet and search for Bookandlink (API 2.0).
- Choose Bookandlink (API 2.0) from the list, as shown in the picture below.
How to Map Tiket.com Channel
- Search and choose Tiket.com on the Control Panel.
- Go to the Username tab and input the Hotel ID.
Note: The Hotel ID is the property ID registered on Tiket.com extranet.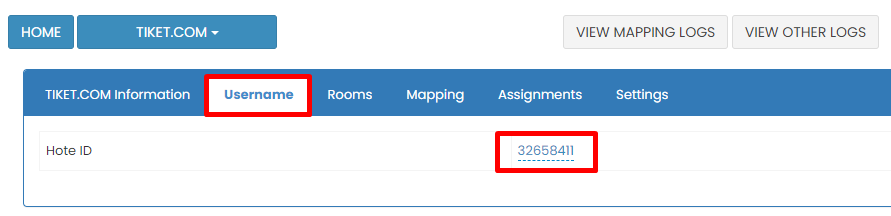
- Go to the Mapping tab and click Import Room.
Note:- Clicking Import Room will pull the rate plans from the OTA extranet so they can be mapped to the channel manager.
- Ensure there is at least one active rate plan on the OTA extranet.
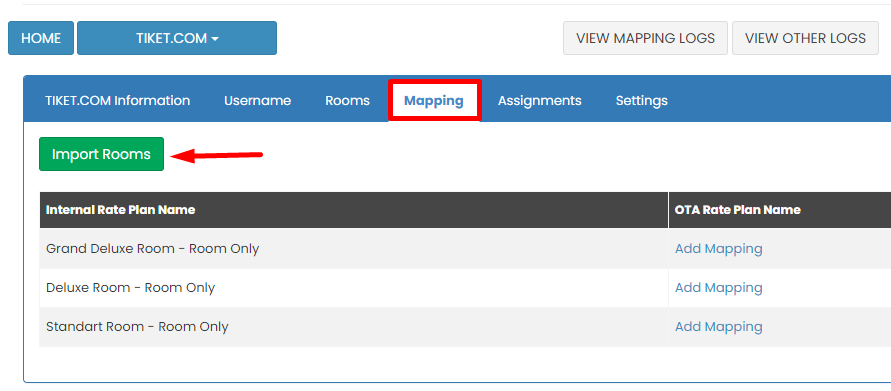
- A popup will appear showing the active rate plans. Click Update Rateplans to import the rate plans into the channel manager.
Note:- At this stage, you can choose how the channel manager will push updates to the relevant OTA.
- If the Availability Only section is Checked, the channel manager will only push inventory.
- If the Availability Only section is Not Checked, the channel manager will push inventory, prices, and restrictions.

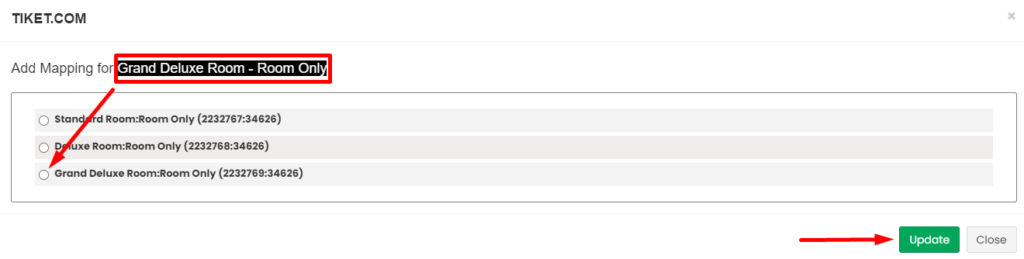
- After a successful import, a Warning notification will appear. Click Add Mapping to begin mapping.
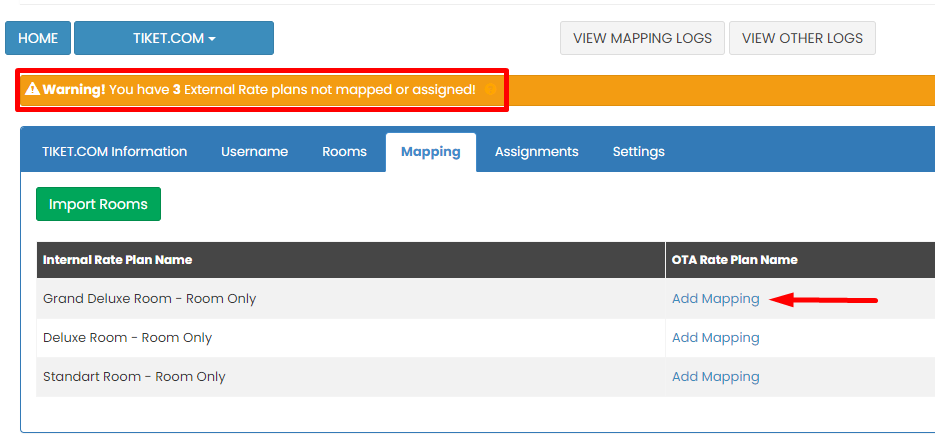
- Choose the appropriate OTA rate plan that corresponds with the internal rate plan, then click Update.
Note:- Ensure all OTA rate plans are mapped or assigned. Any unmapped or unassigned rate plans may cause errors with upcoming reservations.
- Ensure all OTA rate plans are mapped or assigned. Any unmapped or unassigned rate plans may cause errors with upcoming reservations.
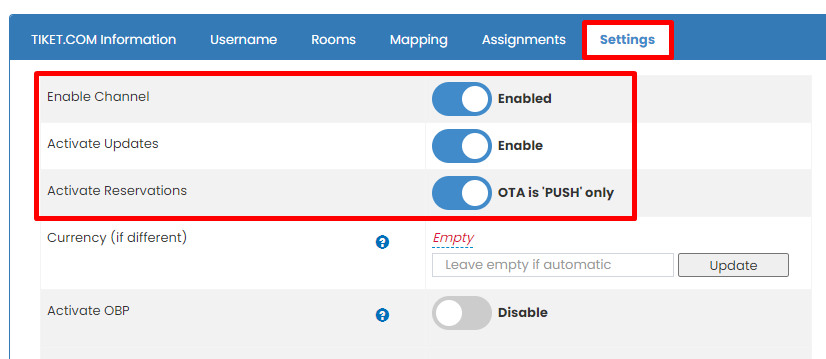
- Go to the Settings tab and ensure the button is enabled.
- Perform an OTA Update from either Monthly Deals or Yearly Deals.
- Double-check the log update and verify the changes on the OTA extranet.
[!NOTE]
Troubleshooting Tiket.com Connection Issues
Tiket.com is not available on the Control Panel
- Make sure you have submitted a connect request via the Tiket.com extranet.
- Confirm that you have selected Bookandlink (API 2.0) in the Connectivity menu.
Hotel ID is not accepted
- Ensure the Hotel ID entered matches the property ID registered on Tiket.com extranet.
- Check for any extra spaces or typos when entering the ID.
- Try refreshing the page and re-entering the ID if the issue continues.
Import Room does not display any rate plans
- Check that you have at least one active rate plan on the Tiket.com extranet.
- Ensure the rate plans are fully configured and not in draft or inactive status.
Update Rateplans does not pull any data
- Confirm the Hotel ID is valid and that the initial connection to Tiket.com was successful.
- Make sure the rate plans are visible and correctly set up in the extranet.
Add Mapping button is unresponsive
- Wait a few moments after importing to ensure data has fully loaded.
- Refresh the Mapping tab or reload the page if needed.
Unable to save mapped rate plans
- Ensure every rate plan is matched with the corresponding internal rate plan and click Update.
- Avoid leaving any selections empty during the mapping process.
Cannot enable the Settings toggle
- Check that all necessary mappings have been completed.
- Unmapped or partially mapped rate plans can prevent activation.
OTA Update has no effect on Tiket.com extranet
- Retry the OTA Update via Monthly Deals or Yearly Deals.
- Review the log update to confirm whether data was successfully pushed.
- If no changes appear, verify again on Tiket.com extranet or repeat the update process.
Hostelworld
How to Map Hostelworld Channel
- Search and choose Hostelworld on the Control Panel.

- Go to the Username tab and input the Password and Hotel ID.
Note:- Password: Your password to log in to Hostelworld extranet.
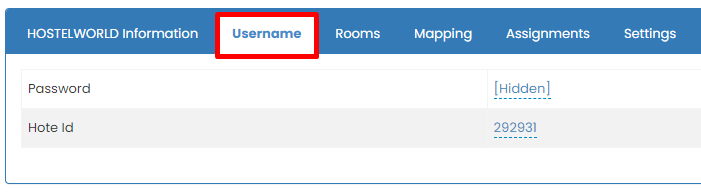
- Password: Your password to log in to Hostelworld extranet.
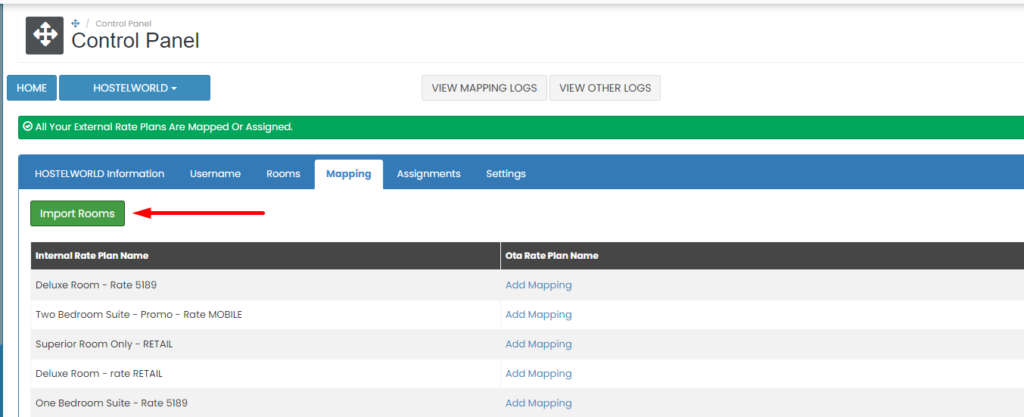
- Go to the Mapping tab and click Import Room.
Note:
- Clicking Import Room will pull the rate plan from the OTA extranet so it can be mapped to the channel manager.
- Ensure there is an active rate plan on the OTA extranet.
- A pop-up will appear showing the active rate plan from the OTA extranet. Click Update Rateplans to import the rate plan into the channel manager.
Note:- You can also choose how the channel manager will push updates to the relevant OTA.
- If the Availability Only section is Checked, the channel manager will only push inventory.
- If the Availability Only section is Not Checked, the channel manager will push inventory, prices, and restrictions.

- A Warning notification will appear to indicate that the import rooms were successful. Click Add Mapping to start mapping.
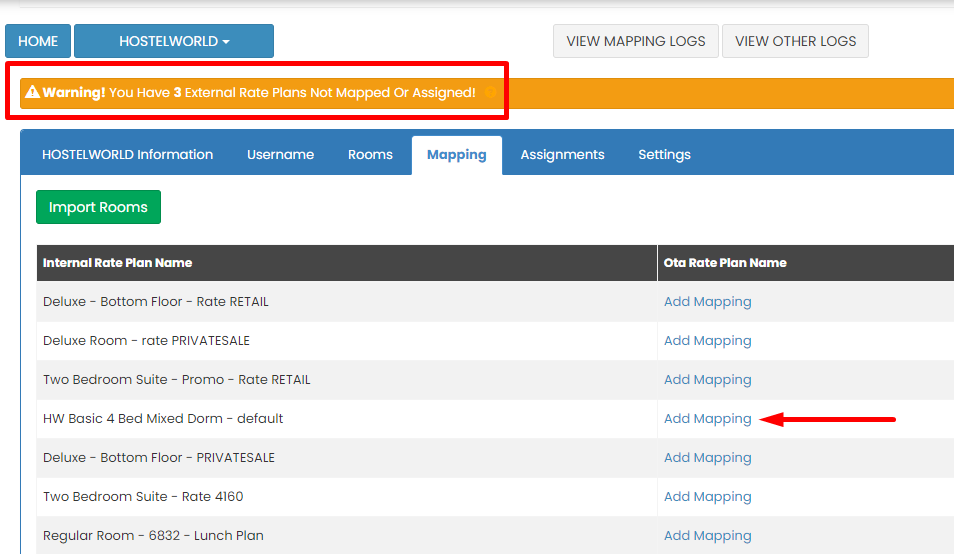
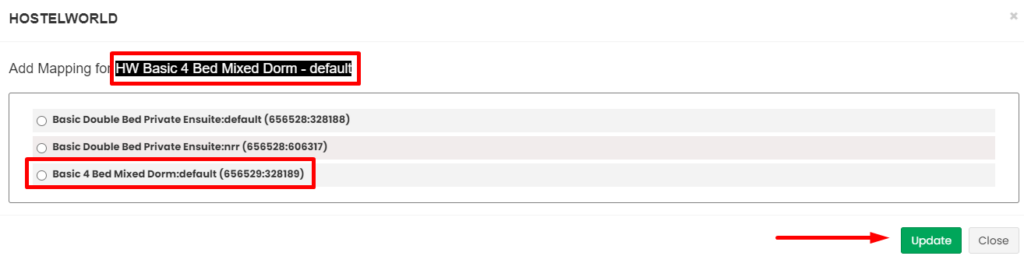
- Choose the appropriate OTA rate plan that corresponds with the internal rate plan, then click Update.
Note:- Ensure all OTA rate plans are mapped or assigned. Any unmapped or unassigned rate plans may cause errors with upcoming reservations.
- Ensure all OTA rate plans are mapped or assigned. Any unmapped or unassigned rate plans may cause errors with upcoming reservations.
- After all rate plans are mapped, check the Room Occupancy under the Rooms tab.
- Ensure Dorm occupancy is set to 1 and Private occupancy is set according to the number of pax.
Note: - You can view your room types (Dorm or Private) on the Hostelworld extranet calendar.
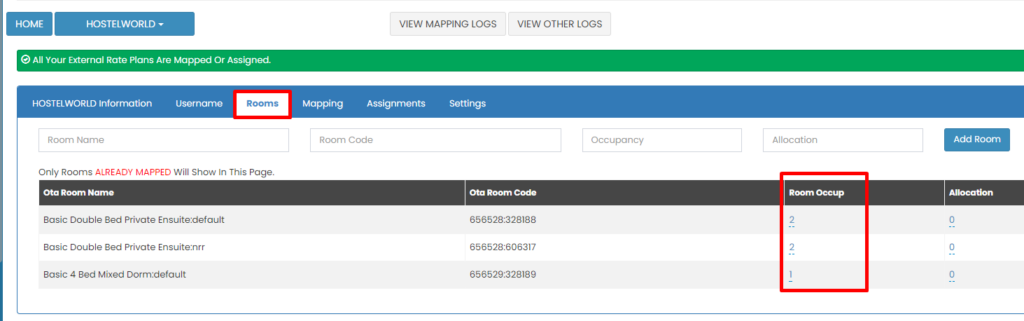
- Ensure Dorm occupancy is set to 1 and Private occupancy is set according to the number of pax.
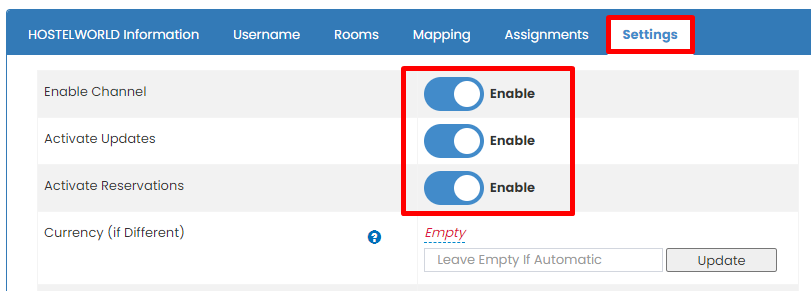
- Ensure the Settings button is Enabled.
- Perform an OTA Update through Monthly Deals or Yearly Deals.
- Double-check the log update and verify the changes on the OTA extranet.
[!NOTE]
Troubleshooting Hostelworld Connection Issues
Hostelworld is not listed in the Control Panel
- Confirm that your property is registered on the Hostelworld extranet.
- Make sure your login credentials are active and valid.
Unable to save credentials in Username tab
- Ensure the Password is correct and matches your Hostelworld extranet login.
- Double-check the Hotel ID for typos or missing characters.
- Try re-entering the credentials after refreshing the page.
Import Room returns no rate plan
- Confirm that at least one active rate plan is available on the Hostelworld extranet.
- Make sure the rate plan is not in draft or deactivated status.
Update Rateplans does not retrieve any data
- Ensure the correct credentials are used and the property is connected successfully.
- Retry the import after a few moments if the pop-up shows no data.
Cannot click Add Mapping
- Wait a few seconds after importing before clicking.
- Refresh the page or Mapping tab and try again.
Mapped rate plan cannot be saved
- Ensure all OTA rate plans are paired with the internal rate plans.
- Avoid leaving any dropdowns unselected during the mapping process.
Incorrect Room Occupancy setup
- Dorm-type rooms must have occupancy set to 1.
- Private-type rooms must match the correct number of guests.
- Check room types and settings directly on the Hostelworld extranet calendar.
Settings toggle is disabled
- Make sure all rate plans are properly mapped.
- Settings can only be enabled once the mapping is complete and occupancy is set.
OTA Update does not reflect on Hostelworld extranet
- Re-perform the OTA Update from Monthly or Yearly Deals.
- Check the log update for confirmation.
- If there is no change, verify again in the Hostelworld extranet or repeat the update.
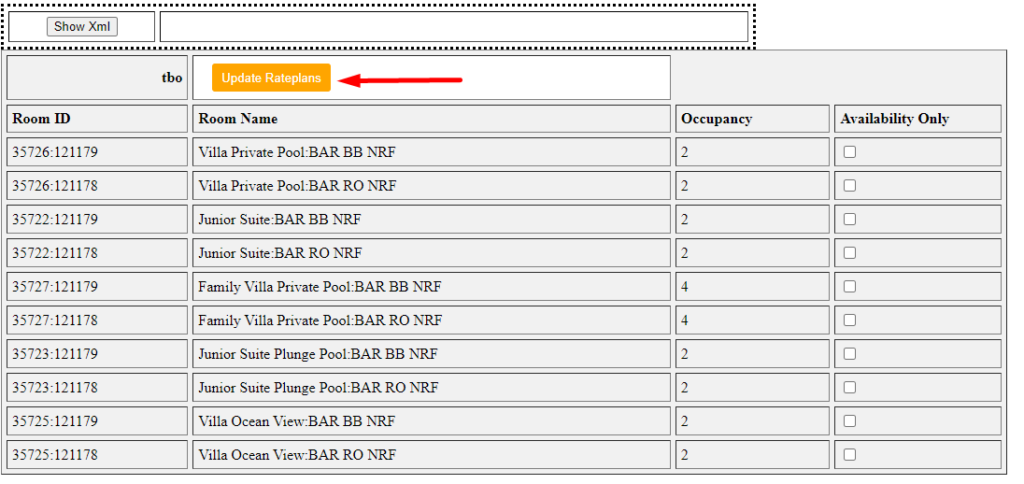
TBO Holidays
Please make sure you have already requested a connection through your TBO Holidays Market Manager. You will usually receive connection credentials.
How to map TBO channel
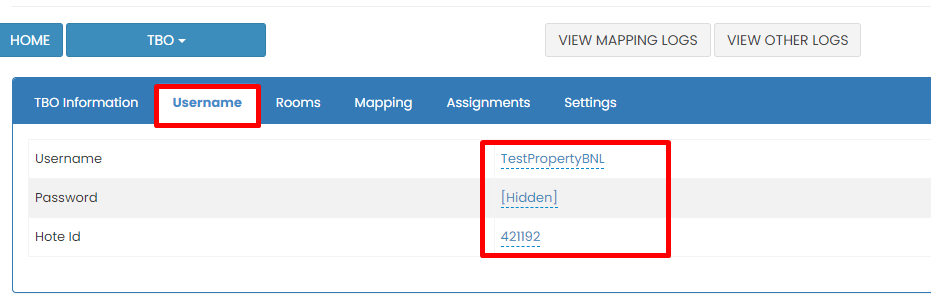
- Search and choose TBO on the Control Panel.

- Go to the Username tab and input your connection credentials.
- Go to the Mapping tab and click Import Room.
Note:- Clicking Import Room will pull the rate plan from the OTA extranet so it can be mapped to the channel manager.
- Ensure there is an active rate plan on the OTA extranet.
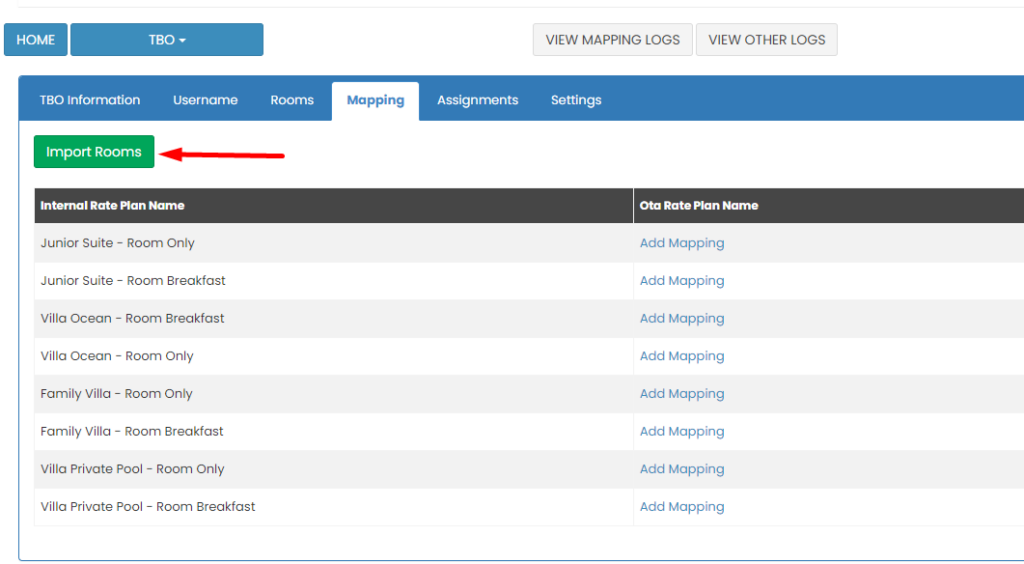
- A pop-up will appear containing the active rate plan from the OTA extranet. Click Update Rateplans to import the rate plan into the channel manager.
Note:- At this step, you can choose how the channel manager will push updates to the OTA.
- If the Availability Only section is Checked, the channel manager will only push inventory.
- If it is Not Checked, the channel manager will push inventory, prices, and restrictions.
- A Warning notification will appear to indicate that the room import was successful. Click Add Mapping to start mapping.
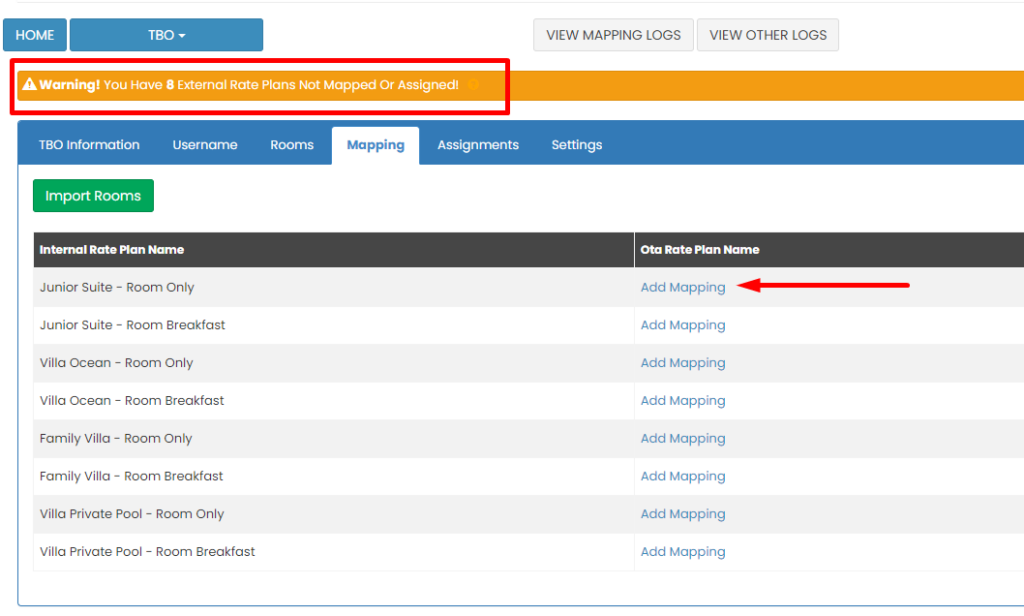
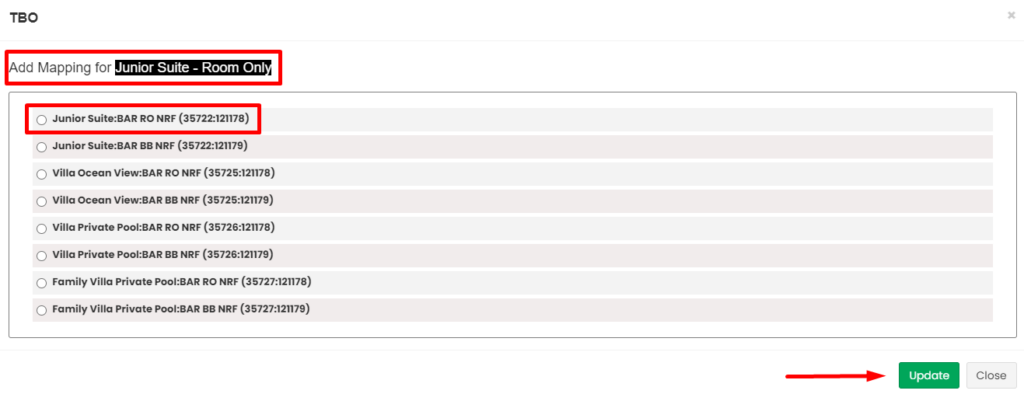
- Choose the OTA rate plan that matches the internal rate plan, then click Update.
Note:- Ensure all OTA rate plans are mapped or assigned. Any unmapped or unassigned rate plan may cause errors with upcoming reservations.
- Ensure all OTA rate plans are mapped or assigned. Any unmapped or unassigned rate plan may cause errors with upcoming reservations.
- After all rate plans are mapped, go to the Setting tab.
- Enable OBP feature and click Settings to configure OBP.
Note: - Activating OBP is mandatory for TBO.
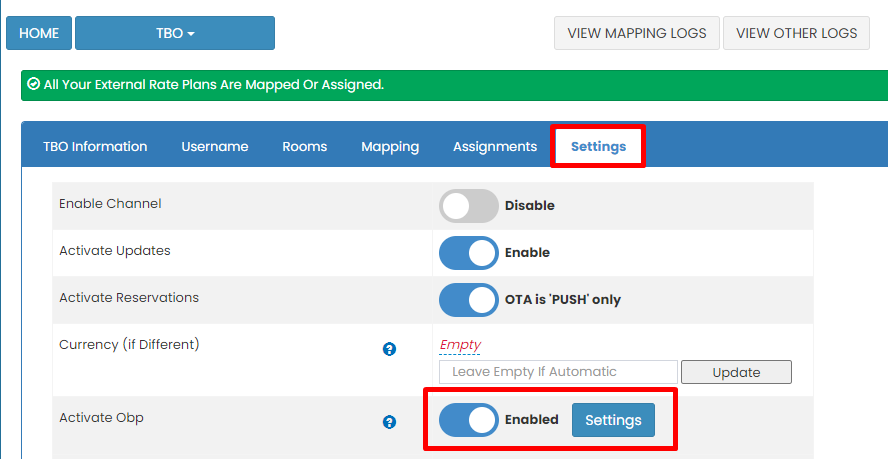
- Enable OBP feature and click Settings to configure OBP.
- Set up OBP by clicking Select Room, then choose the rate plan you want to configure.
- Set the increase or decrease price for OBP using percentage or value.
- To increase, simply input the amount (e.g., 10, 100, 1000, etc.).
- To decrease, input a minus sign in front of the amount (e.g., -10, -100, etc.).
Note: - The base price refers to the price you set in the Monthly Deals Calendar. For example, if your rate plan is for 2 pax and the price set in Monthly Deals is 1,000,000, that is the price for 2 pax.
- If you want to set an OBP for 1 pax, decrease the price accordingly.
- If you do not want different prices for different occupancies, please input 0 in the OBP setting.
- Ensure the Settings button is Enabled.
- Perform an OTA Update through Monthly Deals or Yearly Deals.
- Double-check the log update and verify the settings on the OTA extranet.
[!NOTE]
Troubleshooting TBO Holidays Connection Issues
TBO Holidays is not listed in the Control Panel
- Confirm that your property is registered on the TBO Holidays extranet.
- Make sure your connection credentials are active and valid.
Unable to save credentials in Username tab
- Ensure the credentials are correct and match what was provided by your TBO Holidays Market Manager.
- Double-check for any typos or missing characters in the Username and Password.
- Try re-entering the credentials after refreshing the page.
Import Room returns no rate plan
- Confirm that at least one active rate plan is available on the TBO Holidays extranet.
- Ensure the rate plan is not in draft or deactivated status.
Update Rateplans does not retrieve any data
- Ensure the correct connection credentials are used and the property is successfully connected.
- Retry the import after waiting a few moments if the pop-up shows no data.
Cannot click Add Mapping
- Wait a few seconds after clicking Import Room before attempting to click Add Mapping.
- Refresh the page or go to the Mapping tab and try again.
Mapped rate plan cannot be saved
- Ensure all OTA rate plans are properly paired with the internal rate plans.
- Avoid leaving any dropdowns unselected during the mapping process.
Incorrect Room Occupancy setup
- For Dorm-type rooms, set the occupancy to 1.
- For Private-type rooms, ensure the occupancy matches the correct number of guests.
- Verify room types and occupancy directly on the TBO Holidays extranet.
Settings toggle is disabled
- Ensure all rate plans are mapped correctly.
- Settings can only be enabled once the mapping is complete and occupancy is set.
OTA Update does not reflect on TBO Holidays extranet
- Re-perform the OTA Update from Monthly Deals or Yearly Deals.
- Check the log update for confirmation.
- If no updates are reflected, verify again on the TBO Holidays extranet or repeat the update.
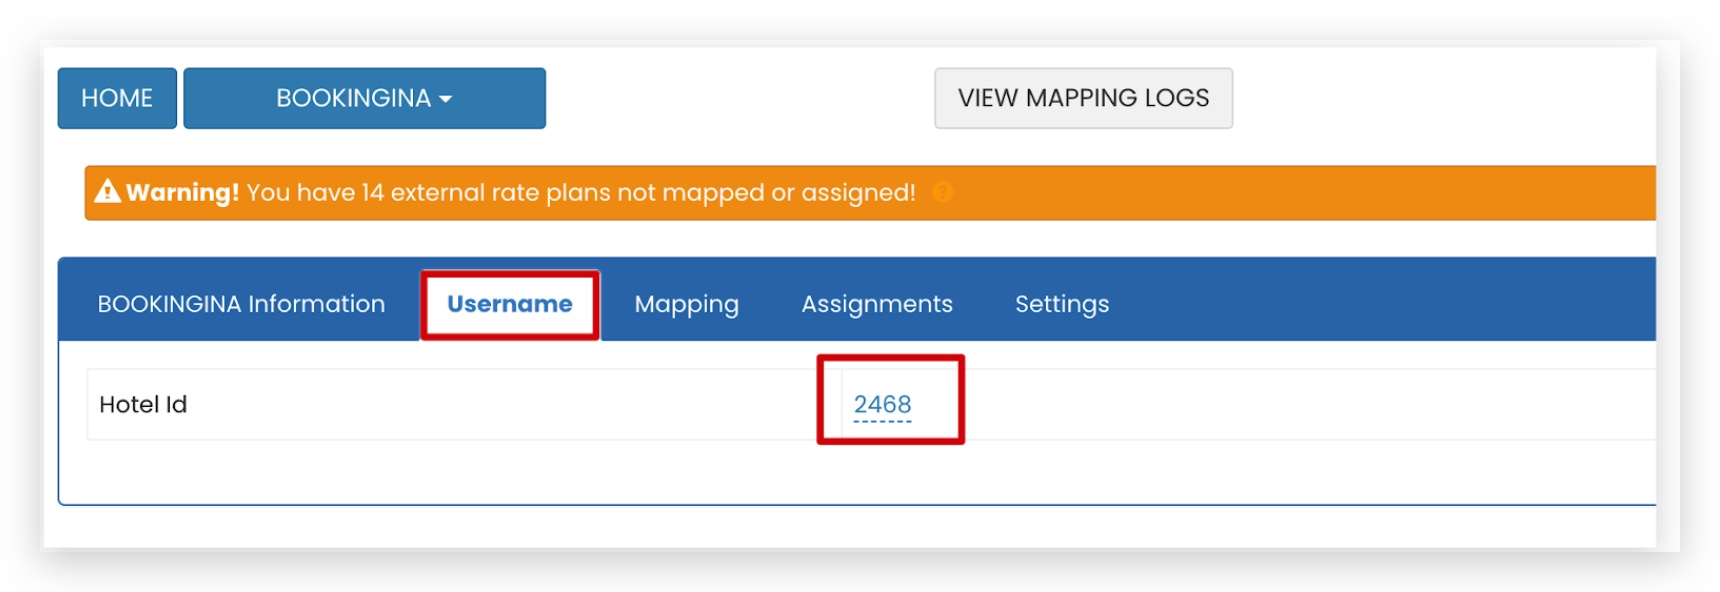
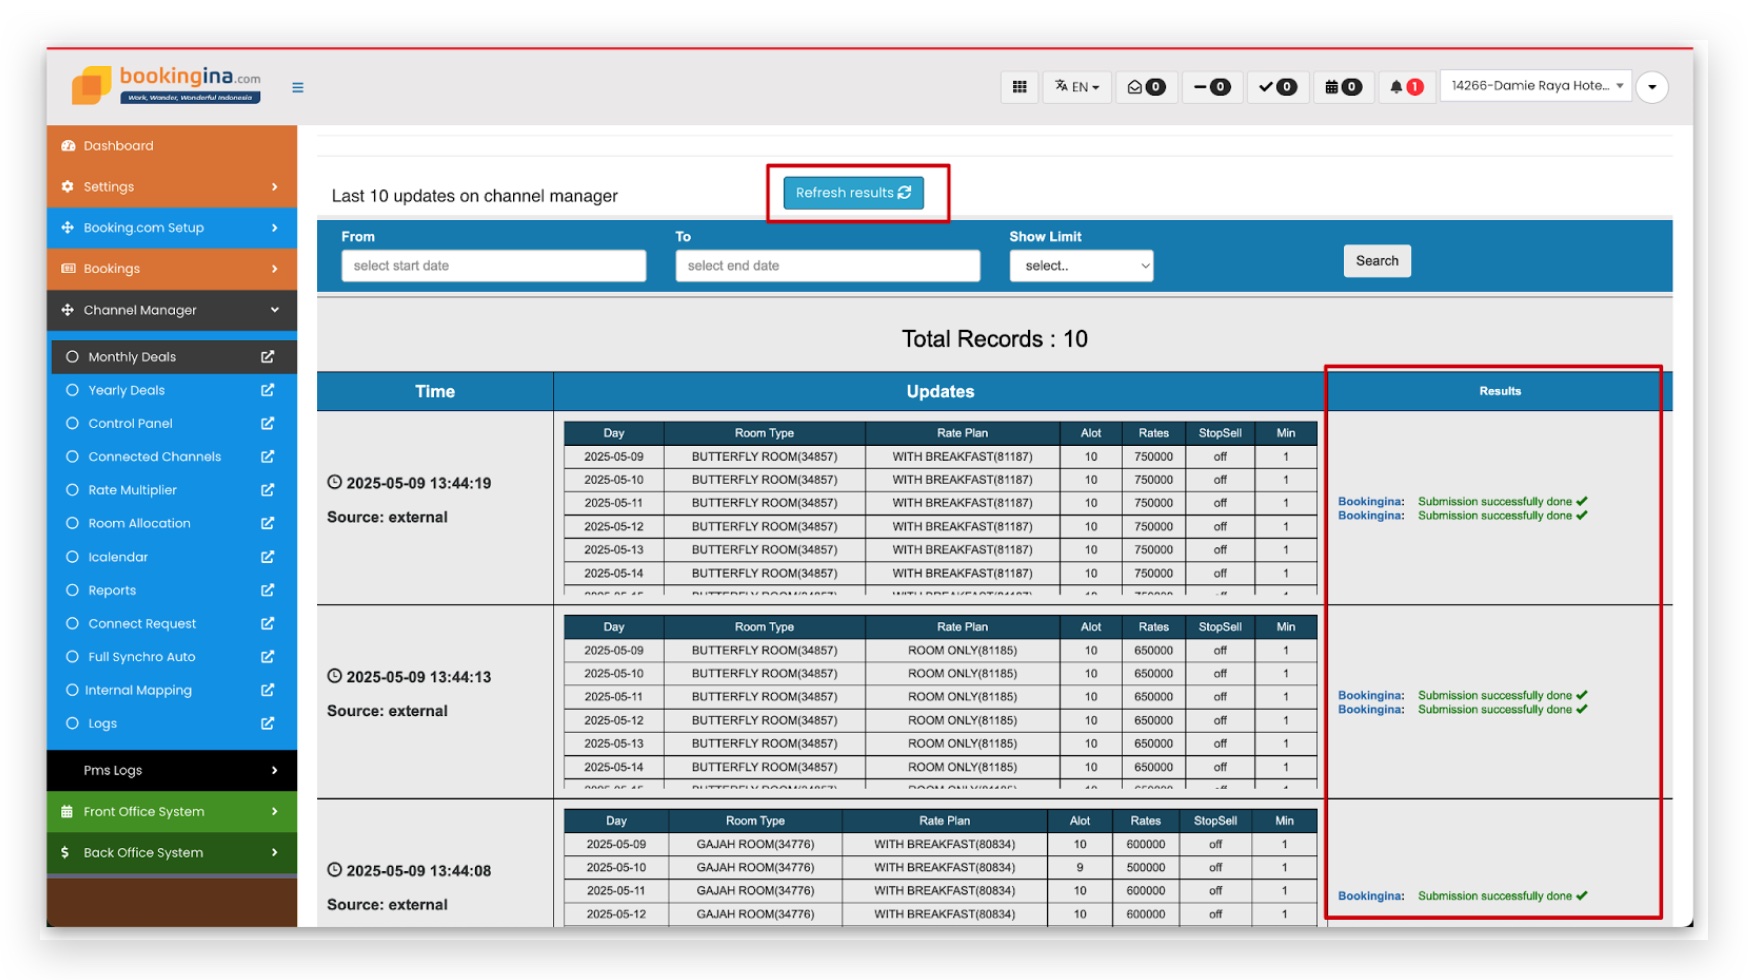
Bookingina
How to Map Bookingina Channel
-
Search and choose Bookingina on the Control Panel.
-
Go to the Username tab and input your Hotel Id
-
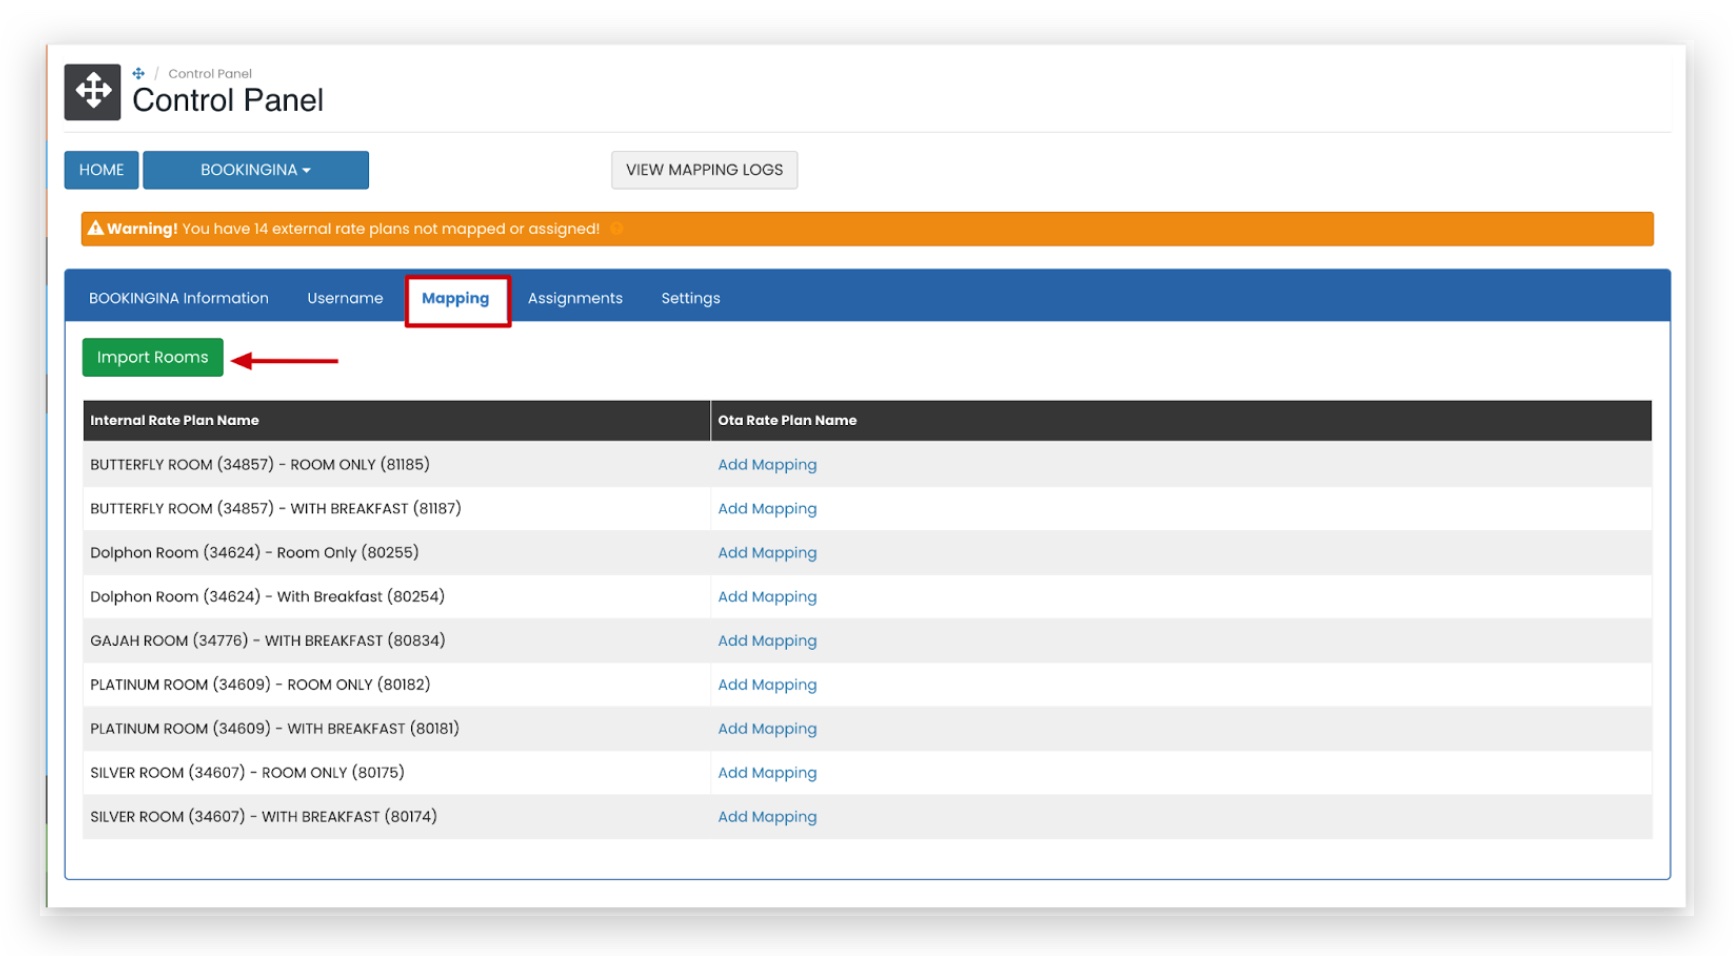
Go to the Mapping tab and click Import Room. Note:
- Clicking Import Room will pull the rate plans from the OTA extranet so they can be mapped to the channel manager.
- Ensure there is at least one active rate plan on the OTA extranet.
-
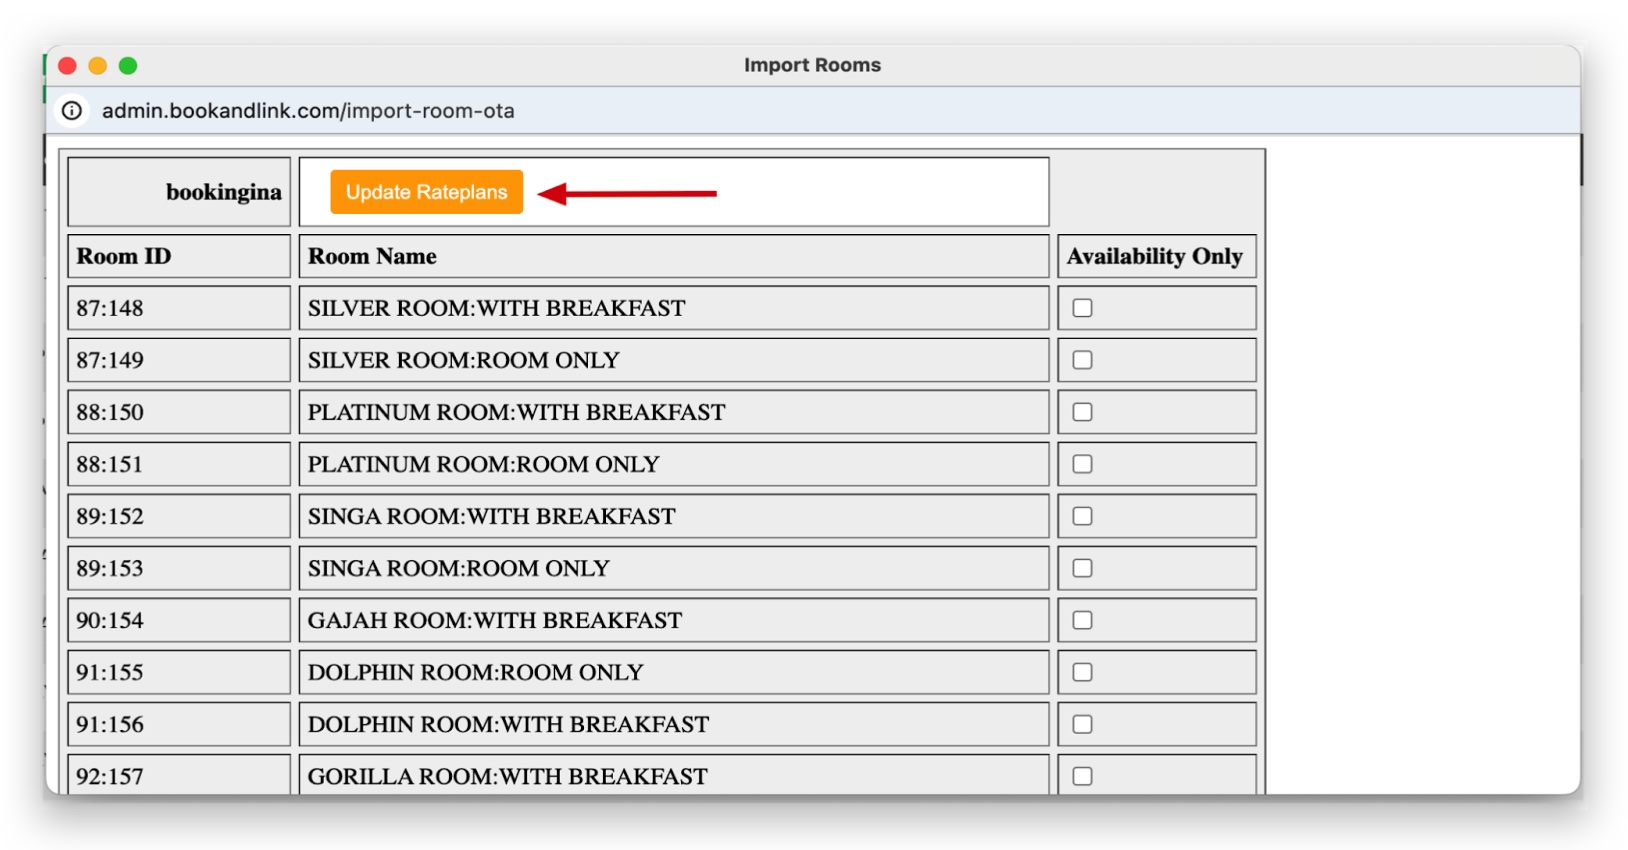
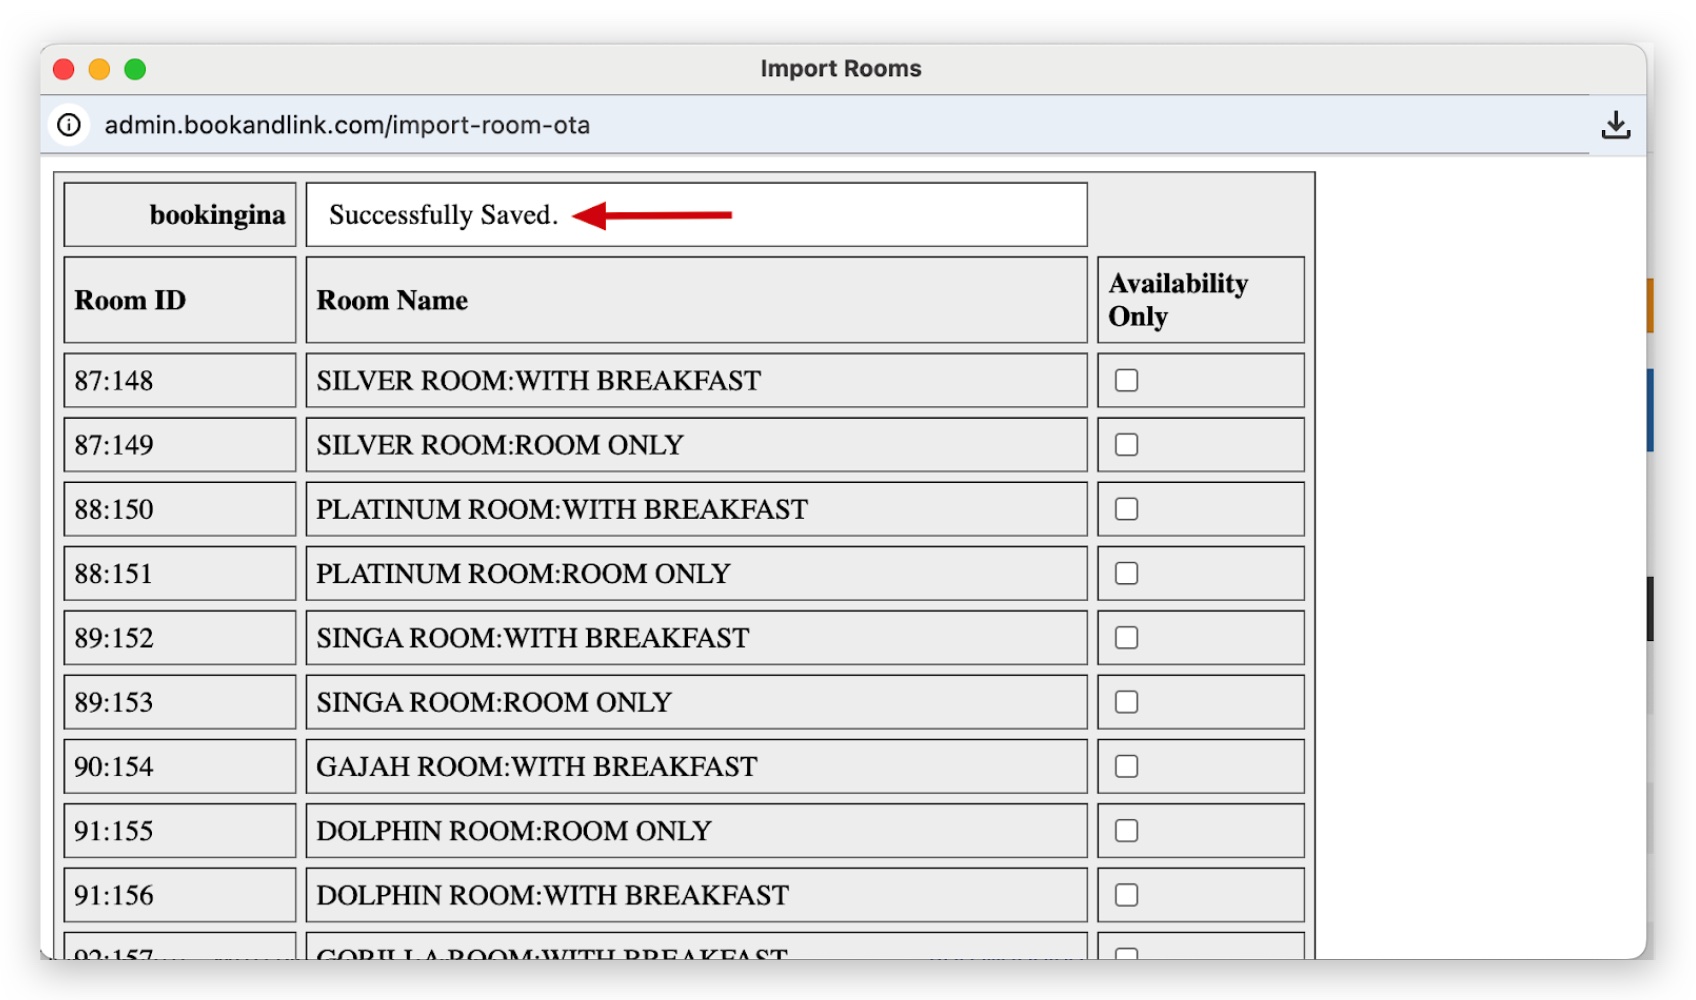
A popup will appear displaying the active rate plans. Click Update Rateplans to import the data into the channel manager. Note:
- You can also choose how the channel manager pushes updates to the OTA.
- If Availability Only is checked, only inventory will be pushed.
- If Availability Only is not checked, the system will push inventory, prices, and restrictions.
-
After a successful import, a Warning notification will appear. Click Add Mapping to start the mapping process.
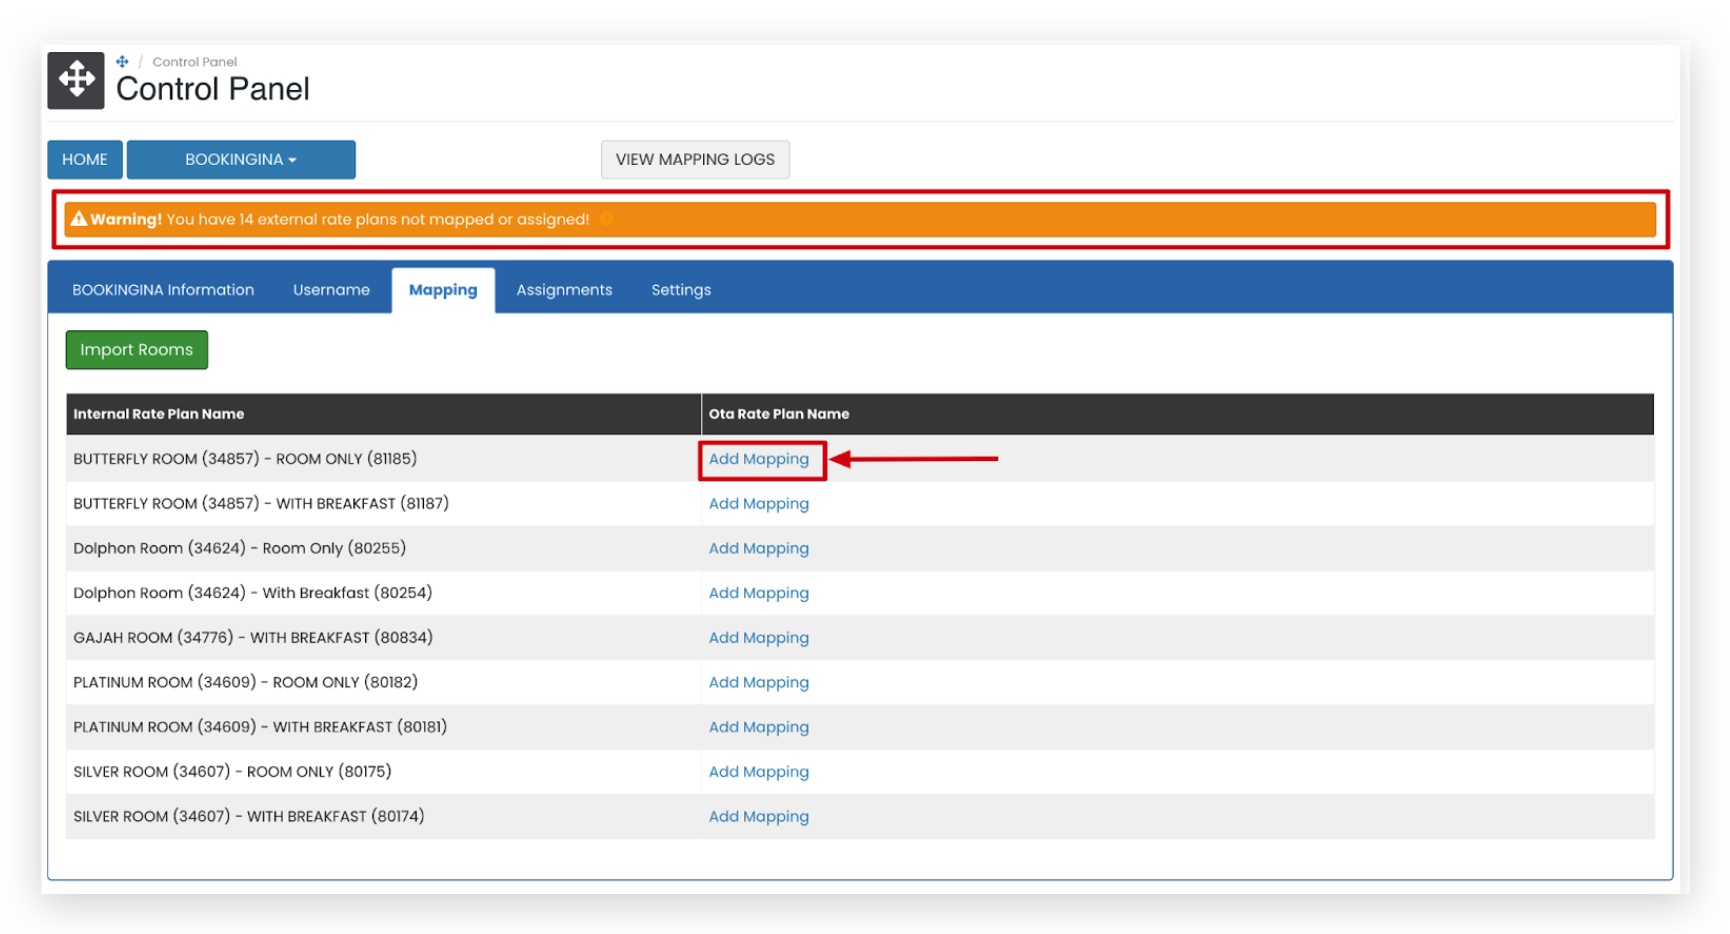
-
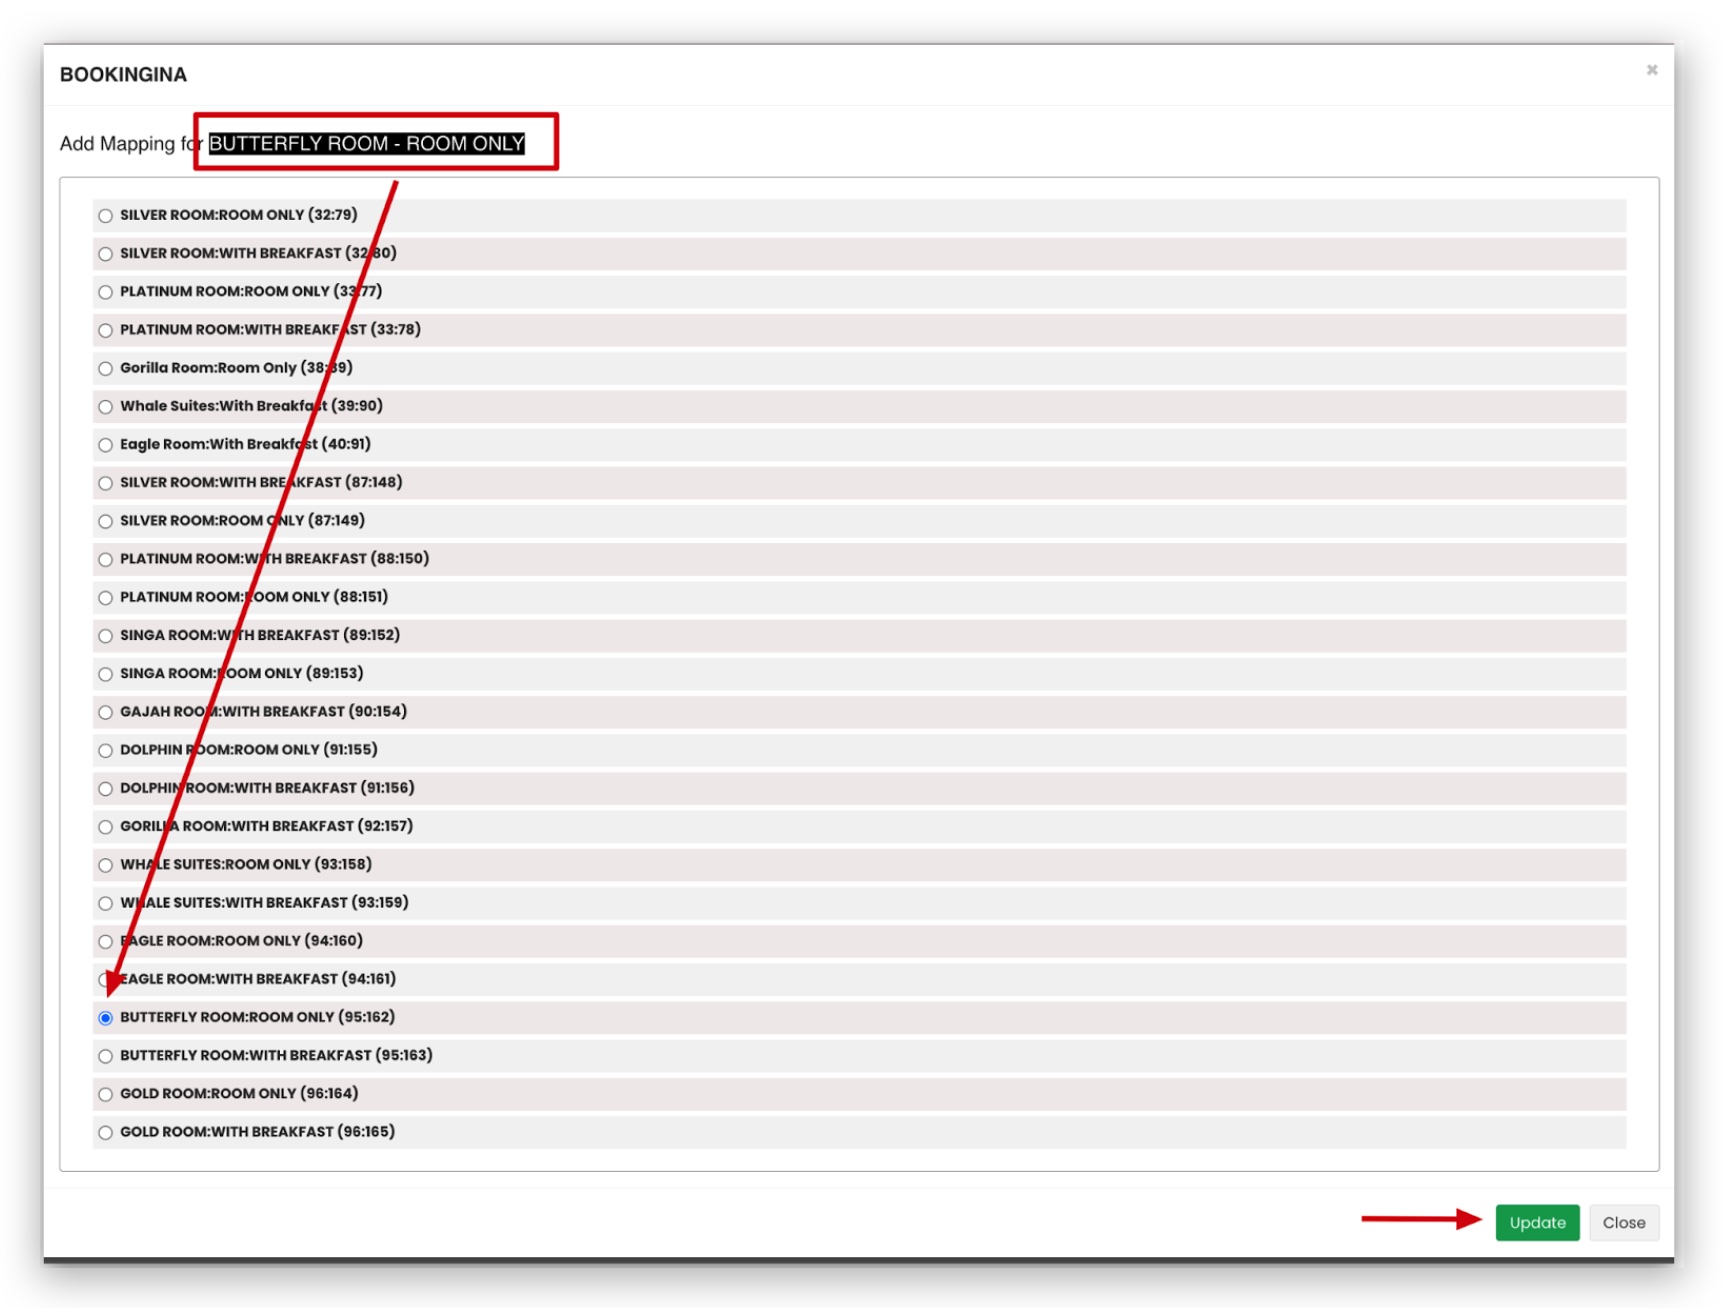
Choose the appropriate OTA rate plan that matches the internal rate plan, then click Update. Note:
- Ensure that all OTA rate plans are mapped.
- Any unmapped or unassigned rate plans may result in reservation errors.
-
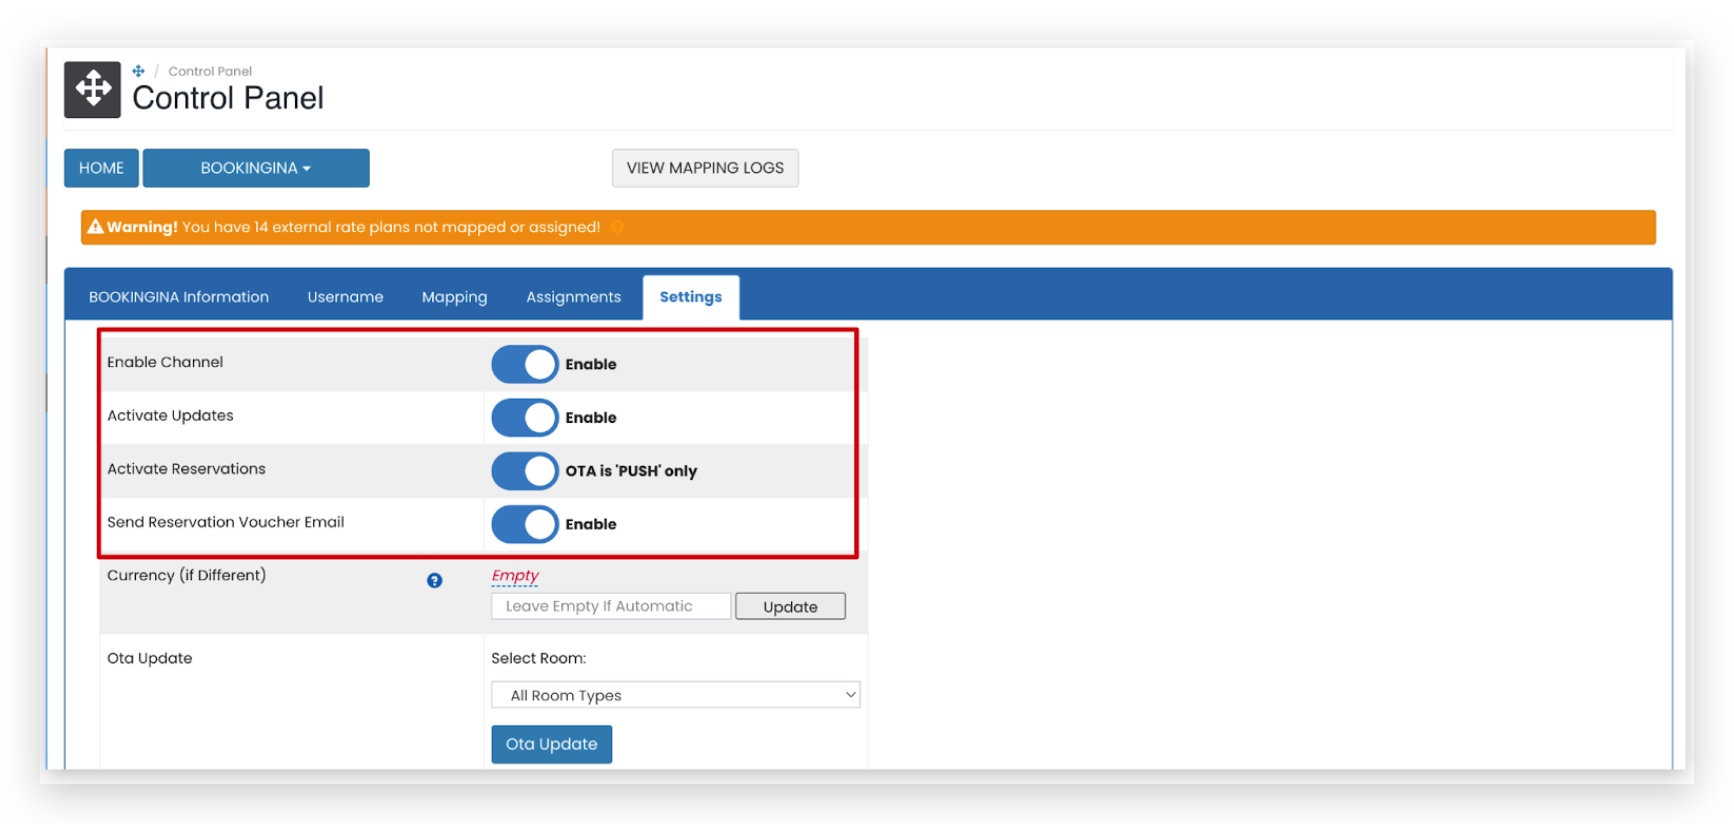
Go to the Settings tab and ensure the button is enabled.
-
**Perform an OTA Update from either Monthly Deals or Yearly Deals.
-
Confirm the update status by checking the log update and verifying on the OTA extranet.
[!NOTE]
Troubleshooting Bookingina Connection Issues
Bookingina channel is not visible in the Control Panel
- This issue usually occurs when the Bookingina channel has not been activated or added in your system.
- Make sure you have the correct access rights to view channel integrations. If the channel is missing, contact your system administrator or support team to enable it.
Hotel ID is not accepted or shows an error
- Each property is identified by a unique Hotel ID. If the Hotel ID in your integration settings doesn’t exactly match the one shown in the Bookingina extranet, the connection will fail.
- Try refreshing the page and re-entering the correct ID.
Import Room does not display any rate plans
- This typically means that no rate plans have been created in Bookingina, or the system is unable to retrieve them due to an API issue.
- If they do, try refreshing the connection or re-entering your API credentials.
- Reload the page and try the import process again.
Popup for Update Rateplans does not appear
- If the popup window for updating rate plans doesn’t appear, it may be due to a browser issue such as a pop-up blocker.
- Try disabling the pop-up blocker, clearing the browser cache, or switching to a different browser. Also, ensure that rooms have been imported first, as the popup depends on room data.
- Ensure your internet connection is stable during the import process.
Warning message appears but Add Mapping does not function
- Confirm that the imported rate plans are valid and not empty.
- Try returning to the Mapping tab and clicking Add Mapping again after refreshing.
- If the issue continues, contact the support team for technical assistance.
Mapped rate plans do not show in the mapping table
- Double-check that you clicked Update after selecting the internal rate plan.
- Make sure all required fields were selected during the mapping step.
- Refresh the page to allow the system to load the updated mapping.
Unable to enable the Settings toggle
- Ensure that the rate plan mapping process has been completed successfully.
- The toggle will remain disabled if there are missing or invalid mappings.
- Revisit the Mapping tab to confirm all required mappings are done.
OTA Update does not reflect on Dida Travel extranet
- Perform the OTA Update again using Monthly Deals or Yearly Deals.
- Check the log update section for confirmation of a successful push.
- Log in to the Dida Travel extranet to verify if the changes have taken effect.
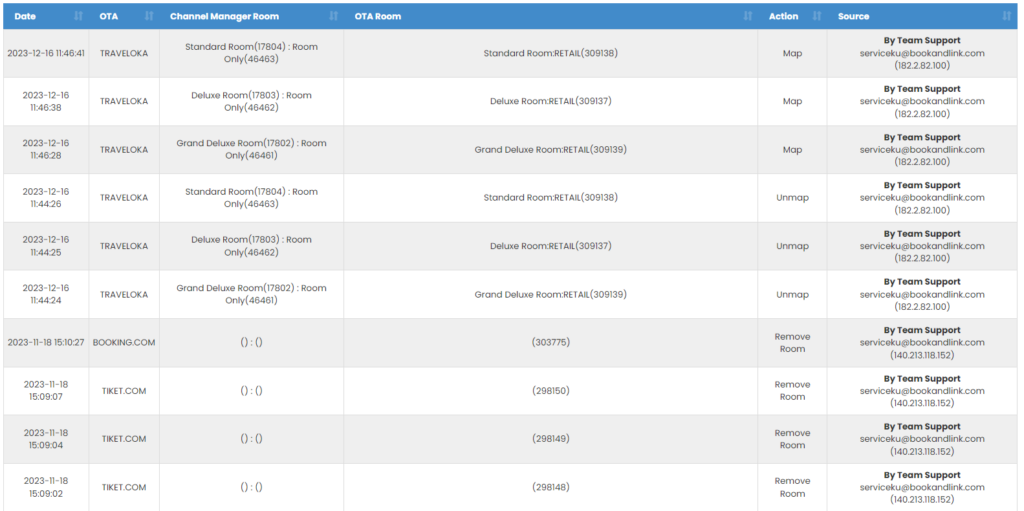
View Mapping Logs
You can access Mapping Logs from the Control Panel menu.
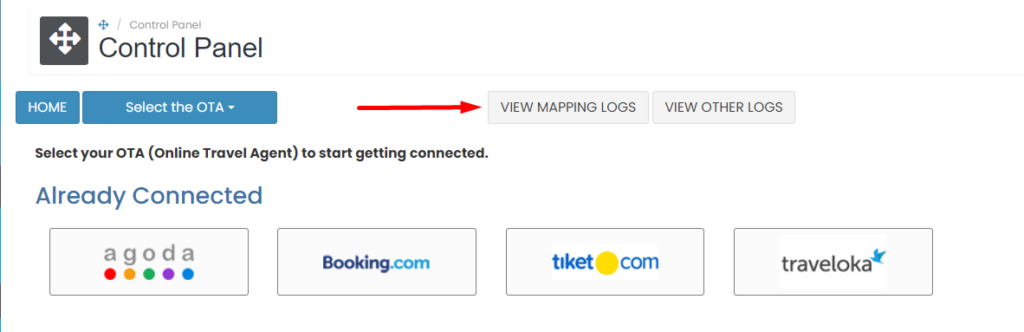
All updates made in the Mapping section will be recorded in the Mapping Logs.
[!NOTE]
Troubleshooting View Mapping Logs Issues
Mapping Logs not visible
- Ensure that you are logged in with the correct permissions to access the Control Panel.
- Confirm that there are updates made in the Mapping section, as empty logs will not display any records.
- Try refreshing the page or clearing the browser cache if the logs fail to load.
Unable to access Mapping Logs
- Check that you have the necessary privileges to view the Mapping Logs in the Control Panel.
- Ensure there are no connection issues with the server or platform causing delays in accessing the logs.
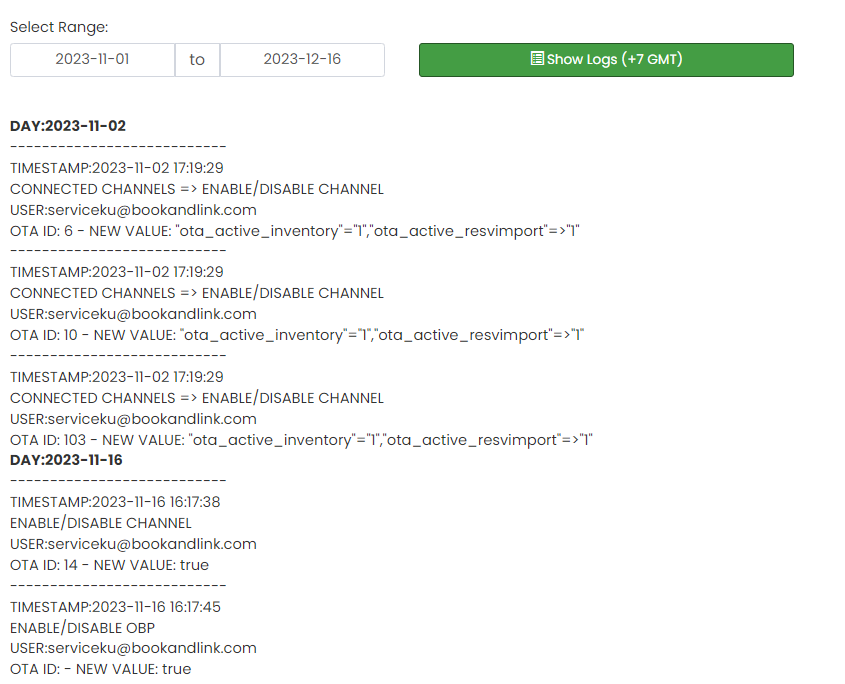
View Other Logs
You can accsess Other Logs from menu Control panel.
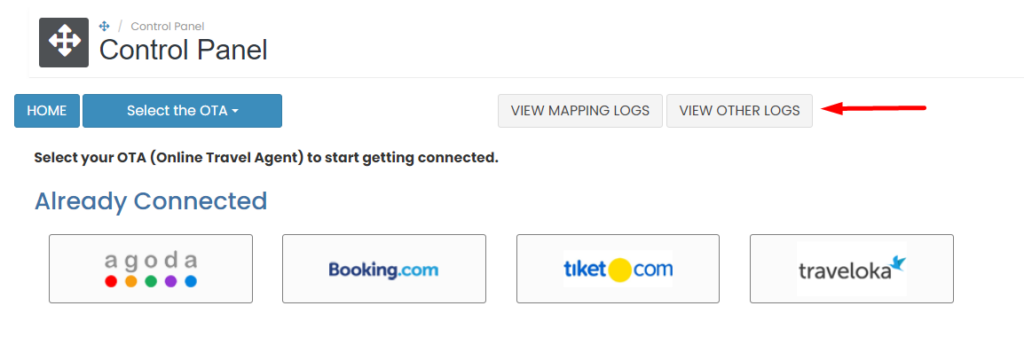
Other log will recorded activity such as : add/remove room, update room/rateplan setting, add/remove rateplan, enable/disable channel, rate multiplier set up, cancel reservation from Booking list menu, etc.
[!NOTE]
Troubleshooting View Other Logs Issues
Other Logs not visible
- Confirm that actions have been taken in the system (e.g., adding/removing rooms, updating settings) that would generate logs.
- If no logs appear, check that your user account has the necessary permissions to view these logs.
- Try reloading the page or clearing the browser cache to resolve any display issues.
Cannot access Other Logs
- Ensure your account has appropriate permissions to access Other Logs from the Control Panel.
- Make sure you are connected to the platform without interruptions. If needed, log out and log back in to reset the session.