Introduction
The Booking Chart feature in the Front Office System displays reservation information in a calendar view, with blocks indicating bookings on spesific dates for each room. This feature makes it easier to visualize occupancy levels and manage room assignments.
Room Details
At the top of Booking Chart, there is a real-time summary of room conditions, including:
- Occupancy: The percentage of rooms occupied (number of rooms booked compared to total available rooms).
- Room Available: The number of available rooms.
- Rooms Booked: The number of rooms that have been booked.
- Rooms Not Assigned: The number of reservations that have not yet been assigned to specific rooms.
- Room Status: Information on room statuses such as Ready, Clean, Dirty, Cleaning in Progress, Do Not Disturb, and Out of Order.
- Room status can be updated directly from the table using the colored pin icon.
- Click the Hide/Show toggle next to the Room Details label to collapse or expand the summary panel as needed.

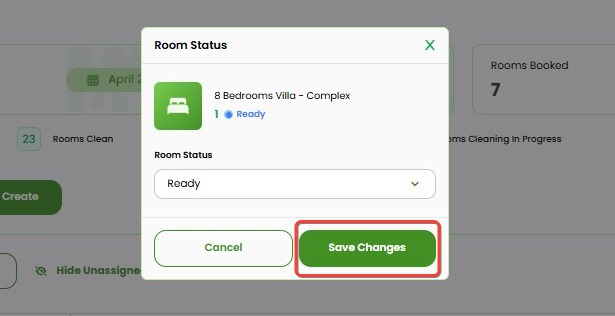
How to Update Room Status
You can update the room status directly from the Booking Chart interface by following these steps:
- Locate the Room
On the left side of the Booking Chart, find the room for which you want to update the status.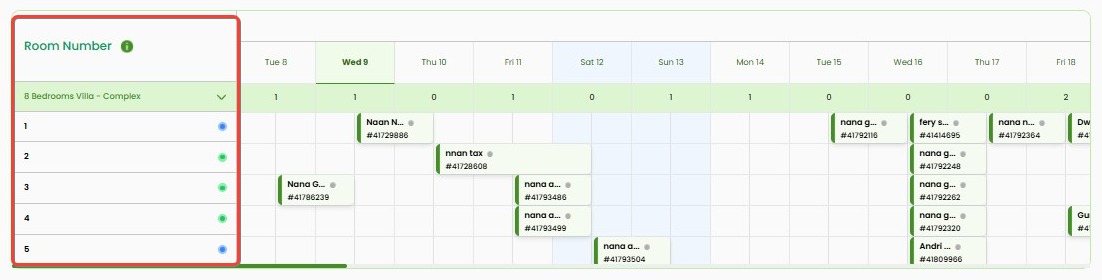
- Click the colored pin icon next to the room number.
The color of the icon represents the current status (e.g., blue for Ready, green for Clean, etc.).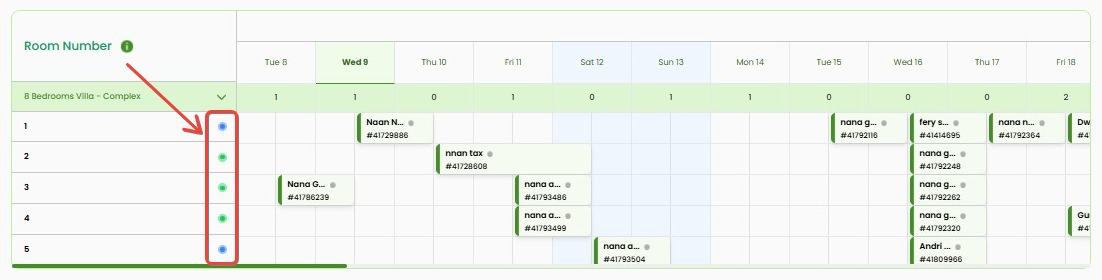
- A popup window labeled Room Status will appear.
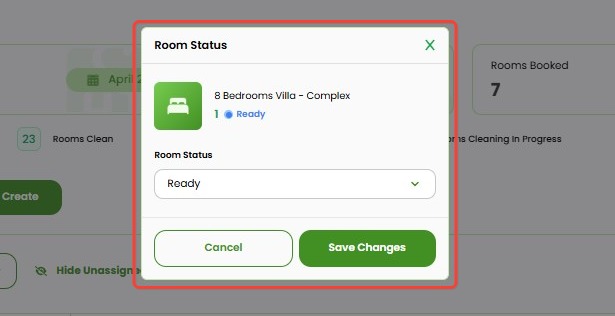
- Select the new Room Status
Use the dropdown menu to select the desired status: Ready, Clean, Dirty, Cleaning in Progress, Do Not Disturb, or Out of Order.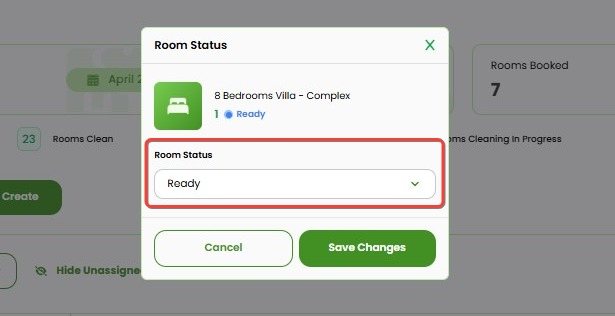
- Click the Save Changes button to apply the update.
The pin icon color will change according to the new room status.
[!NOTE]
Troubleshooting Room Status Update Issues
The Room Status popup doesn’t appear when I click the pin icon
- Refresh the page and try again.
- Ensure you have a stable internet connection.
- Try accessing the Booking Chart using a different browser.
I can’t select or see all status options in the dropdown
- Make sure you have the required permissions to update room status.
- Check if there are any role-based restrictions applied to your account.
The color of the pin icon doesn’t update after saving changes
- Try refreshing the page to confirm the update was applied.
- If the issue persists, clear your browser cache and try again.
Room status updates are not reflected in reports or other modules
- Allow a few minutes for the system to sync the update.
- If the problem continues, contact support and mention the issue along with your browser and device details.
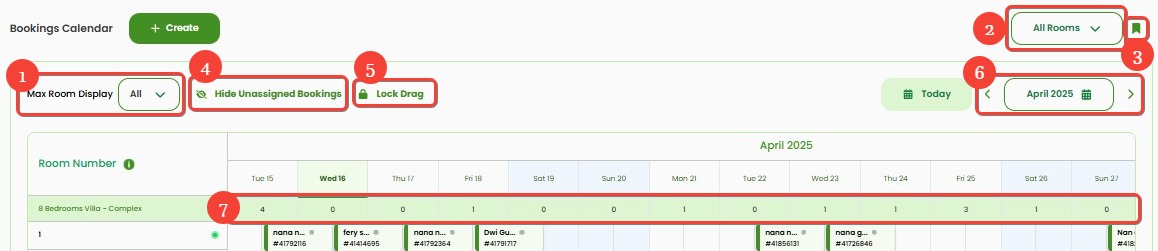
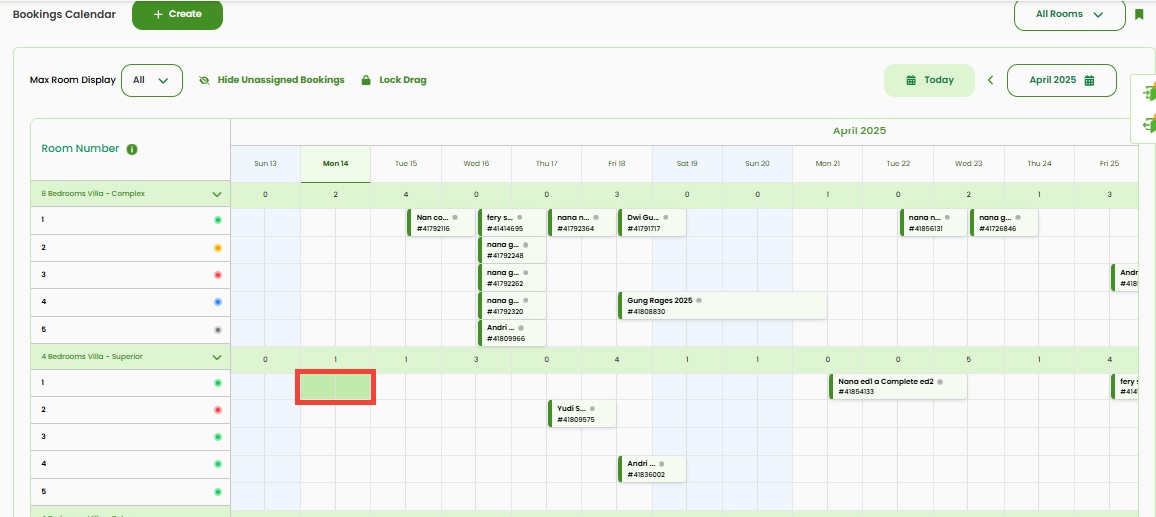
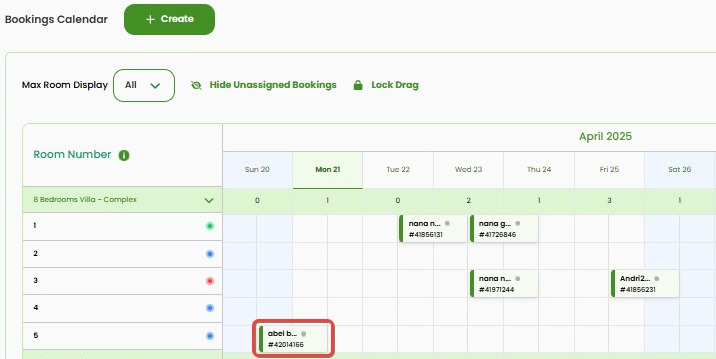
Booking Calendar
The Booking Calendar provides a visual overview of room availability, reservations, and occupancy status across dates. This calendar is the main workspace for managing daily bookings and adjustments. Key features include:
- Max Room Display: Sets the maximum number of rooms to display.
- Filter Room: Filters spesific rooms to be shown. Filter preferences can be saved.
- Save as Default: Saves preferences room as default upon loading
- Hide/Show Unassigned Booking: Hide/Show reservations that haven't been assigned to any room.
- Lock Drag: Enables or disables the drag-and-drop feature for moving reservations across dates.
- Navigation: Arrow button and date selector to switch between months or return to today's date.
- Reservation Day: Clicking on the number inside a date cell (shown in each room type row) opens a pop-up displaying detailed information for that specific date. This includes:
- Room Availability: Number of rooms still available for that day.
- Rate Plan: List of rate plans applied to the room, including rate amount, minimum stay, and stop-sell status.
- Reservations: List of existing bookings with details such as Booking ID, Guest Name, Arrival & Departure Dates, Duration, Number of Guests, Total Amount, and Source.
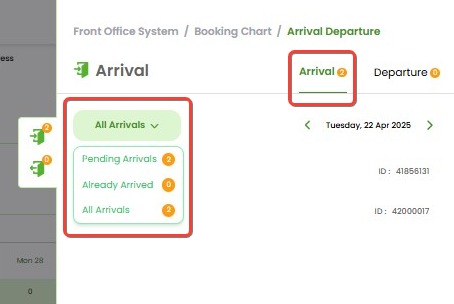
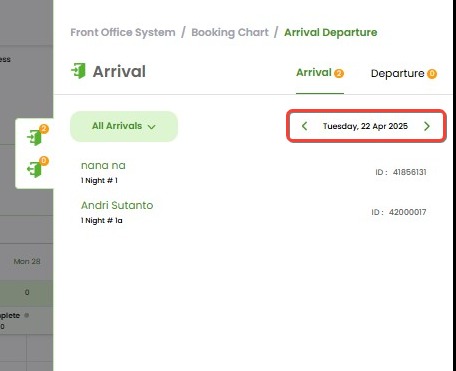
Arrival and Departure Panel
The Arrival & Departure Panel allows you to quickly view and manage guest check-in and check-out statuses. This panel is located on the right side of the Booking Chart page and provides a summary of all arrivals and departures for the selected date.
How to Access the Panel
- Go to the Booking Calendar page.
- On the right-hand side, click the Arrival & Departure Panel icon.

- The panel will expand to show two main tabs:
- Arrival: Displays a list of guests scheduled to arrive. Use the dropdown filter to refine the list:
- Pending Arrivals – Guests scheduled to arrive but not yet checked in.
- Already Arrived – Guests already completed the check-in process.
- All Arrivals – Includes both pending and already arrived guests.
- Departure: Displays a list of guests scheduled to depart. Use the dropdown filter to refine the list:
- Pending Departures – Guests who have not yet checked out.
- Already Left – Guests already completed the check-out process.
- All Departures – Includes both pending and already left guests.

- Arrival: Displays a list of guests scheduled to arrive. Use the dropdown filter to refine the list:
- To check guest arrivals and departures by date, use the arrow buttons beside the displayed date at the top of the panel:
- Left Arrow (◀) – Click to view the list for the previous day.
- Right Arrow (▶) – Click to view the list for the next day.
[!NOTE]
Troubleshooting Arrival and Departure Panel
Panel Does Not Open When Clicked
- Ensure you are on the Booking Chart page; the panel icon only appears on this page.
- Refresh the page in case of a temporary loading issue.
- Check if your user role has the necessary permission to view the panel.
Arrival or Departure List Appears Empty
- Make sure the correct date is selected using the arrow navigation.
- Check the filter dropdown to ensure you're not viewing a category (e.g., Already Arrived) with no data.
- Confirm that guest check-in or check-out statuses have been properly updated in the system.
Date Navigation Buttons Not Responding
- Try reloading the page to reset the panel function.
- Ensure there is no active modal or popup that might be blocking interactions with the arrow buttons.
Incorrect Data Displayed
- Click the Refresh button (if available) or manually refresh the browser page.
- Verify the reservation data and update any outdated check-in/out statuses from the reservation detail page.
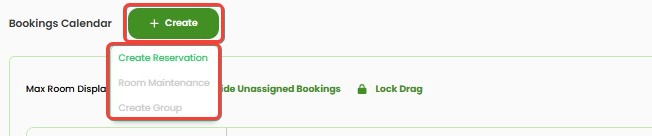
Create Reservation
Access the Create Reservation Menu
- Go to the Bookings Calendar section.
- Click the green + Create button.
- Select Create Reservation from the dropdown options.
Invoice
The Invoice tab is the starting point for creating a reservation. If the guest's email has not been registered before, you only need to enter the email and add a room to create the reservation.
-
Guest Selection:
- By default, the system assumes the reservation is for a New Guest. It will create a new guest profile using the provided email address. If the email already exists in the system, a new guest profile will not be created.
- Click the email field and input the guest email. If the entered Email matches an existing guest, a suggestion list appears. Selecting an existing email will auto-fill the Guest No field and link the reservation to that guest.

-
Invoice and Booking Details:
- (Required) Email: Enter a valid email address for the guest. This field is required to proceed with the reservation.
- If the email belongs to an existing guest with previously completed data (such as First Name and Last Name), the Room Details section may be automatically filled based on the guest’s details.
- If the email is new (not yet linked to a guest details), no room information will appear automatically. You must manually add room details, and complete the required fields (First Name, Last Name) to proceed.
- (Optional) Custom Invoice Nb: Enter a custom invoice number if the you wants to manually assign an invoice number. If left blank, the field will remain empty.
- (Optional) Invoice Date: Specify the invoice issue date. If left blank, the system will automatically set it to the date the reservation is created.
- (Optional) Booking Date: This field is auto-filled with today’s date.

- (Required) Email: Enter a valid email address for the guest. This field is required to proceed with the reservation.
-
Room Details:
- If the reservation is created by clicking cell on the Booking Chart, the system will automatically direct you to the Sub Room that was selected on the chart view.
- If the reservation is created using the + Create Reservation button, the system will automatically select the first Room in the list, while the Sub Room field will remain not assigned.
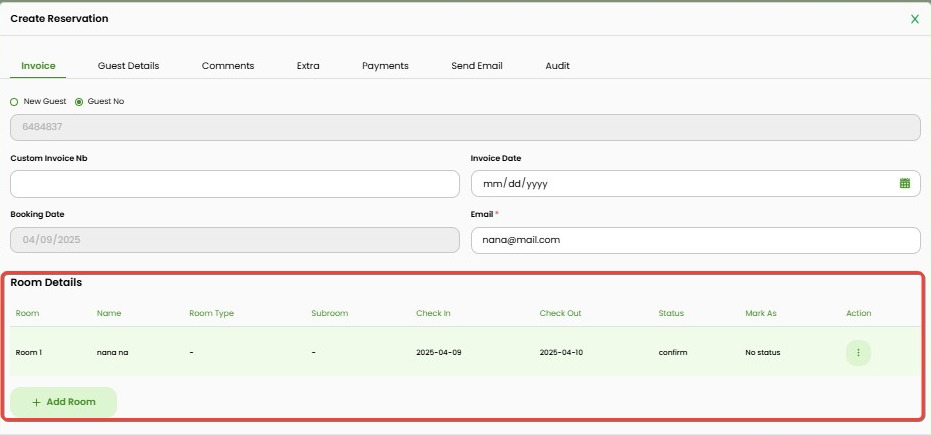
- If the reservation is created by clicking cell on the Booking Chart, the system will automatically direct you to the Sub Room that was selected on the chart view.
How to Add Room
- Click the green + Add Room button under the Room Details section.
In the Add Room popup window, fill in all required fields (usually marked with star symbol).

- Payment Type:
Select how the reservation payment is handled:- Hotel Collect: This is the default payment type, where the payment is handled directly to the hotel. It will be displayed as "Hotel Collect" in the Channel Manager (CM) or Hotelku system.
- Channel Collect: Payment will be completed through a third party, such as a travel agent or external booking platform, either online or offline. The hotel does not handle the payment directly.
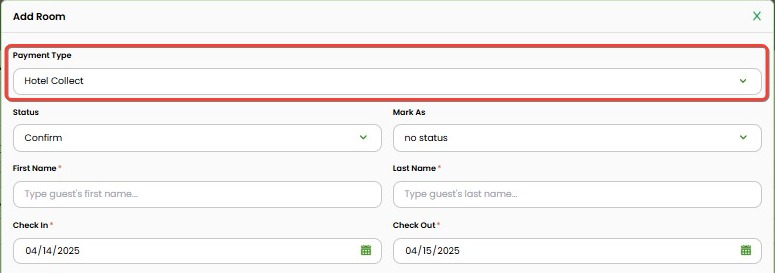
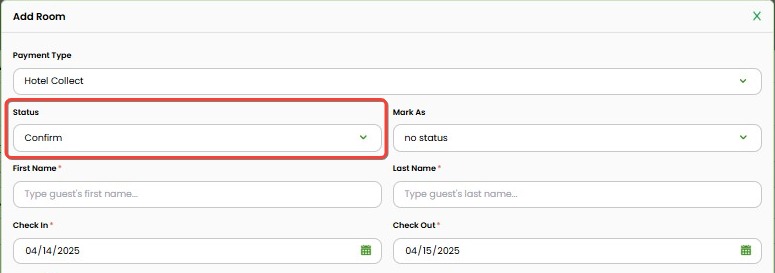
- Status:
Choose the current status of the reservation.
- Confirm: The reservation is confirmed.
- Cancel: The reservation is canceled.
- On Hold: The reservation is pending (room udah ter-block untuk guest tapi masih nunggu confirm dari guest). When this status is selected, a Release Date field will appear and is required. If the guest does not confirm or complete the payment by the release date, the system will automatically update the status to Cancel, and the room will be released back into availability.
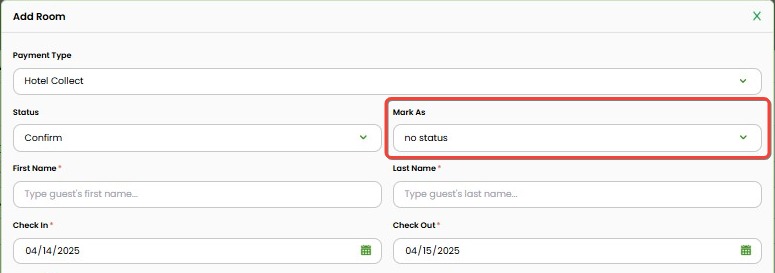
- Mark As:
Choose a label to categorize the reservation status. By default, this field is set to No Status.
- No Status: Default state with no specific label assigned.
- Check Out: Mark the reservation as checked out after the guest leaves. Note: This option is only available on or after the check-out date.
- Check In: Mark the reservation as checked in when the guest arrives.
- No Show: Select this if the guest did not arrive on the scheduled check-in date.
Note: This option is only available on or after the check-in date.
- Guest Information (Required): Input First Name and Last Name of the guest.

- Check-in & Check-out Dates (Required): Select the Check in and Check out dates.
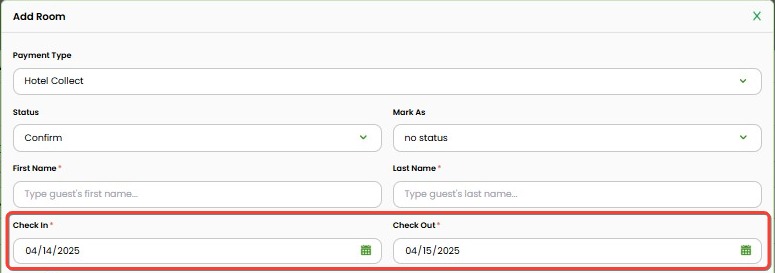
- Room & Subroom: Select the specific room and subroom (if available) to assign the reservation.

- Rate Plan: Select the applicable pricing plan (e.g., Standard Rates).

- Adults / Children: Indicate the number of adult and child guests staying in the room.

- Rate Details:
- Total Accommodation & Extras: The total amount from nightly charges (Rate, Extra Charges, Extra Pax) combined with additional items from the Extra tab — calculated before taxes and other fees.
- OTA Com: Commission taken by OTA, if applicable.
- Taxes: Total taxes as defined in Settings > Booking Policy > Tax & Other Additional Charges. All values are combined into one total amount.
- POS F&B: If the property is connected to a POS system, all purchases made from POS (e.g., food & beverage) that are linked to the guest will appear here. This field is read-only — all changes must be made directly from the POS system.
- Discount: Apply a discount by the total amount.
- Tax breakdown: Shows the total of taxes and additional charges configured in Settings > Booking Policy.
- Total Accommodation & Extras + Taxes: The final total including accommodation, extras, all additional charges such as additional tax and deducted with discount.

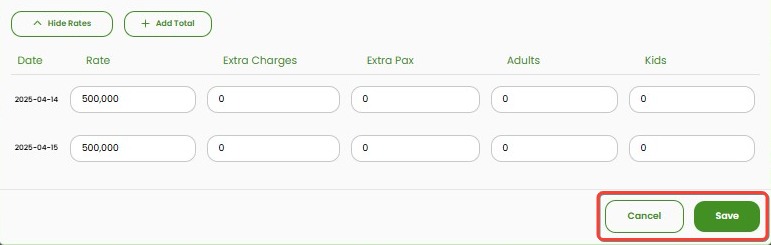
- Rate Breakdown:
If the reservation spans multiple nights, rates will appear per date.- Hide Rates: Click the Hide/Show Rates to collapse or expand the Rates panel as needed.
- Rate: The nightly room rate based on the rate settings.
- Extra Charges: Additional charges per night.
- Extra Pax: Extra charges for guests exceeding the default occupancy per night.
- Adults / Kids: Number of adults and children assigned per night.
- Add Total: Use this option to set a fixed total price for the entire stay.
- For example, if a guest stays for 4 nights and the total is 1,000,000, then set the total 1,000,000 and the system will divide it evenly into 250,000 per night.
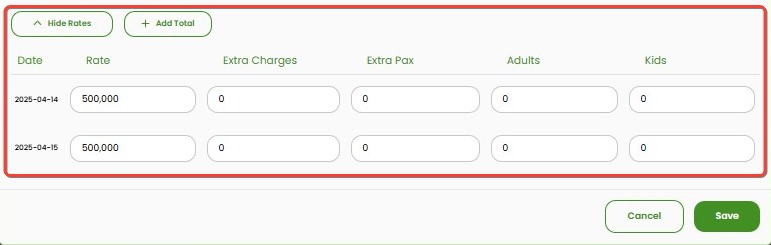
- Click Save to finalize the room details.
- Click Cancel to cancel the room addition.
- Click Cancel to cancel the room addition.
- Room Details Section
Once a room has been successfully added, it will appear in the room details section. From here, you can:
- View Details – Review the complete information related to the room and guest.
- Edit – Modify room details such as rate, occupancy, or stay dates.
- Remove – Delete the room from the current reservation if no longer needed.
- Additional rooms can also be added as required.

[!NOTE]
Troubleshooting Add Room Process
The “Add Room” button is not clickable or does not respond
- Ensure that your user role has permission to create or modify reservations. Contact your administrator if unsure.
- Refresh the page or re-login to your account.
- Try using a different browser or disable any browser extensions that might interfere.
Required fields are not saving even after filling them in
- Double-check all required fields, especially those marked with a star symbol (*).
- Make sure the check-in and check-out dates are correctly selected and the room type is assigned.
- If using "On Hold" status, the Release Date must be filled.
Guest information or room details do not appear after saving
- Wait a few seconds and scroll down to see if the room has been added under the Room Details section.
- If still missing, refresh the page. The system may need time to update.
- Check your internet connection to ensure data was properly submitted.
Incorrect rate distribution when using “Add Total”
- Verify the total value entered matches your intended full stay total.
- The system automatically distributes the total evenly per night. If you need different nightly rates, input them manually instead.
Changes to POS F&B or Tax values not reflected
- POS-related charges are read-only and must be updated directly in the connected POS system.
- For tax changes, go to Settings > Booking Policy > Tax & Other Additional Charges, then return to the reservation and recheck the values.
Unable to save the room
- Confirm all mandatory fields are completed.
- Review for any validation errors displayed on the form.
- Check if you have internet connectivity and try again.
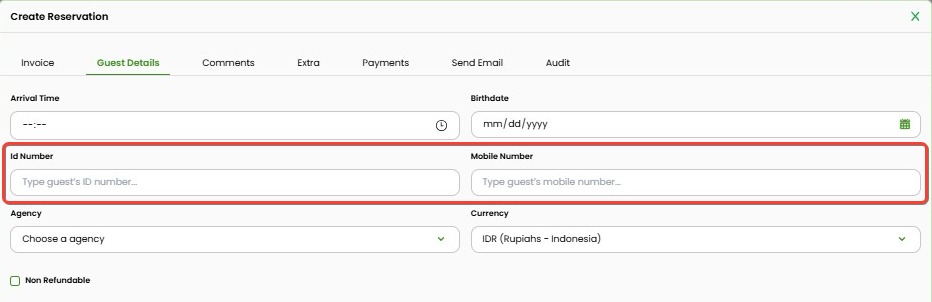
Guest Details
Guest Details are used to record additional information about the guest, such as arrival time, ID number, and other personal data. This information can be filled by either the property or the guest via the Guest Portal.
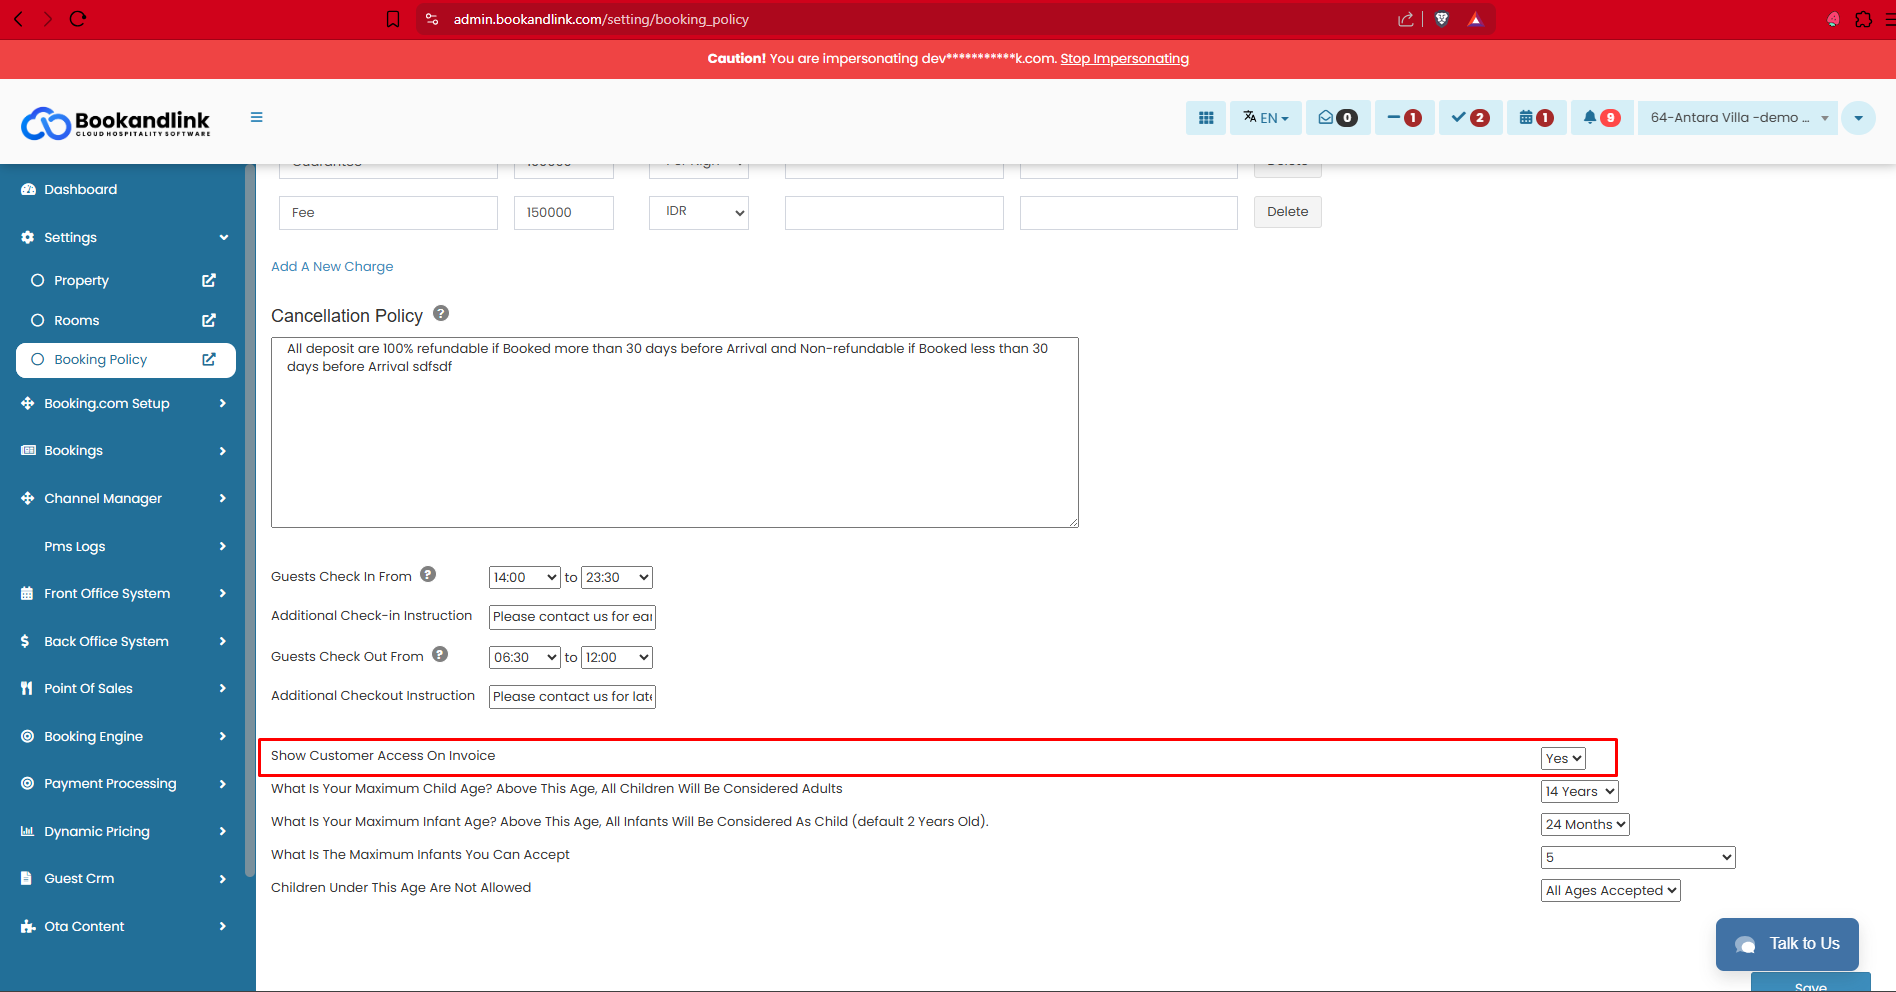
The completion of the Guest Information and Guest Details tabs does not impact the guest's access to the Guest Portal. The access will be automatically created upon reservation, provided that:
- The guest's email is filled during create reservation process.
- The Show Customer Access on Invoice option is enabled in the Settings > Booking Policy menu.
How to Add Guest Details
The Guest Details section filled and used to record additional information about the guest making the reservation. The data entered here is intended for the property’s internal use that will be recorded in Guest Database, such as:
- Arrival Time: The guest’s expected arrival time.
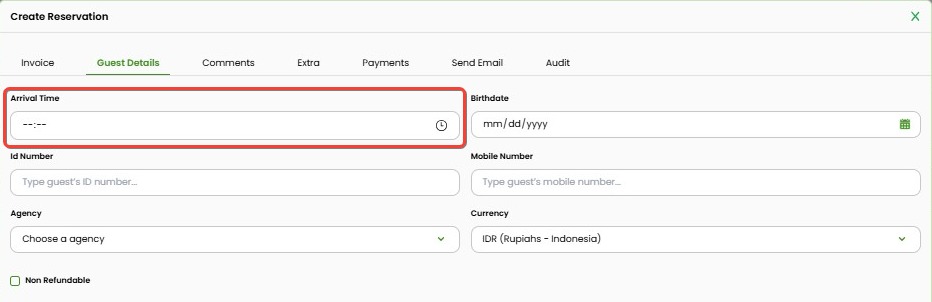
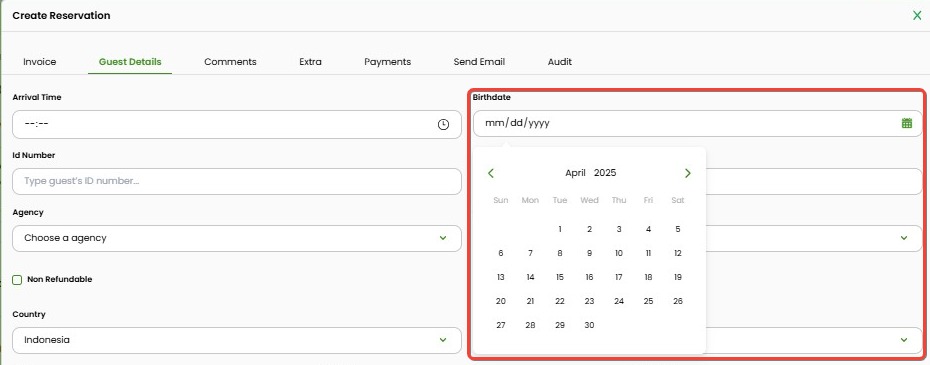
- Birthdate: The guest’s date of birth.
- ID Number and Mobile Number: Guest’s identification and contact details.
- Agency:
- Select the offline agency that made the reservation, if applicable. Agency options can be managed and customized by the property through FOS > Agent Settings.
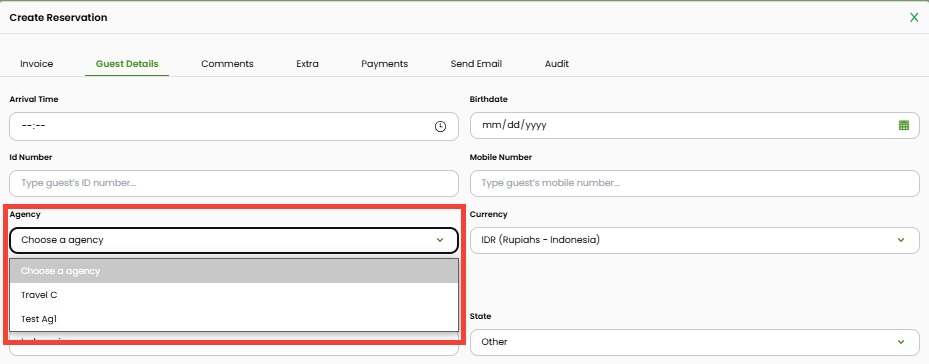
- Select the offline agency that made the reservation, if applicable. Agency options can be managed and customized by the property through FOS > Agent Settings.
- Currency:
- Select the preferred currency for the reservation. By default, it follows the property’s currency setting configured in Settings > Property.
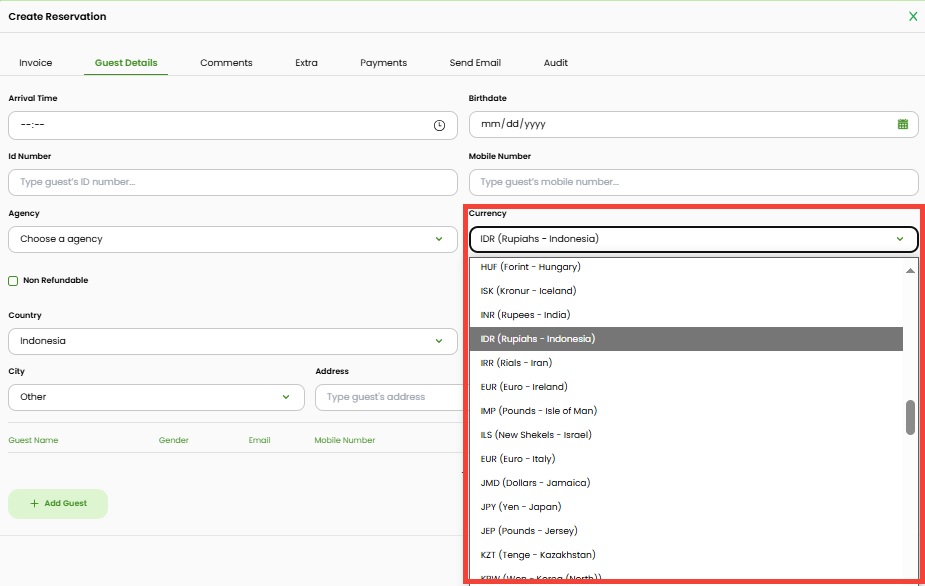
- Select the preferred currency for the reservation. By default, it follows the property’s currency setting configured in Settings > Property.
- Non-Refundable:
- Check this option if the reservation is non-refundable.
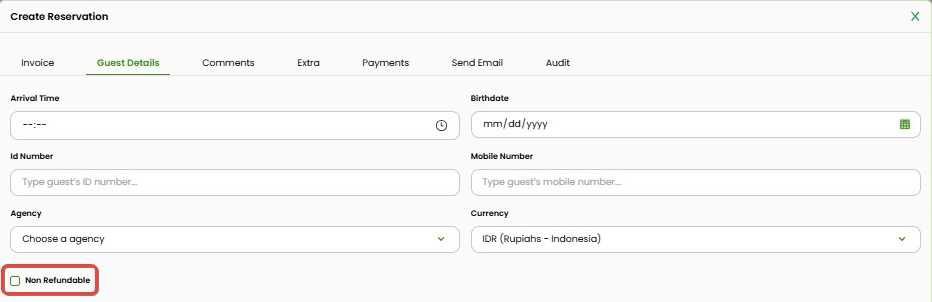
- Check this option if the reservation is non-refundable.
- Country, State, City:
- Select the country, province/state, and city according to the guest’s address.
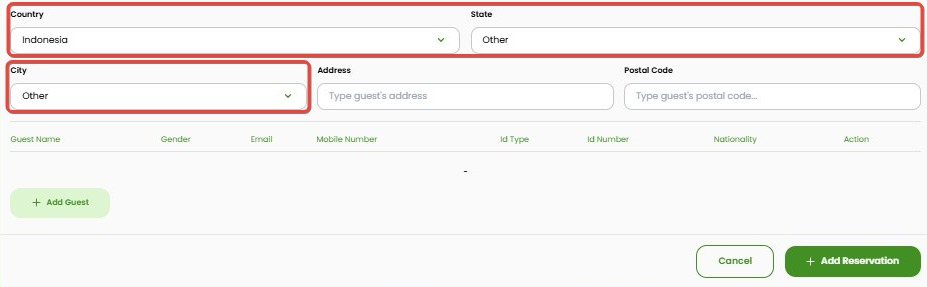
- Select the country, province/state, and city according to the guest’s address.
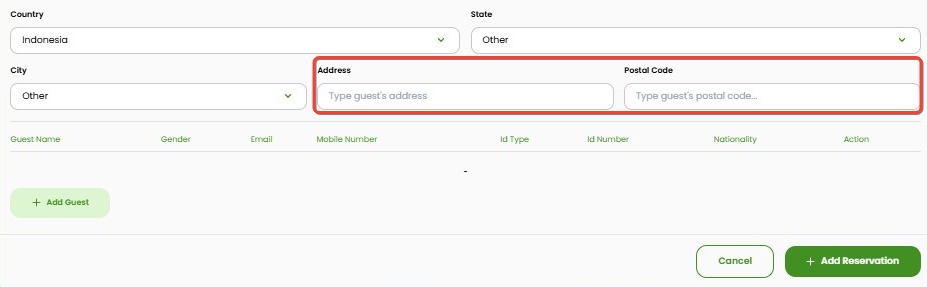
- Address and Postal Code:
- Enter the guest’s full address and Input the postal or ZIP code associated with the guest’s address.
- Enter the guest’s full address and Input the postal or ZIP code associated with the guest’s address.
This section is not mandatory but helps provide a more complete record of the guest’s information.
[!NOTE]
Troubleshooting Guest Details Section
Guest Details section is not editable or fields are disabled
- Ensure the page has fully loaded before interacting with the form.
- Check your internet connection and refresh the page if needed.
- Try accessing the page using a different browser or clear your browser cache.
Guest data disappears after entry
- Make sure to click Save Guest after filling in the information.
- Avoid switching tabs or refreshing the page before saving.
- If the issue persists, re-enter the data and ensure all required fields are completed before saving.
Offline agency name not available in dropdown
- Confirm that the agency has been added through FOS > Agent Settings.
- Only agencies listed there will appear as options during reservation entry.
- Contact the system administrator if you don’t have access to Agent Settings.
Currency selection is not showing expected default
- The default currency follows the property’s settings in Settings > Property.
- For example, if the property is in Japan, the default will be JPY.
- You can still manually select a different currency for specific reservations.
Saved guest not appearing in the list
- Make sure you clicked Save Guest after completing the form.
- If you clicked Cancel, the guest data will not be saved.
- Try re-entering the information and saving again.
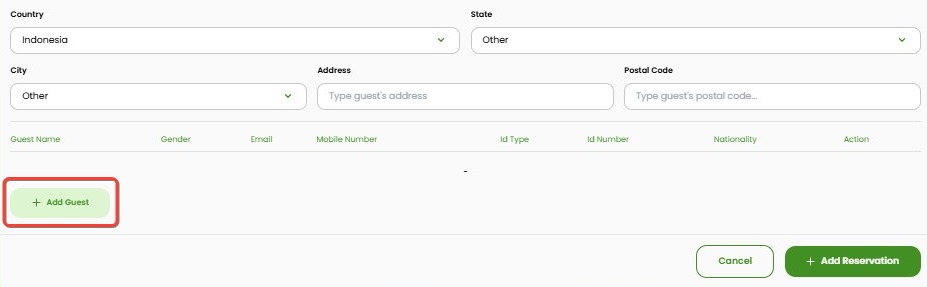
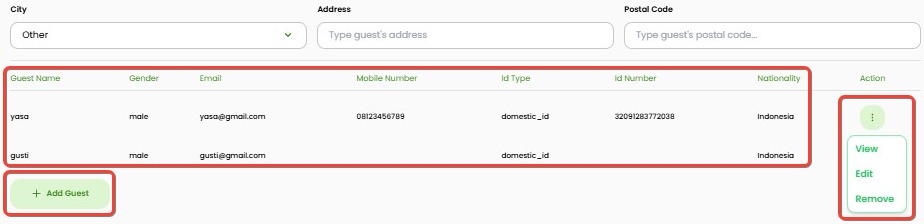
How to Save Guests
If a reservation includes more than one guest (e.g., multiple guests sharing one room), you can add the additional guest details using the + Add Guest button at the bottom of the Guest Details section. The saved data will not appear on the invoice but will be linked under the same reservation.
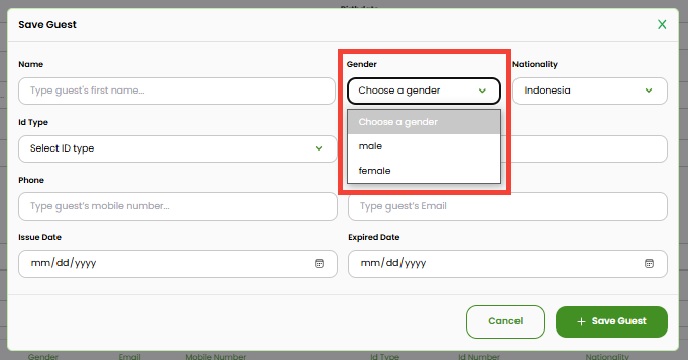
- Click + Add Guest to open the Save Guest popup window.
 Fill in the guest details:
 - Name: Guest’s first name.
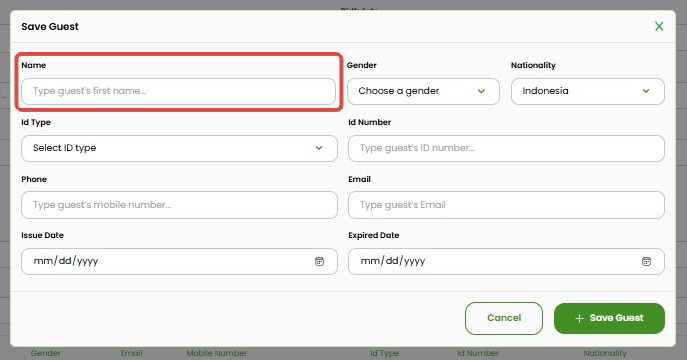
- Gender: Select male or female.
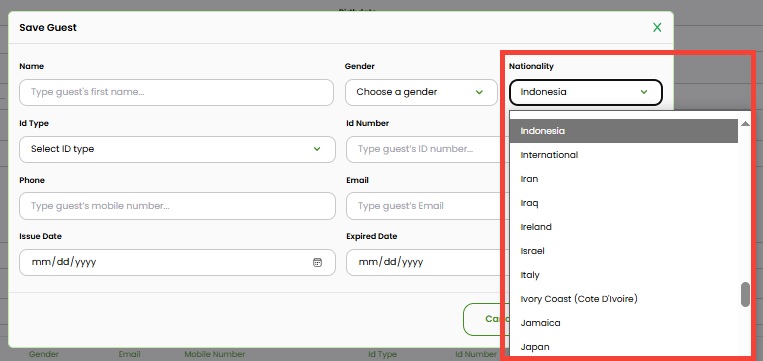
- Nationality: Default is Indonesia, but can be changed as needed.
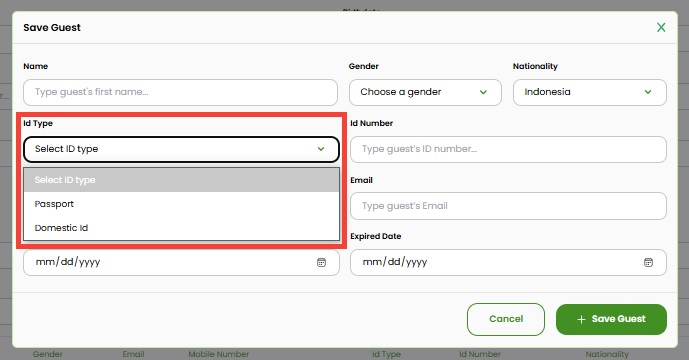
- ID Type: Select the guest's type of identification:
- Passport
- Domestic ID
- ID Number: Enter the guest’s ID number.

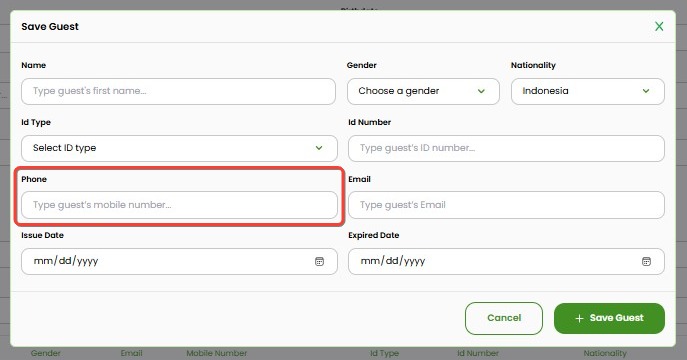
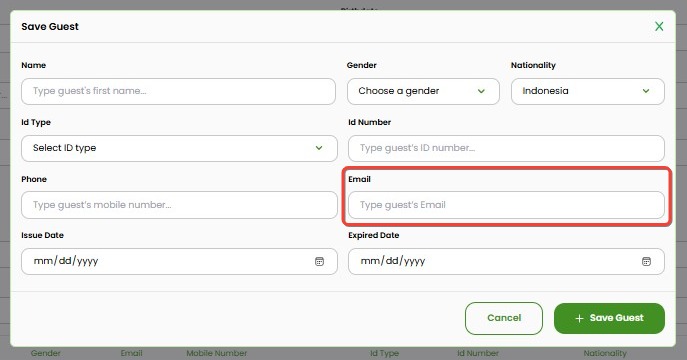
- Phone: Enter the guest’s phone number.
- Email: Enter the guest’s email address.
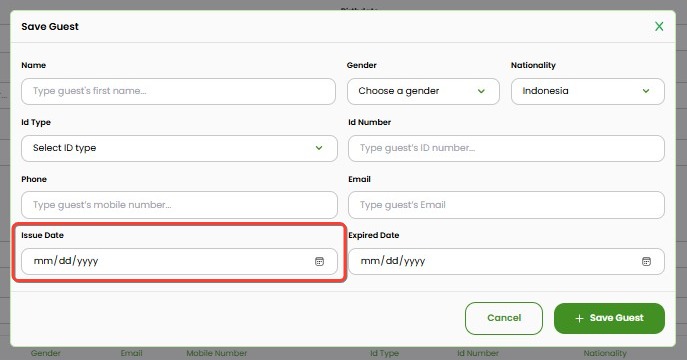
- Issue Date: The date the ID was issued (if applicable).
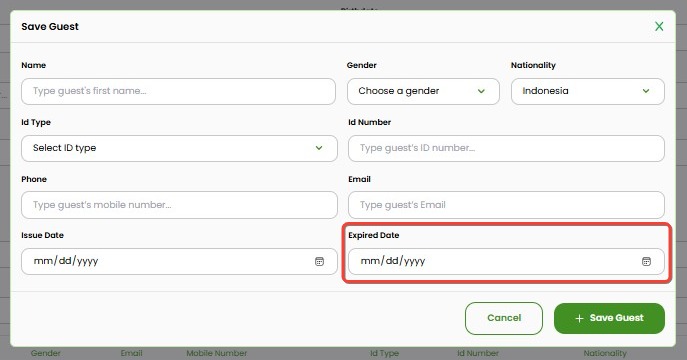
- Expired Date: The ID’s expiration date (if applicable).
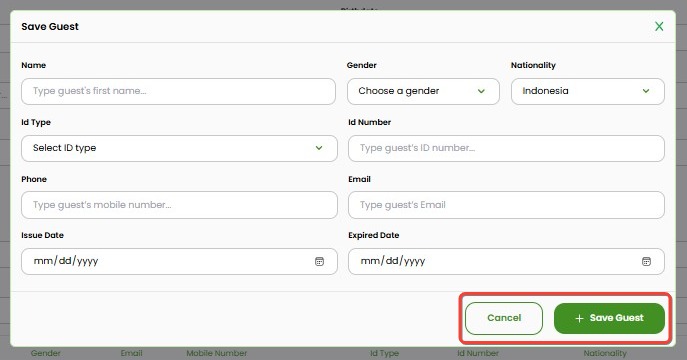
- Click Save Guest to save the guest’s information.
- Click Cancel to close the window without saving.
- Click Cancel to close the window without saving.
- Once saved, the guest you save will be shown in the table at the bottom of the page. From here, you can:
- View – Review the complete information related to the guest.
- Edit – Modify guest details such as name, gender, ID Type, or Email.
- Remove – Delete the guest from the list if no longer needed.
- Use + Add Guest to add more guests under the same reservation.
 This information is only used by the property for internal records and will not appear on the invoice.
[!NOTE]
Troubleshooting Save Guest Section
Save Guest popup does not appear after clicking + Add Guest
- Ensure the page is fully loaded before clicking the + Add Guest button.
- Try refreshing the page or using another browser.
- If the problem persists, clear your browser cache and try again.
Cannot save guest details
- Make sure all required fields (such as Name, Gender, ID Number and Email) are filled in correctly.
- Check if the input format is valid (e.g., proper email format, valid date selection).
- Ensure there are no blank spaces at the beginning of fields like name or email.
Guest not listed after clicking Save Guest
- If you clicked Cancel instead of Save Guest, the data will not be stored.
- Try re-entering the details and ensure to click Save Guest.
- Wait a few seconds after saving to allow the list to refresh.
View/Edit/Remove buttons are not responding
- Try reloading the page to reinitialize the guest table actions.
- Disable any ad blockers or browser extensions that might interfere with UI scripts.
- If the issue continues, try using a different browser.
Guest email or ID input is rejected
- Double-check for unsupported characters or extra spaces.
- For email, ensure it follows the correct format (e.g., user@example.com).
- For ID number, confirm it matches the required length/type based on ID Type selected.
Comments
The Comments tab allows you to record any additional notes related to the reservation. This section is helpful for documenting special requests, internal notes, or important information that may not fit in other fields. There are two types of comment fields:
- Guest Comment
This field is used to record special requests from the guest.
The content depends on the source of the reservation:
- If the reservation comes from an OTA and the guest adds a comment during booking, the comment will automatically appear in this field.
- If the reservation is created directly by the property (e.g., via phone, WhatsApp, or walk-in), the hotel staff can manually enter the guest’s request.
This field is considered public but is not displayed on the Guest Portal. It serves as a reference for the property to handle the guest’s special needs.
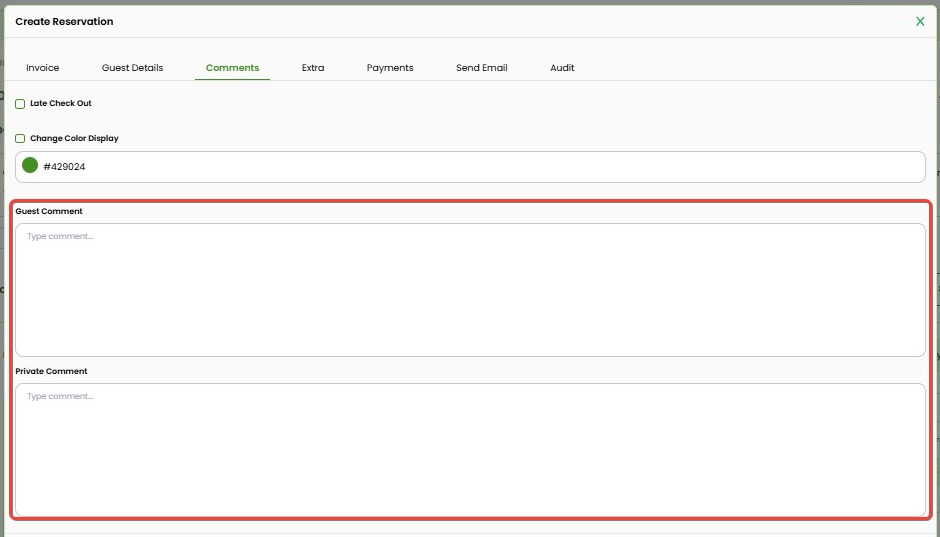
- Private Comment
This field is reserved for internal notes. It is not visible to the guest and is used only by the staff managing the reservation.
Additional options available:
- Late Check Out
Check this option if the guest is allowed a late check-out beyond the standard time. - Change Color Display
Enable this option to modify the reservation block color in the calendar view. You can select a custom color using a hex code.
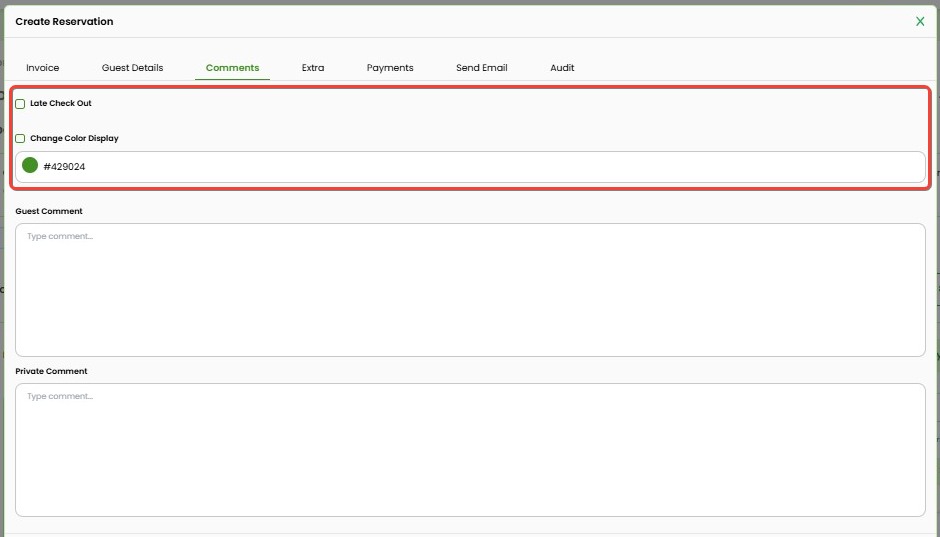
How to Change Color Display
To customize the reservation color on the calendar view, follow these steps:
- Open an existing reservation or create a new one
Access a reservation where you want to change the color display.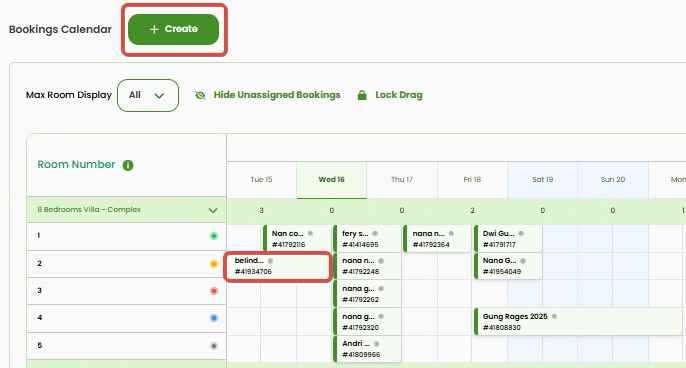
- Click the Comments section
In the reservation page, locate the Comments section.
- Enable Change Color Display
Check the box labeled Change Color Display to activate the color picker.
- Choose a color
- Click the color box to open the color picker and select your preferred color.
- Alternatively, enter a specific hex code in the provided field (e.g.,
#FF9900).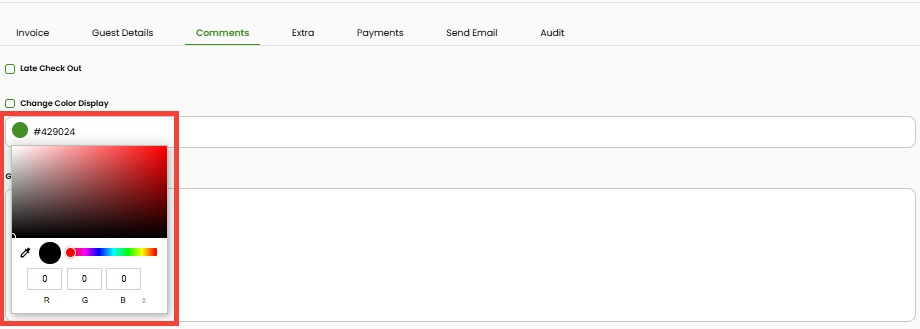
- Save the reservation
Click Save at the bottom of the page to apply the color change.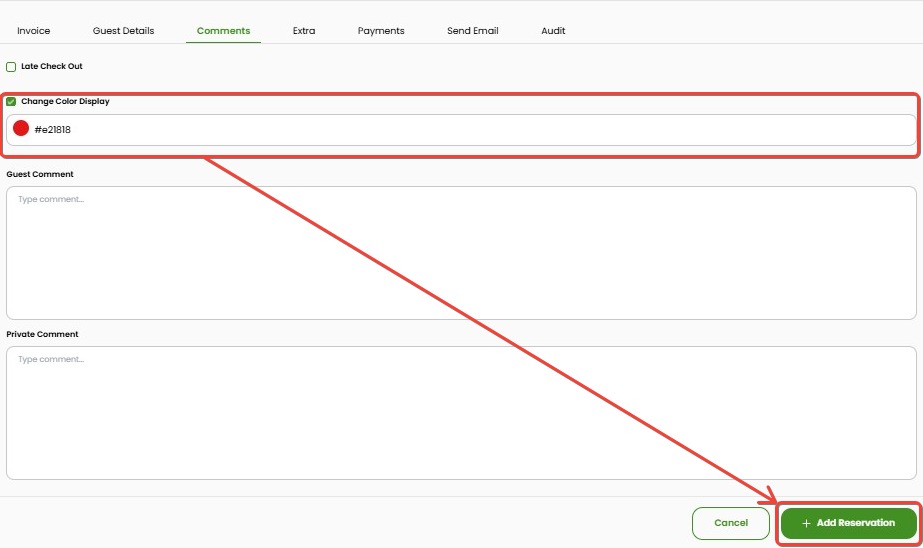
- View on Booking Calendar
The reservation block will now appear in the selected color on the calendar view, helping differentiate it from others.
[!NOTE]
Troubleshooting Comments Section
Guest Comment is not appearing for OTA reservations
- Ensure that the guest provided a comment during the OTA booking process.
- Check if the reservation integration with the OTA platform is functioning properly.
- Refresh the reservation page or re-sync the reservation from the OTA.
Guest Comment is visible, but the content is not accurate
- The guest comment may have been edited manually by staff after the reservation was created.
- Verify the original booking source and check logs or communication history if available.
Private Comment is not saving
- Make sure all required fields are filled before clicking Save.
- Check your internet connection and retry saving.
- If the issue persists, try clearing browser cache or switching to a different browser.
Color Display not changing after saving
- Confirm that the Change Color Display option is checked.
- Make sure a valid hex color is selected.
- After choosing the color, click Save and refresh the Booking Calendar to see the update.
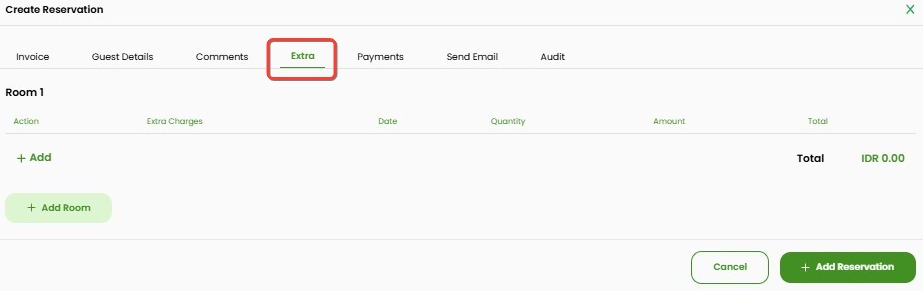
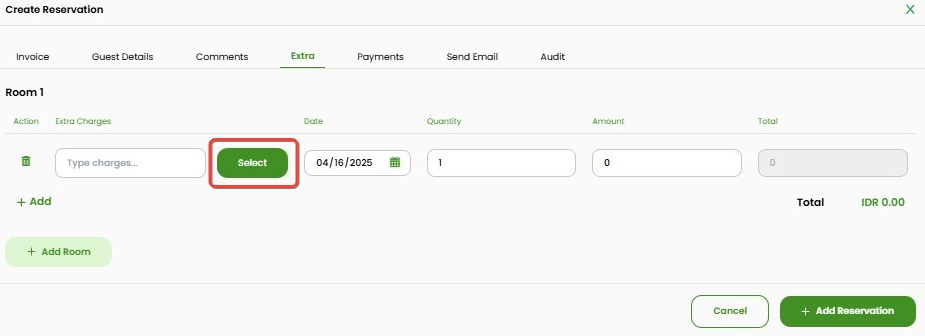
Extra
The Extra tab is used to add extra charges to a reservation, such as food services, beverages, laundry, or other special requests that are not included in the room rate. This feature allows the property to record and calculate additional charges transparently, which will be listed in both the dedicated Extra Invoice and the Invoice.
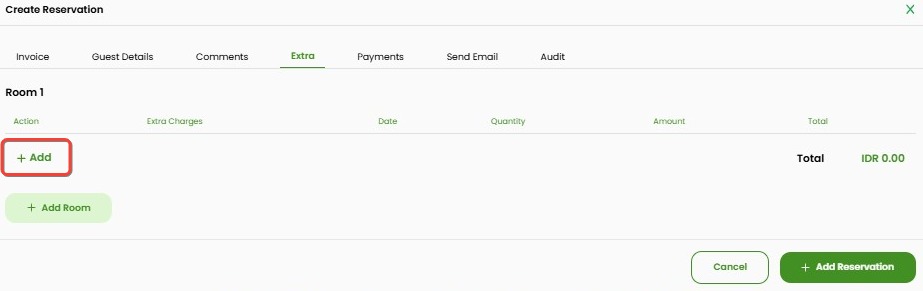
How to Add Extra
Follow the steps below to add extra charges to a reservation:
- Open the Extra Tab
Access the Extra tab from the reservation detail page.
- Click the + Add button to display the fields for adding additional services.
You must ensure the reservation already includes at least one room in Invoice tab before adding extra charges. Extras cannot be added to a reservation without a room.
- You now have two options:
- From Special List:
- Click the Select button to open the Special List window. Special List items can be managed in FOS → Stock Inventory.
- Choose a category (e.g., Food, Beverages, or any other available category).
- Select an item from the list.
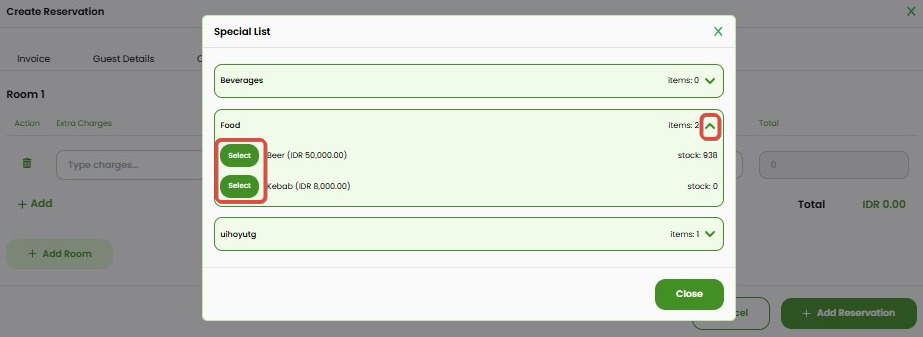
- The system will automatically fill in the Type Charges and Amount fields, and set Quantity to 1 (you may adjust it).

- Click the Select button to open the Special List window. Special List items can be managed in FOS → Stock Inventory.
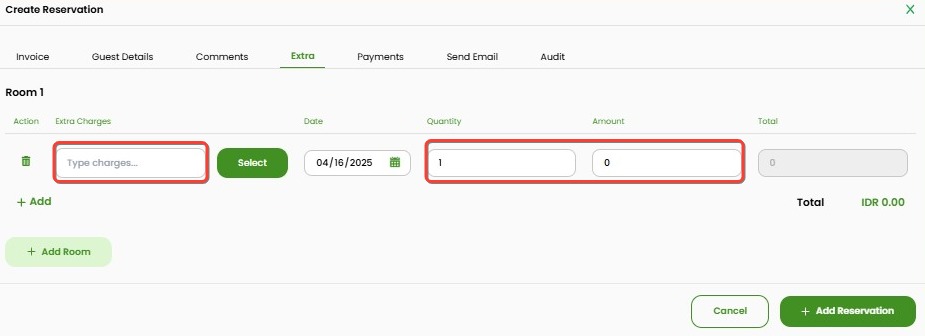
- Manual Input:
- Skip the Select button if the service is not in the list.
- Directly type the name of the service in the Type Charges field.
- Enter the Quantity and Amount manually.
- From Special List:
- Service Details:
- Date: The date the service is provided. By default, today’s date is selected, but you can modify it.
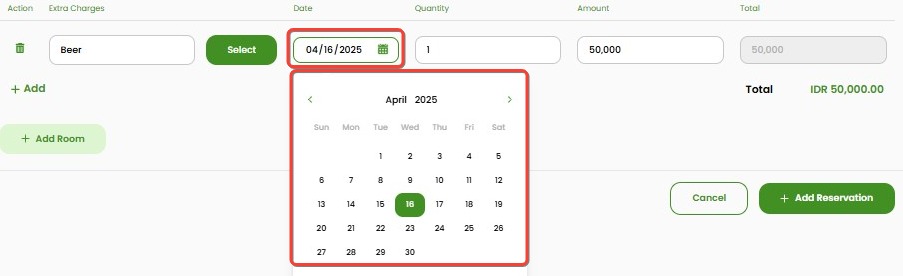
- Total will be automatically calculated as Quantity x Amount and updated in real time.
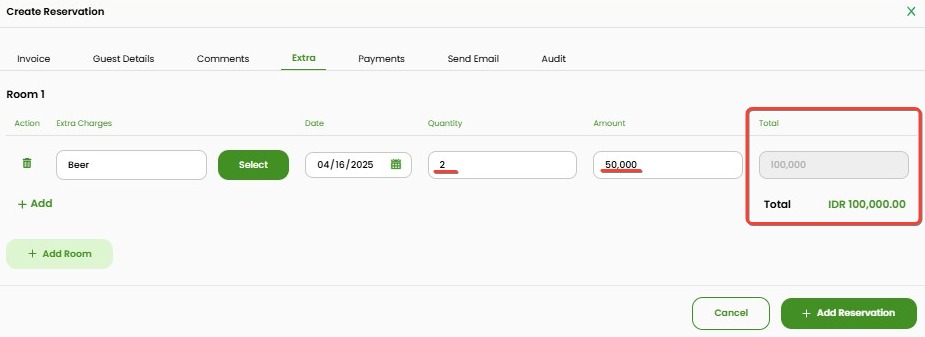
- Date: The date the service is provided. By default, today’s date is selected, but you can modify it.
- Delete Extra Charge
To remove an extra charge entry, click the trash icon on the left of the row.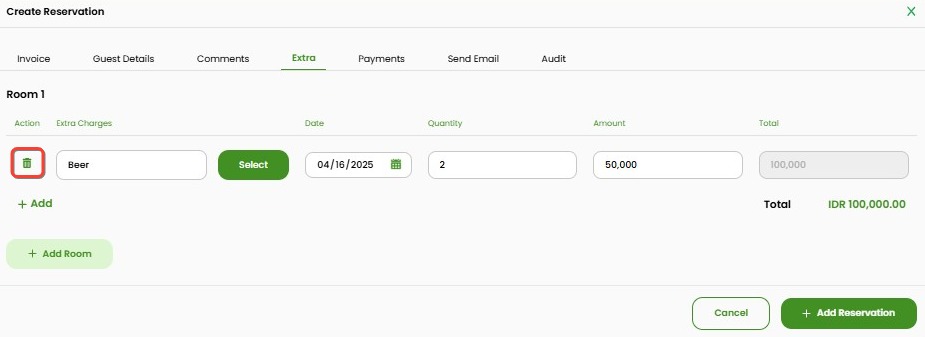
[!NOTE]
Troubleshooting Extra Charges
“+ Add” button is clicked but no fields appear
- Make sure you are on the Extra tab and not in another section of the reservation.
- A reservation must have at least one room added in the Invoice tab before you can add extra charges.
- Try refreshing the page if the issue persists.
- Ensure JavaScript is enabled in your browser.
Special List window does not open or shows empty categories
- Confirm that the Select button is clicked properly.
- If the Special List modal is empty or loading indefinitely, check your internet connection.
- Special List items are managed in FOS → Stock Inventory.
Selected item does not auto-fill Type Charges or Amount
- This may happen if the item in the Special List is not properly configured.
- Contact the admin to review the item details in the Stock Inventory setup.
Total is not calculating correctly
- Ensure both Quantity and Amount fields are filled with valid numbers.
- Remove any non-numeric characters or spaces.
- Try clearing the field and entering the value again to retrigger calculation.
Incorrect or missing Date field
- The Date field should default to today’s date. If it doesn’t, select the correct date manually.
- Check if your browser’s date settings or language locale is affecting date display.
Cannot delete an extra charge item
- Use the trash icon next to the charge row to remove it.
- If the delete function does not respond, refresh the page and try again.
- Make sure you have permission to modify reservation entries.
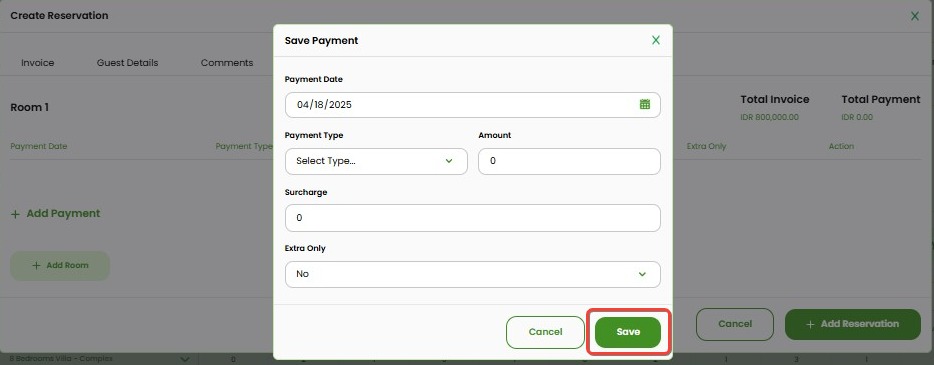
Payment
The Payments tab is used to record payments made by the guest for the reservation. Properties have the flexibility to log various types of payments, such as partial payments (down payments), full payments, or payments with additional charges (surcharges).
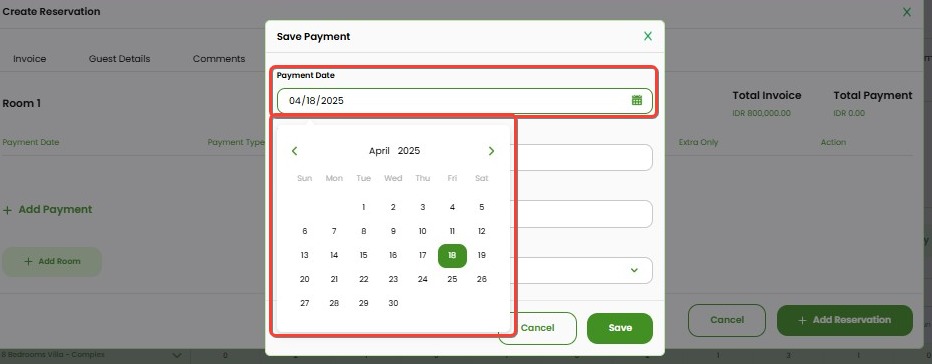
How to Add Payment
Follow the steps below to add a payment:
- Open the Payments Tab
Access the Payments tab from the reservation detail page. You will see the total invoice, total payment, and the + Add Payment button.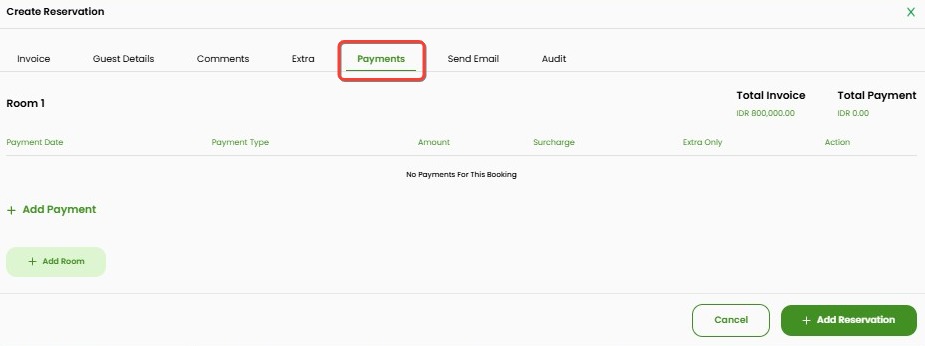
- Add Payment
Click the + Add Payment button to open the payment input window.
You must ensure the reservation already includes at least one room listed in the Invoice tab before adding a payment. Payments cannot be recorded if the reservation does not have a room.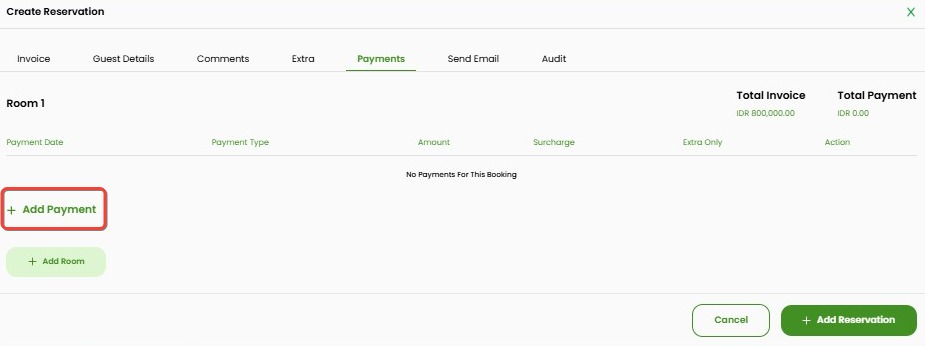
- Fill Out the Payment Form
Enter the following information:- Payment Date: The date the payment was made.
- Payment Type: Select the payment method (e.g., Cash, Credit Card, Transfer, etc.).
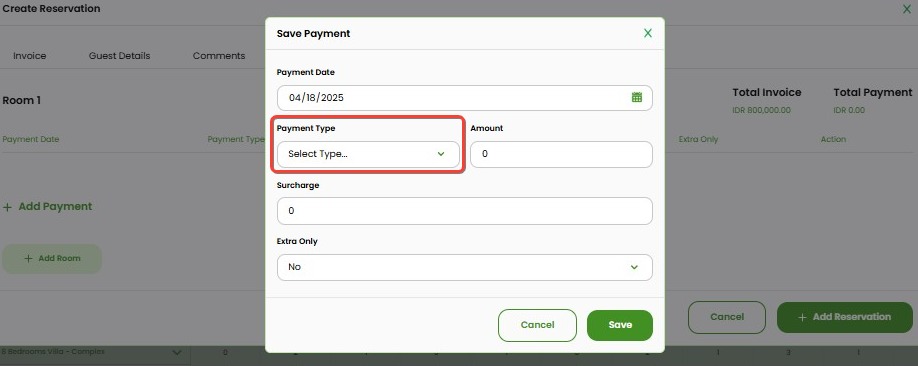
- Amount: The payment amount. This field is free input, depending on the payment scenario.
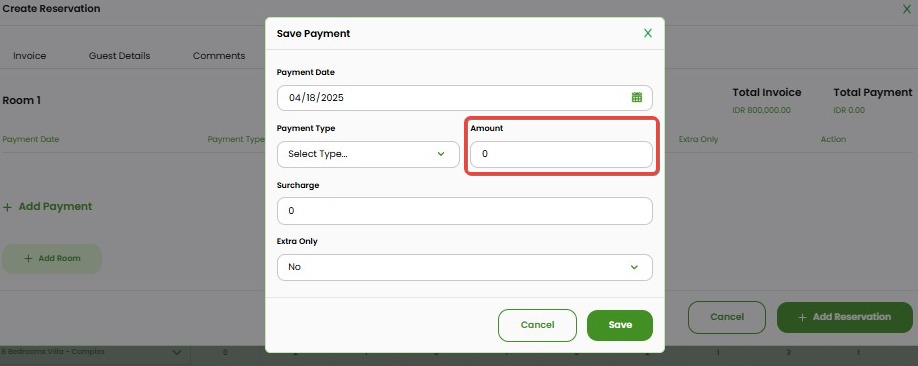
- Surcharge: Additional charges like credit card administrative fees in percentage. This value will increase the total invoice and is also reflected in the payment total.
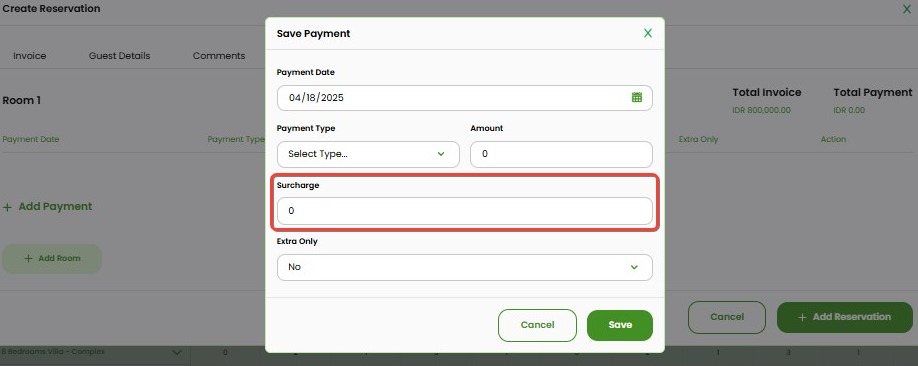
- Extra Only: Select "Yes" if the payment is only for extra charges (not for the room invoice), or "No" if it includes the full bill.
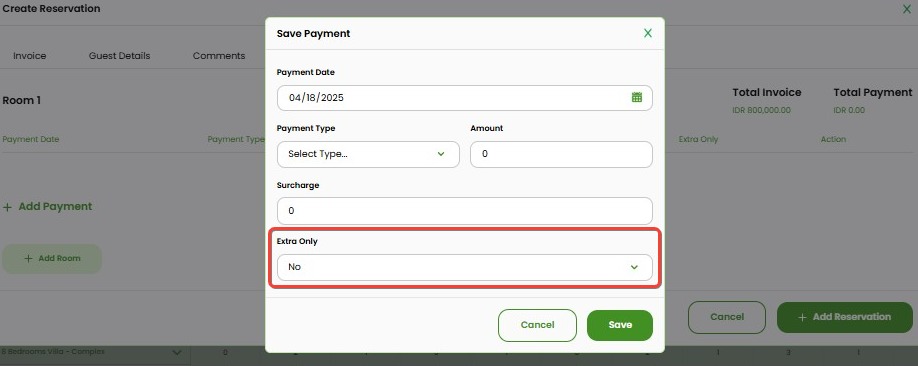
- Payment Date: The date the payment was made.
- Click Save after filling in the data.
[!NOTE]
Troubleshooting Payment Issues
Cannot click + Add Payment
- Make sure at least one room has been added in the Invoice tab. Payments cannot be added if there is no room in the reservation.
- Refresh the page if the button doesn’t respond.
Payment form not appearing
- Try using incognito mode or clearing your browser cache.
- Ensure your browser supports pop-ups.
Surcharge not reflected in the total invoice
- Starting from the latest update, surcharge will increase the total invoice as well as the total payment.
- Make sure the surcharge is entered correctly as a percentage (e.g., "1" for 1%).
Amount entered doesn't match expectations
- The amount field is free input. Double-check the entry to ensure the correct value is recorded (e.g., for full payment, down payment, or extra charges).
Total Payment not updating after saving
- Ensure all required fields (Amount, Payment Type, etc.) are filled in correctly.
- Try saving again after re-checking the fields.
- If the problem persists, reload the page and try again.
Dropdown for Payment Type is empty or cannot be selected
- Try refreshing the page or switching to another browser.
- If the issue persists, the problem might be related to browser compatibility or temporary loading error.
- If payment methods are still not appearing, report the issue to support team for further assistance.
Send Email
The Send Email tab is used to send or re-send the invoice and extra invoice to the hotel or client by email.
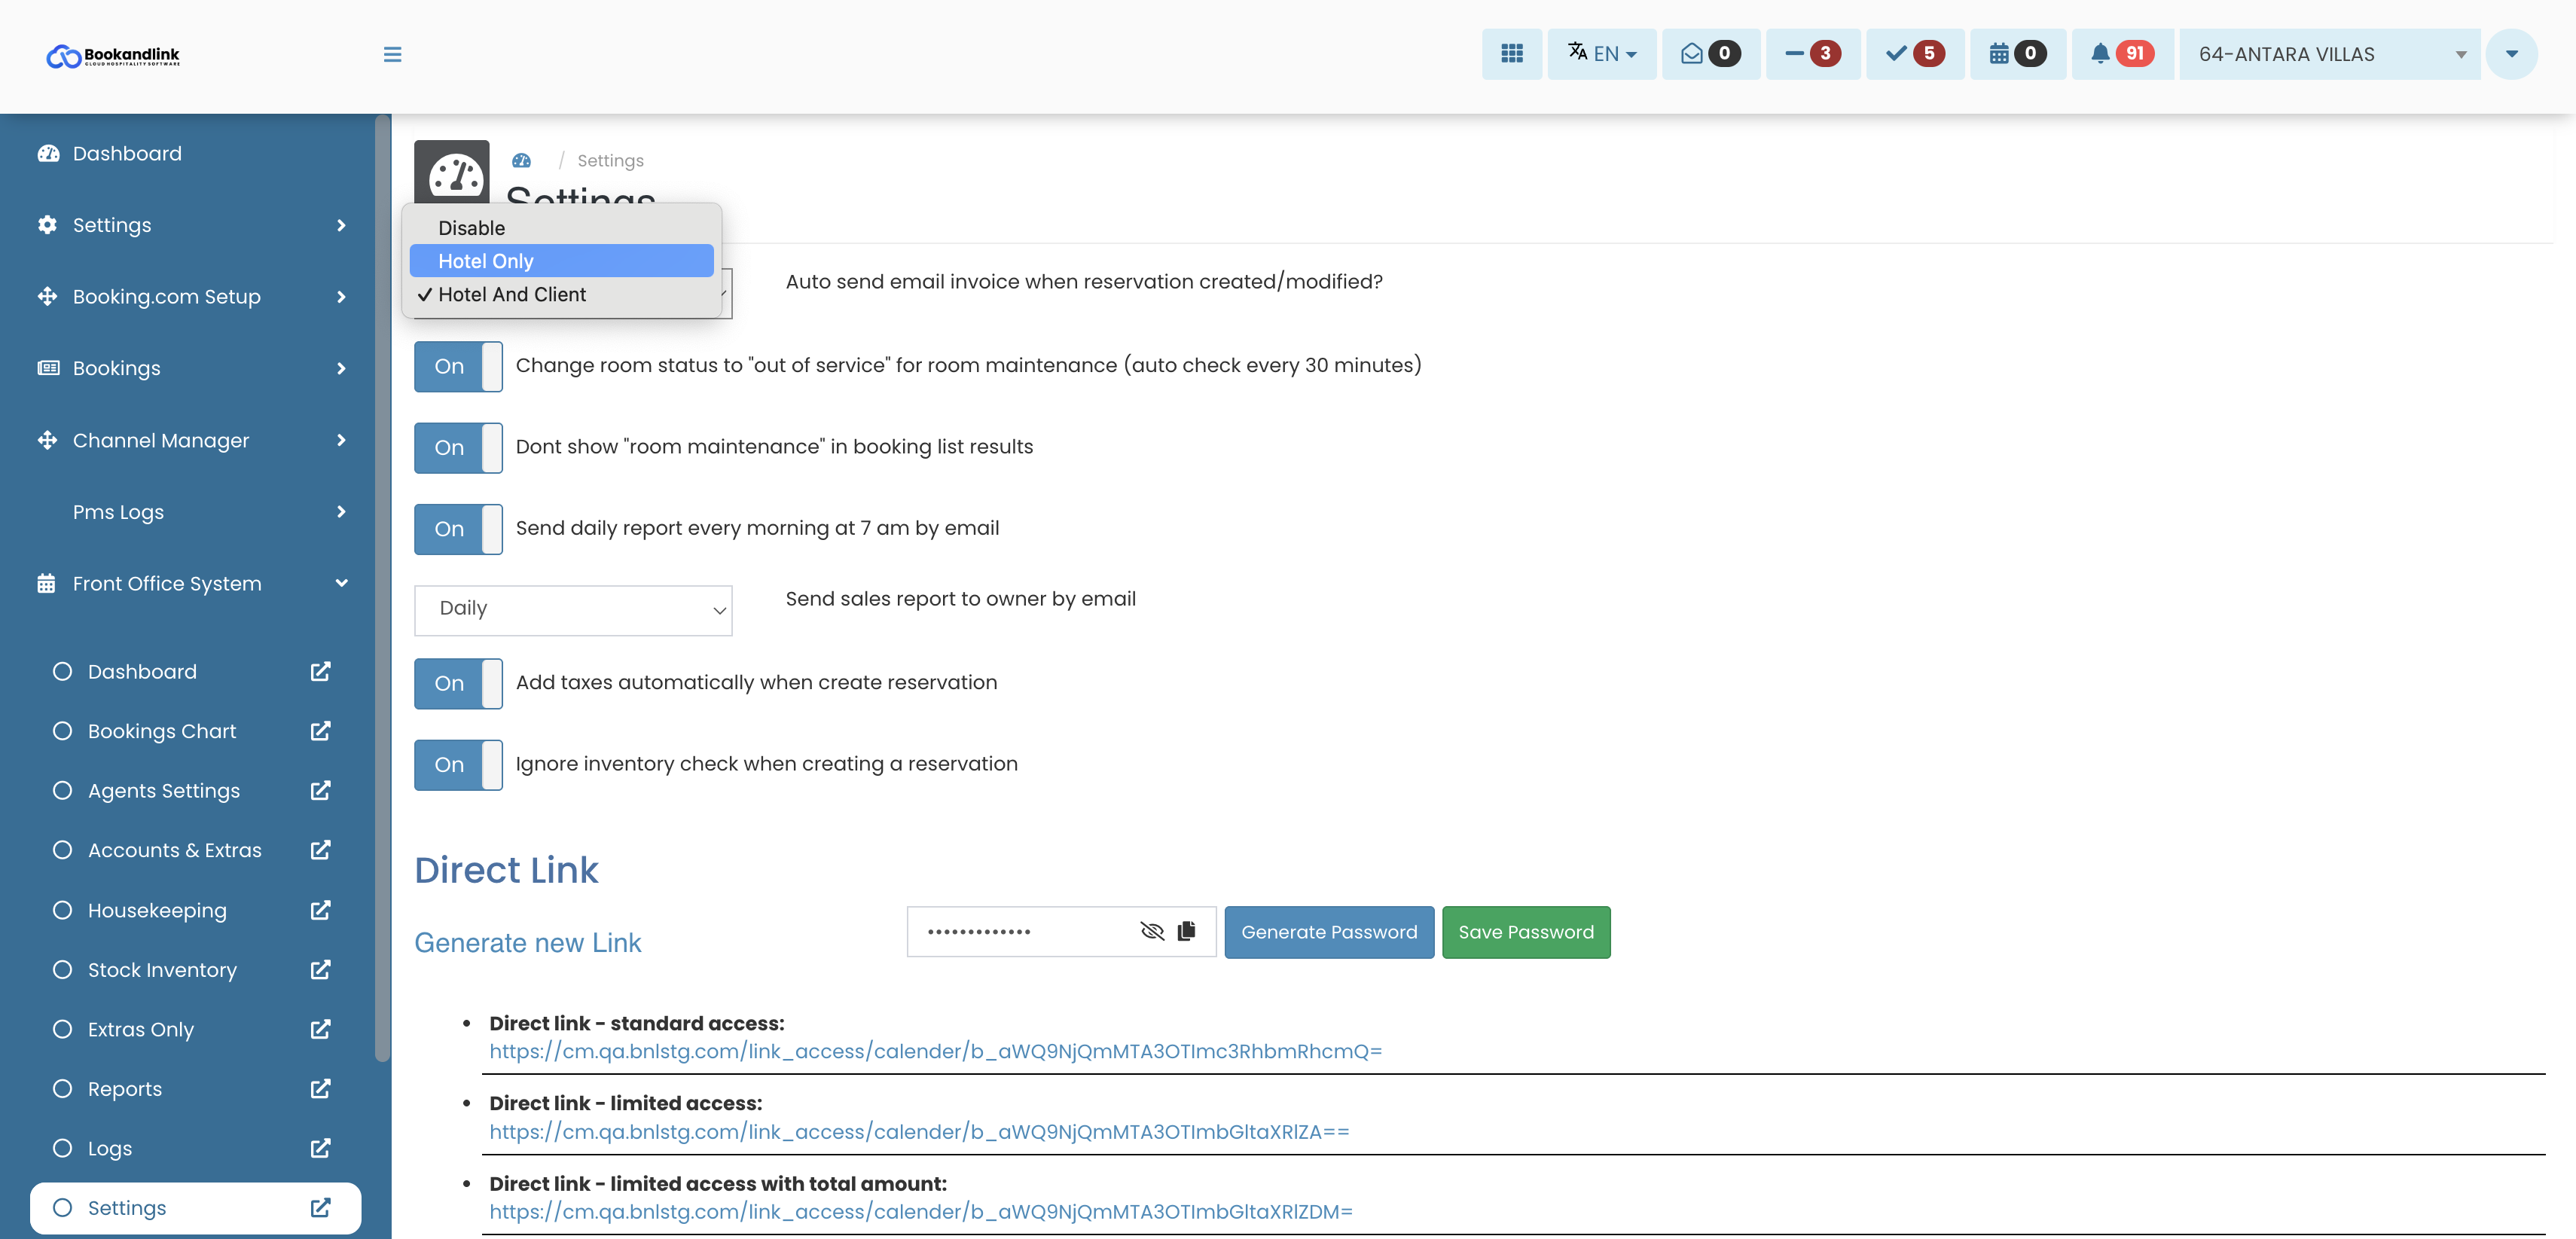
If Auto Send Email Invoice is enabled in Settings > Front Office System, the invoice is sent automatically when the reservation is created.
If Auto Send Email Invoice is disabled, email is not sent.
This menu allows the hotel to re-send the email manually.
How to Send Email Invoice
Follow the steps below to send the invoice:
- Choose Delivery Options
Check one or more of the following options as needed:- Save & Send Invoice to Hotel: Sends the main invoice to the registered hotel email.
- Send Invoice to Client: Sends the main invoice to the client.
- Send 'Extra' Invoice to Hotel: Sends an invoice for extra charges to the hotel.
- Send 'Extra' Invoice to Client: Sends an invoice for extra charges to the client.

- Add Message (Optional)
You can add a custom message to be included in the email by typing a comment in the Add Message field. The message will appear in the body of the email.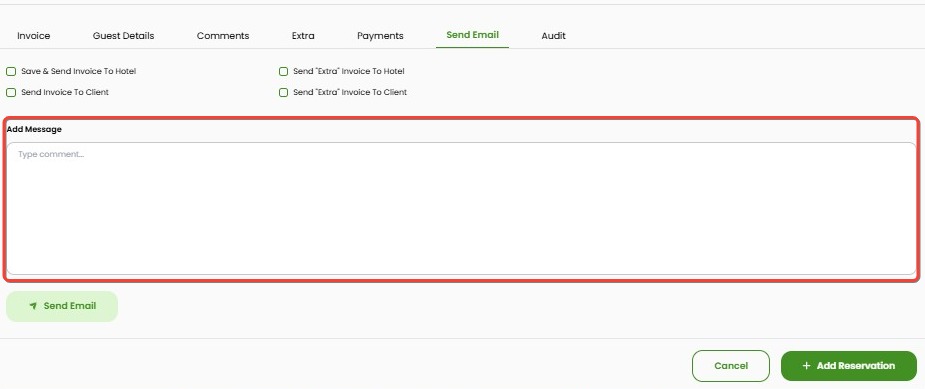
- Send Email
Click the Send Email button to send the invoice according to the selected options.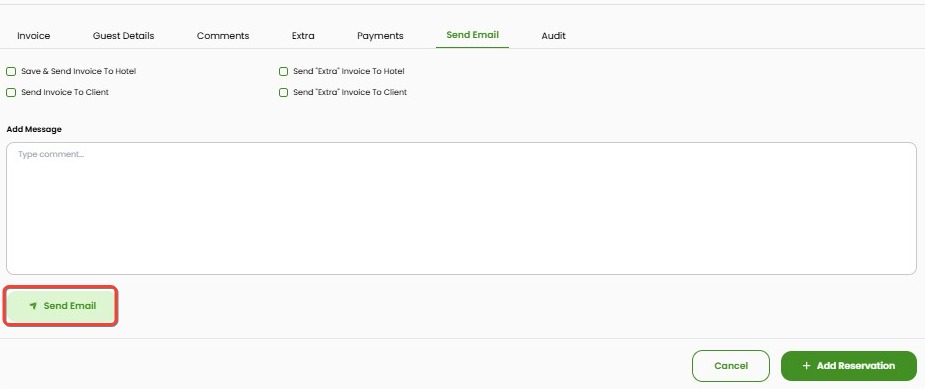
[!NOTE]
Troubleshooting Send Email Issues
Send Email button is disabled
- Make sure the reservation has been created and saved. You cannot send email for unsaved reservations.
- Ensure at least one delivery option is selected (e.g., Send to Hotel or Client).
No email received
- Check the spam or junk folder.
- Confirm the email address in the reservation is correct and active
- Wait a few minutes and retry sending.
Custom message not appearing in the email
- Ensure the message is typed in the Add Message field before clicking Send Email.
- Avoid using unsupported characters or overly long messages.
Error message appears after clicking Send Email
- Check your internet connection.
- Refresh the page and try again.
- If the issue persists, contact your system administrator to verify email server configuration.
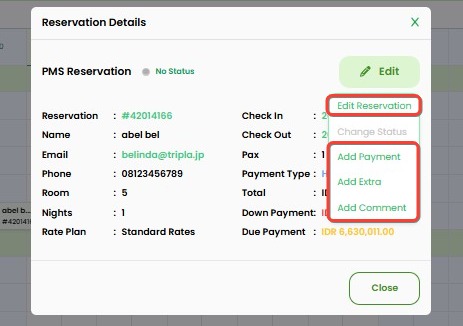
Edit Reservation
The Edit Reservation feature allows users to edit the created reservation information, including guest details, stay dates, payment information, and invoice.
How to Access Reservation Actions
To edit a reservation or other related actions such as add payments, extras, or comments, follow these steps:
- Click on a reservation from the Bookings Calendar page.
- In the Reservation Details window, click the Edit button.
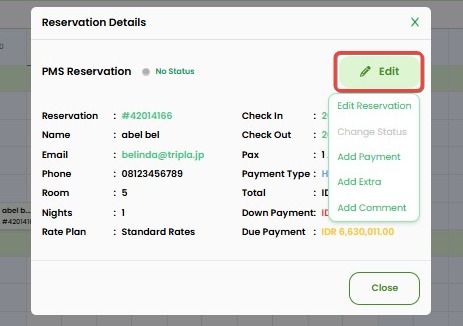
- From the dropdown menu, choose one of the following options:
- Edit Reservation – Open the Edit Reservation details such as invoice, guest, and more.
- Add Payment – Opens the Payments tab in the Edit Reservation modal. See Payment for details.
- Add Extra – Opens the Extra tab in the Edit Reservation modal. See Extra for details.
- Add Comment – Opens the Comments tab in the Edit Reservation modal. See Comment for details.
- Change Status – Opens the Reservation Status modal where you can update the booking status to one of the following: No Status, Checked In, Checked Out, No Show, Early Checked Out, or Early Checked Out + Update Available.
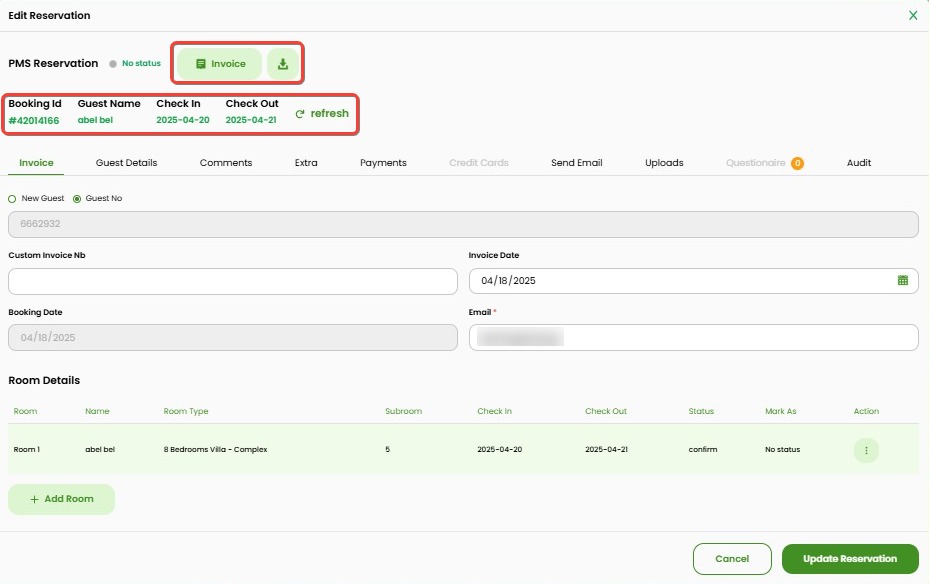
- On the top of Edit Reservation tabs, you will see several key details of the reservation:
- Booking ID: A unique, non-editable identifier for the reservation.
- Guest Name: The name of the guest registered for the reservation.
- Check In / Check Out: The start and end dates of the stay.
- Refresh: Click this button to reload or update the latest information, including invoice data.
- Invoice: Opens a new tab displaying the full invoice details, including room booking info, pricing, taxes, and total amount.
- Download (downward arrow icon): When clicked, several options appear:
- Download PDF Invoice: Download the invoice as a PDF document.
- View Invoice: View the invoice directly in a new browser tab.
- Guest Details: Download guest information as a PDF document, based on the invoice data.
[!NOTE]
Troubleshooting Reservation Actions Access
"Edit" button is not visible in the Reservation Details window
- Ensure you have the required user role or permissions to edit reservations.
- Try refreshing the page or logging out and back in to reload your access settings.
Dropdown options (Edit Reservation, Add Payment, etc.) do not appear after clicking Edit
- Verify whether the reservation status allows modification (e.g., cancelled or locked reservations may restrict actions).
- Check if any browser extensions (e.g., script blockers) are interfering with interactive elements.
Invoice or other reservation details do not reflect recent changes
- Use the Refresh button at the top of the Edit Reservation window to reload the latest data.
- If you've added extras or payments, click Update before downloading the invoice to ensure it's up to date.
Extra
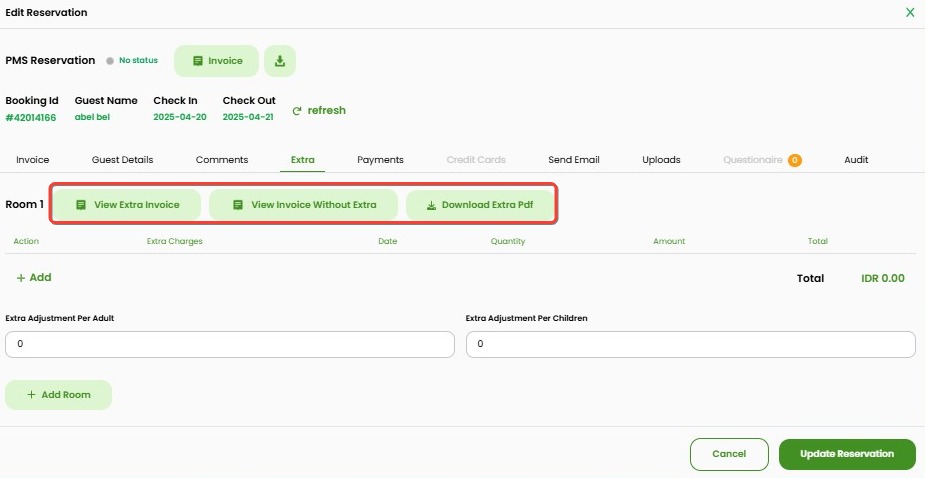
The Extra tabs displays a list of invoices related to additional charges. You can also add new extra charges if necessary. See "How to Add Extra" here.
- View Extra Invoice: Display only the invoice for extra charges.
- View Invoice Without Extra: Display the invoice without any extra charges.
- Download Extra PDF: Download the extra charges invoice as a PDF file.
[!NOTE]
Troubleshooting Extra Charges Invoice
New extras are added but not reflected in the invoice
- After adding new extras, make sure to click the Update button to apply the changes.
- Use the Refresh button at the top of the page to reload the latest invoice data.
Downloaded invoice does not include recent extras
- Ensure you select the correct invoice type: use View Extra Invoice or Download Extra PDF to get the updated version.
- If updates were made but not saved, the invoice may still reflect the previous state—click Update before downloading.
Uploads
The Uploads tabs allows you to manage files or images related to the guest’s reservation, especially from the self check-in process.
Features in the Uploads
- Self Checkin Link
Directs the guest to the Guest Portal to complete the self check-in process. Guests can fill in personal details and upload documents such as passports or ID cards.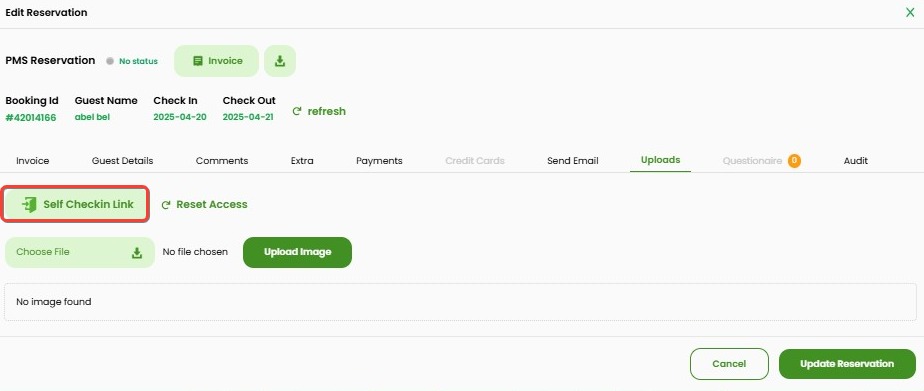
- Reset Access
Resets the guest’s access to the Guest Portal. If reset, the guest will be able to re-submit their guest details.
This is useful when the guest has submitted incorrect information or needs to re-upload documents. Without a reset, the portal will display a message indicating that the form has already been submitted.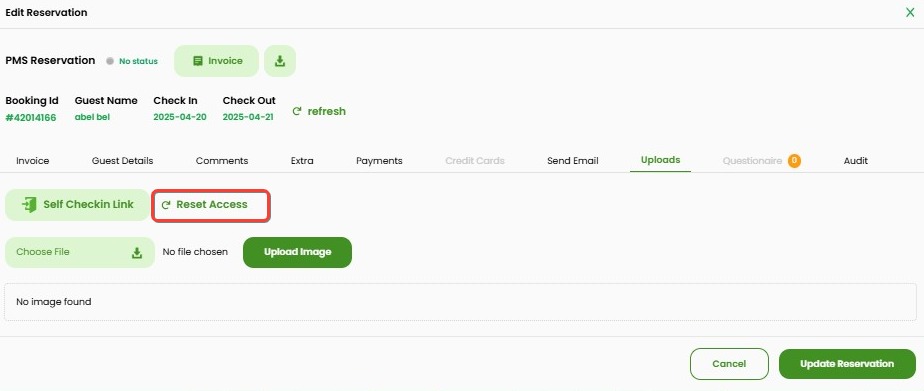
- Choose File & Upload Image
Files uploaded by the guest through the Guest Portal will automatically appear in this section. Or you can use this section to upload file related with guest by click buttons choose and upload and select images file from your device.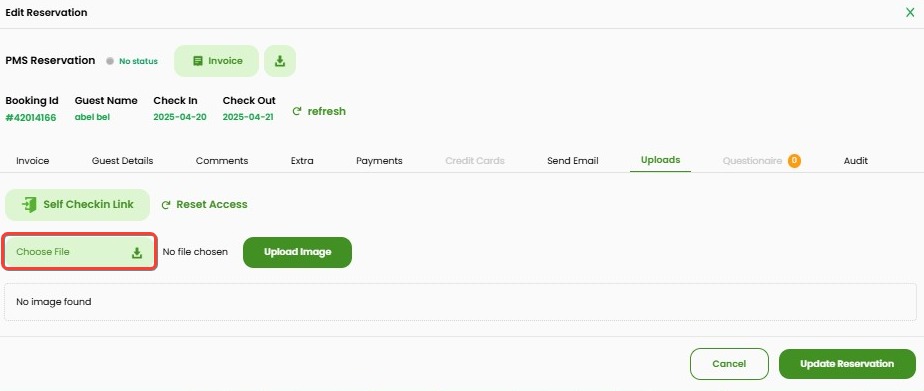
How to Upload Files
- Click the Choose File button to select an image from your device.
- Ensure the selected file meets the following requirements:
- Allowed: JPG, JPEG, PNG | Min. width: 1000px | Max. height: 700px | Max. image size: 800KB
- Click the Upload Image button to upload the file.

- If the file is valid, the image will be displayed below the upload area. If not, the system will show a warning message.
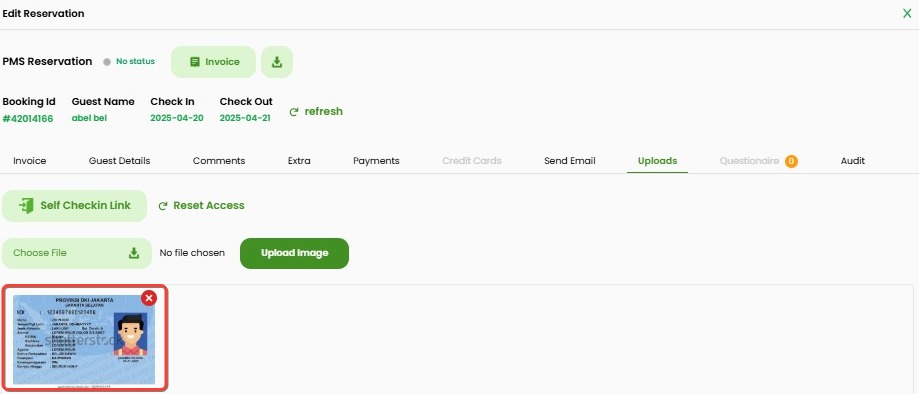
- Click update reservation button to save the changes.
[!NOTE]
Troubleshooting Uploads
Image failed to upload
- Make sure the file format is JPG, JPEG, or PNG.
- Ensure the image width is at least 1000px, and height does not exceed 700px.
- Confirm the file size is 800KB or less.
Uploaded image not displayed
- Try refreshing the page if the uploaded image does not appear immediately.
- Ensure you have clicked the Update Reservation button to save and display the uploaded file.
Guest unable to access self check-in link
- Use Reset Access to allow the guest to resubmit their guest details and re-upload documents.
- Confirm that the guest logs in using the correct credentials after reset.
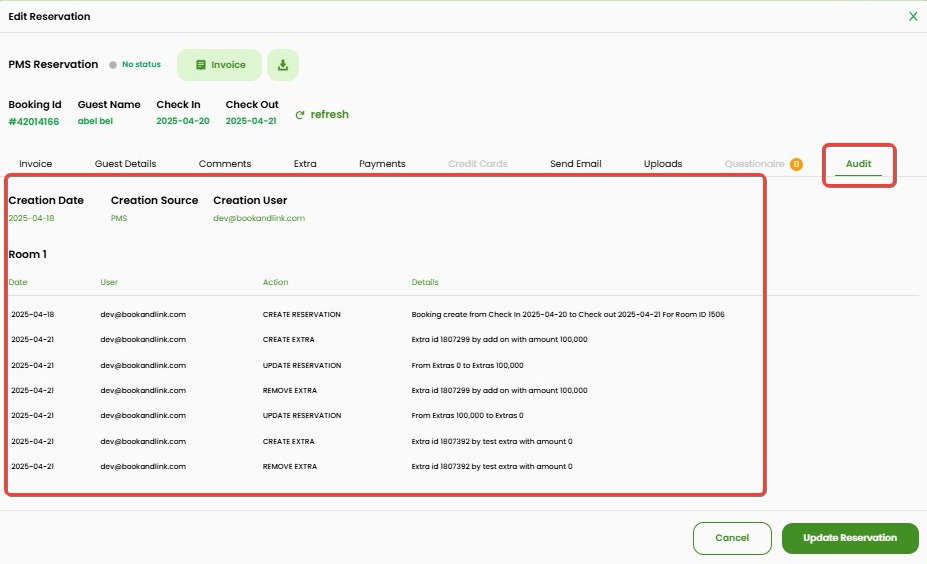
Audit
The Audit tab records key changes made to the reservation. Each log includes the date, user, action, and details of the change.
Changes shown in the audit log include:
- Create new Reservation
- Update Reservation
- Change Check in or Check out Date
- Change Booking Status
- Change Room
- Change Rateplan
- Change Sub Room
- Change Discount or OTA Commission
- Change Payment Type
- Change Rates
- Change Guest Details
- Agency
- Non Refund
- Maintenance
- Currency
- Mobile
- ID
- Change Comment
- Add, Update, or Remove Extras
- Add, Update, or Remove Payment
- Move drag and drop
How to View Audit Log
- Open a reservation.
- Go to the Audit tab.
- View the list of tracked actions, along with the timestamp and user who made the change.
[!NOTE]
Troubleshooting Audit Log
No changes recorded in the Audit tab
- Make sure the reservation has been updated or edited. The Audit tab only records actual changes.
- Reload the page to ensure the latest log entries are displayed.
Incorrect or missing user information
- Ensure the user making changes is properly logged in.
- If issue persists, report to the system administrator to check audit tracking configurations.
Timestamps not matching actual change time
- Confirm that the server time is correctly set.
- Time discrepancies may occur if there are timezone misconfigurations in the system.