Introduction
Monthly Deals is a Channel Manager feature that helps property managers update room availability, pricing, and restrictions across OTAs efficiently. This reduces manual updates and ensures consistency across platforms.
Monthly Deals allows property managers to update room availability and pricing in bulk, apply restrictions like minimum nights, stop sell, Close to Arrival (CTA), and Close To Departure (CTD), and synchronize changes instantly across all connected OTAs for seamless management.
Rate Plans & Room Availabilities
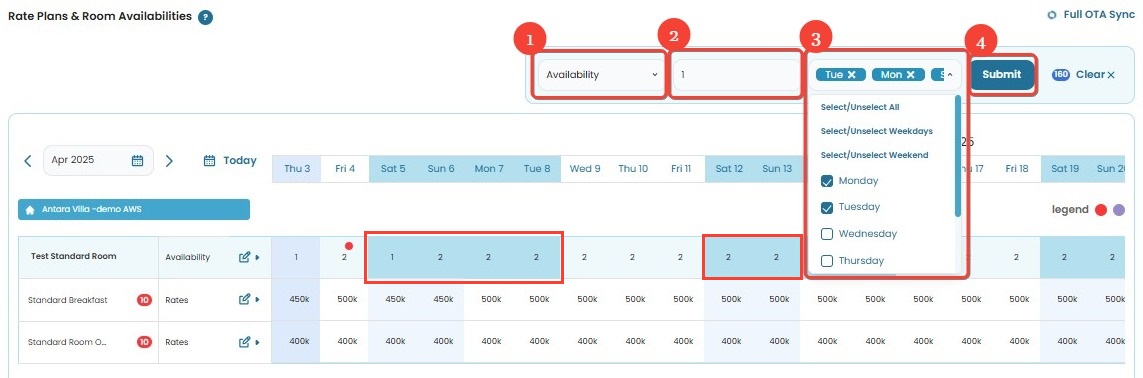
Availability
How to Update Availability
This feature allows property managers to set room availability for specific weekdays or weekends, ensuring accurate inventory updates across OTAs.
There are two ways to update availability:
General Update
- Select Availability from the dropdown menu.
- Enter the number (value) of available rooms.
- Choose the days manually or use the Weekday/Weekend selection.
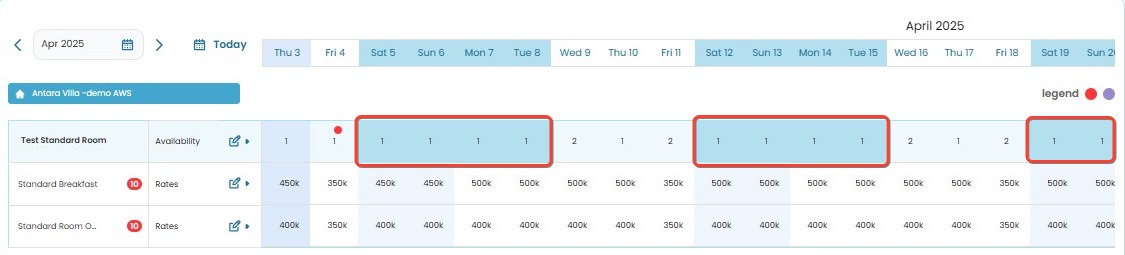
- Click Submit to apply the changes. A success notification will confirm that the update has been applied.
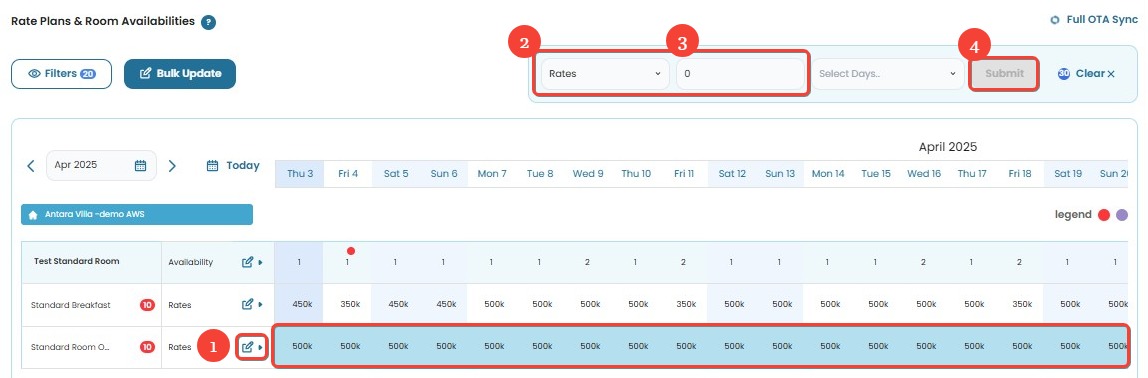
Row-Based Update
- Select/block the Availability row in the table.
- Click on the dropdown in the respective date column.
- Enter the availability value.
- Click Submit to apply the changes. A success notification will confirm that the update has been applied.
[!NOTE]
Troubleshooting Update Availability Issues
The Availability option is missing from the dropdown menu
- Refresh the page or clear your browser cache.
- Ensure you have the correct access permissions.
- Log out and log back in to see if the option appears.
Availability updates are not applied
- For general updates, make sure you have selected the correct days manually or using the Weekday/Weekend selection.
- For row-based updates, ensure you have entered a valid value in the dropdown.
- Try submitting the update again after refreshing the page.
No success notification appears after submission
- Ensure your internet connection is stable.
- Wait a few moments and check if the availability updates are reflected in the OTA sync.
- If the issue persists, contact support for further assistance.
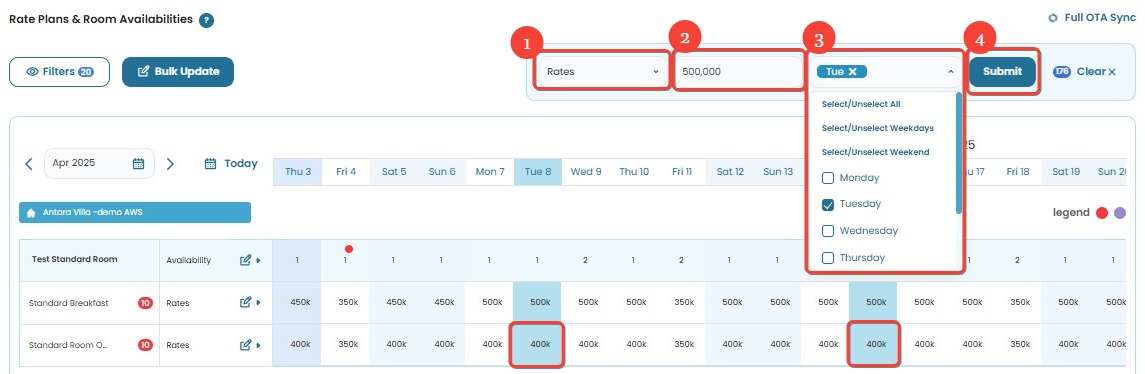
Rates
How to Update Rates
This feature allows property managers to set room rates for specific weekdays or weekends, ensuring accurate pricing updates across OTAs.
There are two ways to update rates:
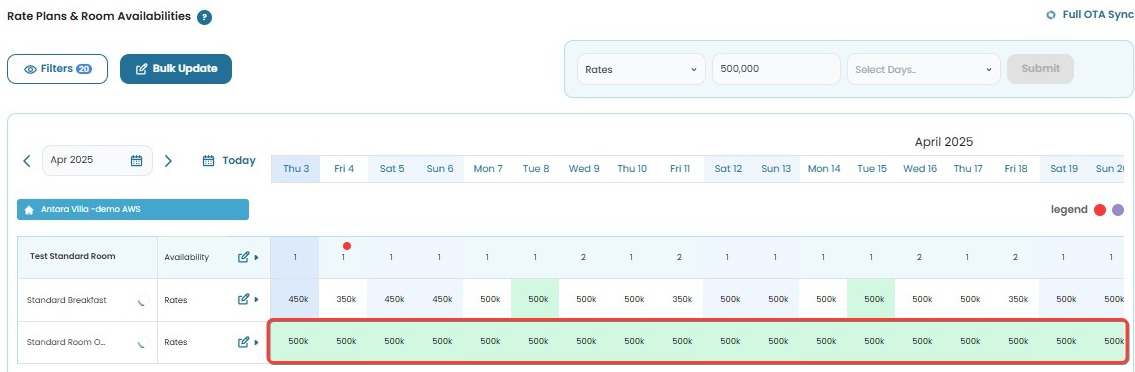
General Update
- Select Rates from the dropdown menu.
- Enter the new rate or price.
- Note: Do not use commas (
,) or dots (.) as thousand separators. - Example: Input
500000instead of500.000or500,000.
- Note: Do not use commas (
- Choose the days manually or use the Weekday/Weekend selection.
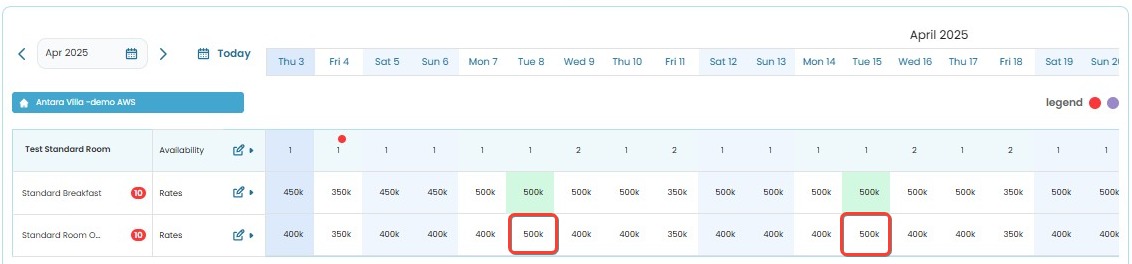
- Click Submit to apply the changes. A success notification will confirm that the update has been applied.
Row-Based Update
- Locate the Rates row in the table.
- Click on the dropdown in the respective date column.
- Enter the new rate or price.
- Note: Do not use commas (
,) or dots (.) as thousand separators. - Example: Input
500000instead of500.000or500,000.
- Note: Do not use commas (
- Click Submit to apply the changes. A success notification will confirm that the update has been applied.
[!NOTE]
Troubleshooting Update Rate Issues
The Rates option is missing from the dropdown menu
- Refresh the page or clear your browser cache.
- Ensure you have the correct access permissions.
- Log out and log back in to see if the option appears.
Rate updates are not applied
- For general updates, make sure you have selected the correct days manually or using the Weekday/Weekend selection.
- For row-based updates, ensure you have entered a valid rate value in the dropdown.
- Try submitting the update again after refreshing the page.
No success notification appears after submission
- Ensure your internet connection is stable.
- Wait a few moments and check if the rate updates are reflected in the OTA sync.
- If the issue persists, contact support for further assistance.
Error message: "Invalid rate format"
- Make sure you enter the rate as a whole number without commas or dots (e.g.,
500000instead of500.000or500,000).Unable to edit rates for a specific date
- The rate may be locked by system rules or restrictions.
- Check with the system admin or support team if any restrictions are applied.
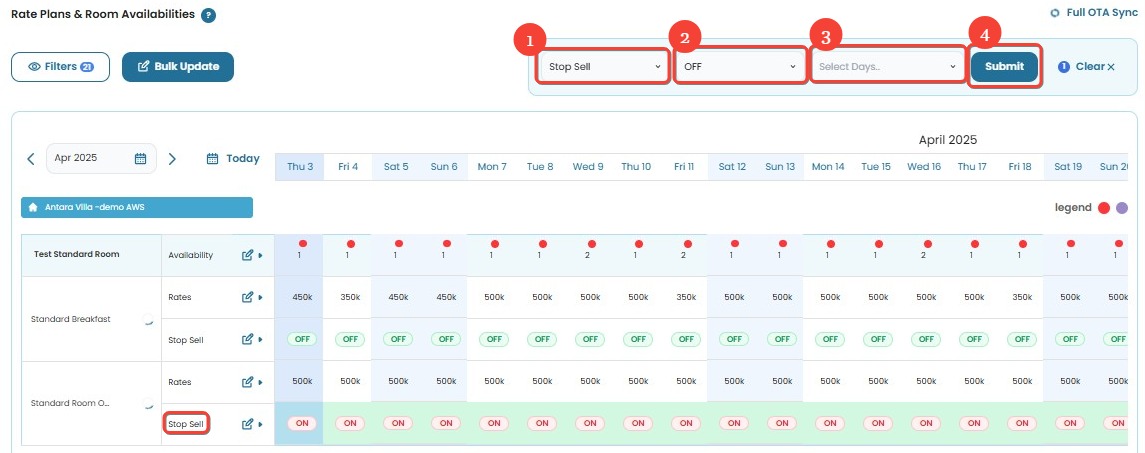
Stop Sell
How to Update Stop Sell
This feature allows property managers to enable or disable Stop Sell for specific weekdays or weekends, ensuring room availability is controlled effectively across OTAs.
There are two ways to update Stop Sell:
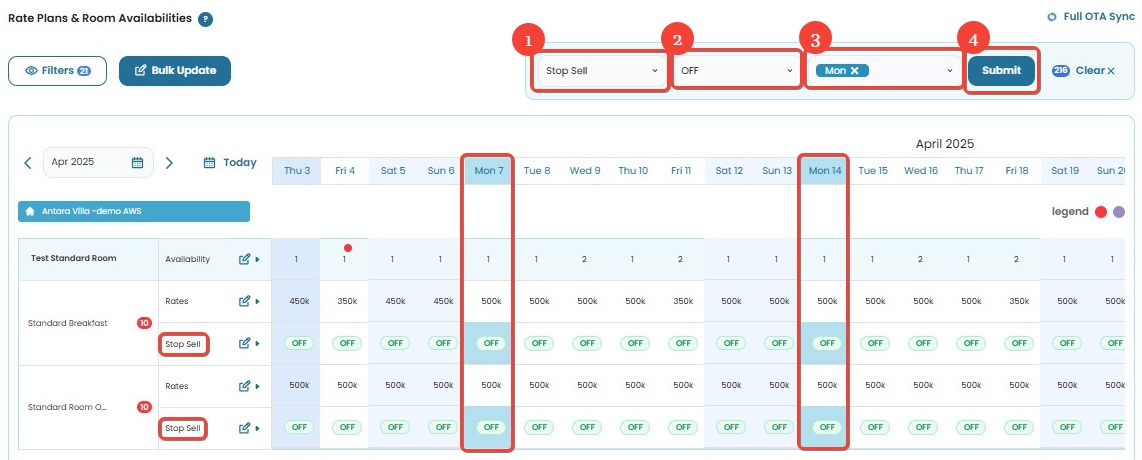
General Update
- Select Stop Sell from the dropdown menu.
- Choose the ON/OFF option:
- ON → The room will no longer be available for booking.
- OFF → The room will be available for booking.
- Choose the days manually or use the Weekday/Weekend selection.
- Click Submit to apply the changes. A success notification will confirm that the update has been applied.
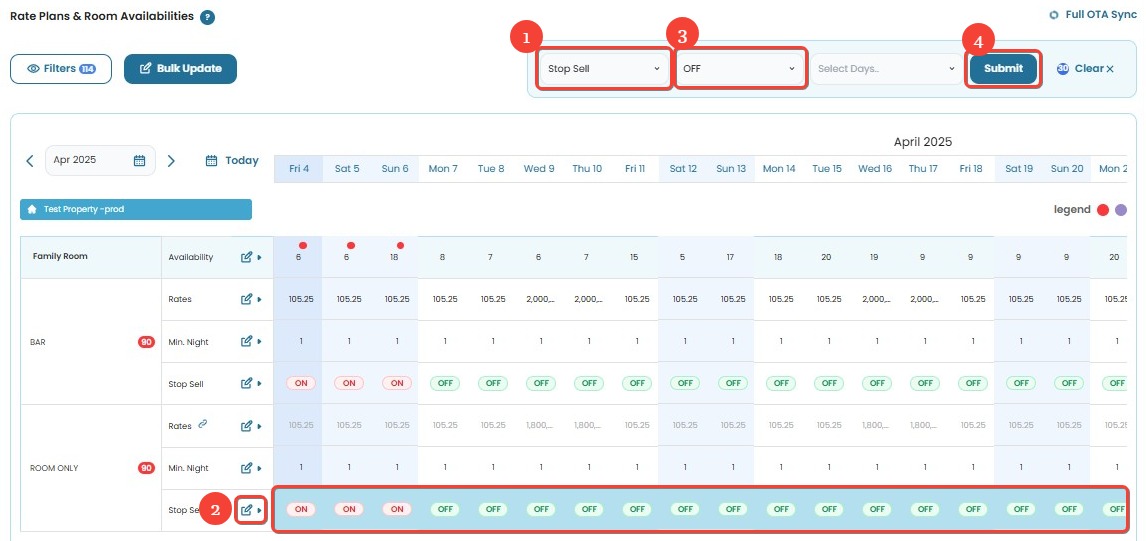
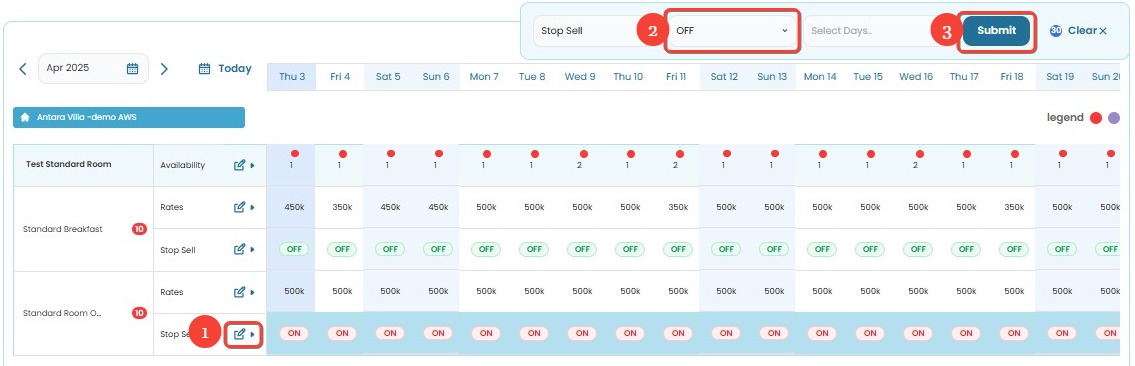
Row-Based Update
- Select the Stop Sell option from the dropdown menu.
- Locate the Stop Sell row in the table.
- Select the ON/OFF option:
- ON → The room will no longer be available for booking.
- OFF → The room will be available for booking.
- Click Submit to apply the changes. A success notification will confirm that the update has been applied.
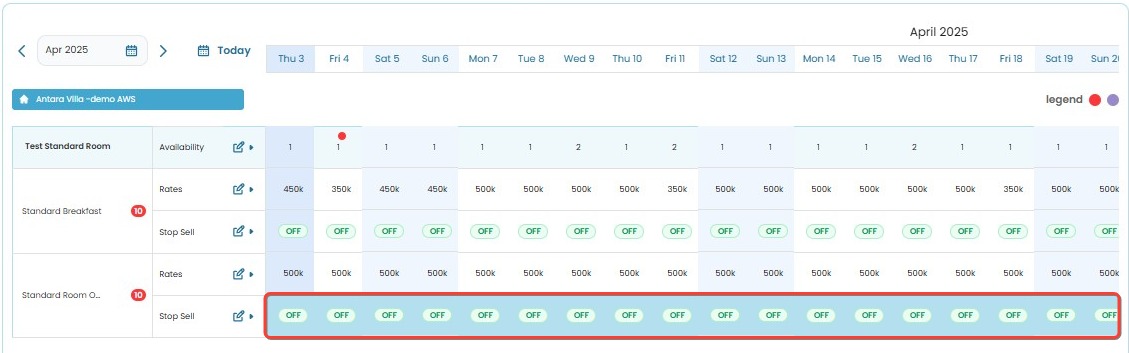
How to Remove Stop Sell
This feature allows property managers to remove Stop Sell settings for specific weekdays or weekends, ensuring rooms become available for booking across OTAs.
There are two ways to remove Stop Sell:
General Removal
- Select Stop Sell from the dropdown menu.
- Choose the OFF option:
- OFF → The room will be available for booking.
- Choose the days manually or use the Weekday/Weekend selection.
- Click Submit to apply the changes. A success notification will confirm that the update has been applied.
Row-Based Removal
- Locate the Stop Sell row in the table.
- Select/block the dates you want to remove Stop Sell from. Blocked dates will be indicated with a blue highlight.
- Choose the OFF option:
- OFF → The room will be available for booking.
- Click Submit to apply the changes.
- Check the log to ensure the update has been successfully applied.
[!NOTE]
- OFF means no Stop Sell (room is available).
- ON means Stop Sell is active (room is not available).
[!NOTE]
Troubleshooting Stop Sell Issues
The Stop Sell option is missing from the dropdown menu
- Refresh the page or clear your browser cache.
- Ensure you have the correct access permissions.
- Log out and log back in to see if the option appears.
Stop Sell updates are not applied
- For general updates, ensure you have selected the correct days manually or using the Weekday/Weekend selection.
- For row-based updates, confirm that you have selected the correct ON/OFF option and clicked Submit.
- Refresh the page and try submitting the update again.
- If removing Stop Sell using the row-based method, ensure the selected dates are properly highlighted before submission.
No success notification appears after submission
- Ensure your internet connection is stable.
- Wait a few moments and check if the Stop Sell updates are reflected in the OTA sync.
- If the issue persists, review the change log to confirm if the update was recorded.
- Contact support if the problem continues.
Unable to update or remove Stop Sell for a specific days
- The Stop Sell setting may be locked due to system rules or restrictions.
- Check with the system admin or support team if any restrictions are applied.
- If using the row-based method, ensure that the date selection is correctly applied before making changes.
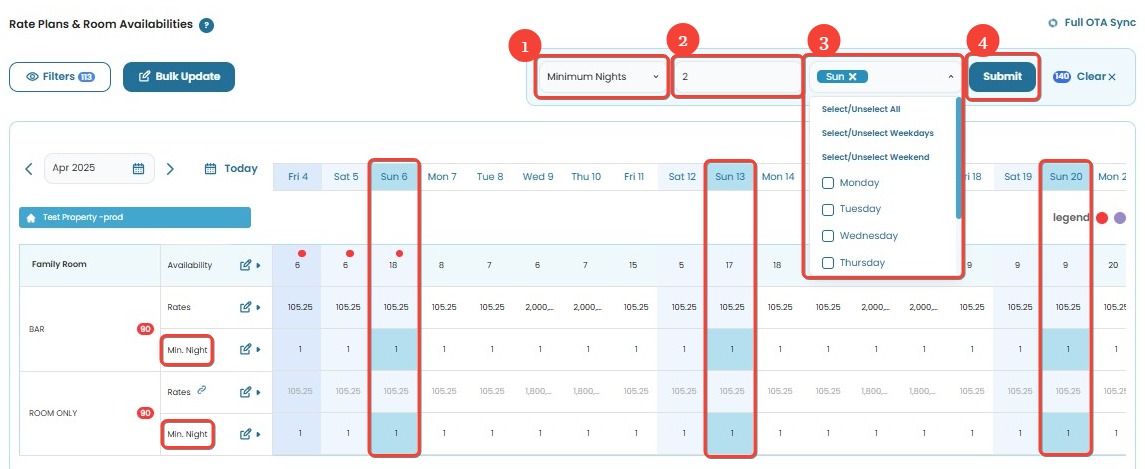
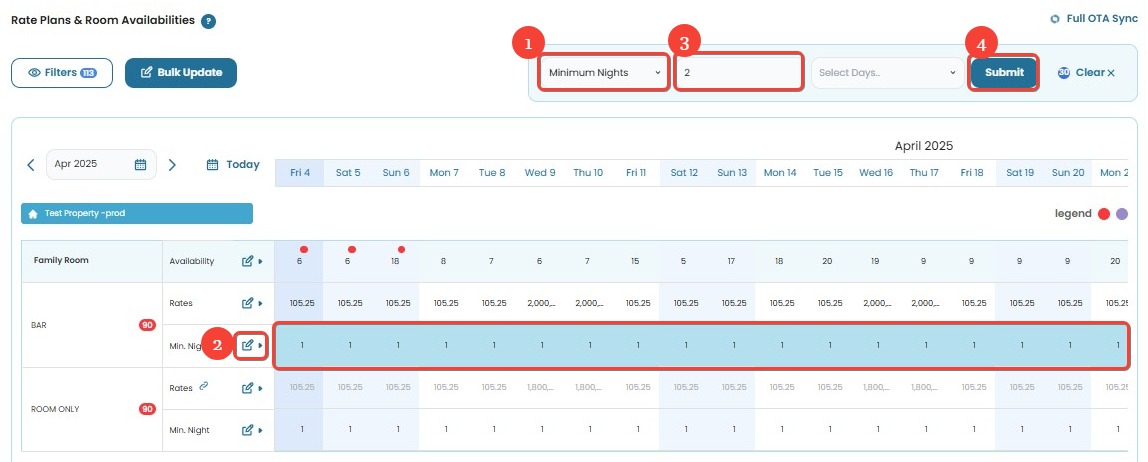
Minimum Night
How to Update Minimum Night
This feature allows property managers to set a minimum stay requirement for specific weekdays or weekends, ensuring guests book for the required number of nights across OTAs.
There are two ways to update Minimum Night:
General Update
- Select Minimum Night from the dropdown menu.
- Enter the required minimum number of nights.
- Choose the days manually or use the Weekday/Weekend selection.
- Click Submit to apply the changes. A success notification will confirm that the update has been applied.
Row-Based Update
- Select Minimum Night from the dropdown menu.
- Locate the Minimum Night row in the table.
- Enter the required minimum number of nights.
- Click Submit to apply the changes. A success notification will confirm that the update has been applied.
[!NOTE]
Troubleshooting Minimum Night Issues
The Minimum Night option is missing from the dropdown menu
- Refresh the page or clear your browser cache.
- Ensure you have the correct access permissions.
- Log out and log back in to see if the option appears.
Minimum Night updates are not applied
- For general updates, ensure you have selected the correct days manually or used the Weekday/Weekend selection.
- For row-based updates, confirm that you have entered the correct minimum night value and clicked Submit.
- Refresh the page and try submitting the update again.
No success notification appears after submission
- Ensure your internet connection is stable.
- Wait a few moments and check if the Minimum Night updates are reflected in the OTA sync.
- If the issue persists, review the change log to confirm if the update was recorded.
- Contact support if the problem continues.
Unable to update Minimum Night for a specific days
- The Minimum Night setting may be locked due to system rules or restrictions.
- Check with the system admin or support team if any restrictions are applied.
- If using the row-based method, ensure that the date selection is correctly applied before making changes.
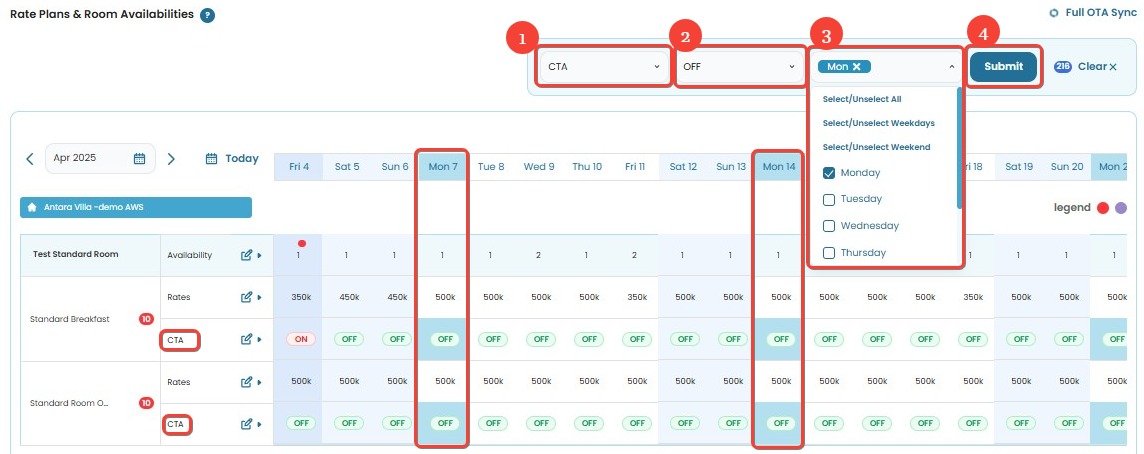
Close to Arrival (CTA)
How to Update CTA (Close to Arrival)
This feature allows property managers to enable or disable Close to Arrival (CTA) for specific weekdays or weekends, ensuring check-in control is maintained effectively across OTAs.
There are two ways to update CTA:
General Update
- Select CTA from the dropdown menu.
- Choose the ON/OFF option:
- ON → Guests will not be able to check in on the selected date.
- OFF → Guests will be able to check in on the selected date.
- Choose the days manually or use the Weekday/Weekend selection.
- Click Submit to apply the changes. A success notification will confirm that the update has been applied.
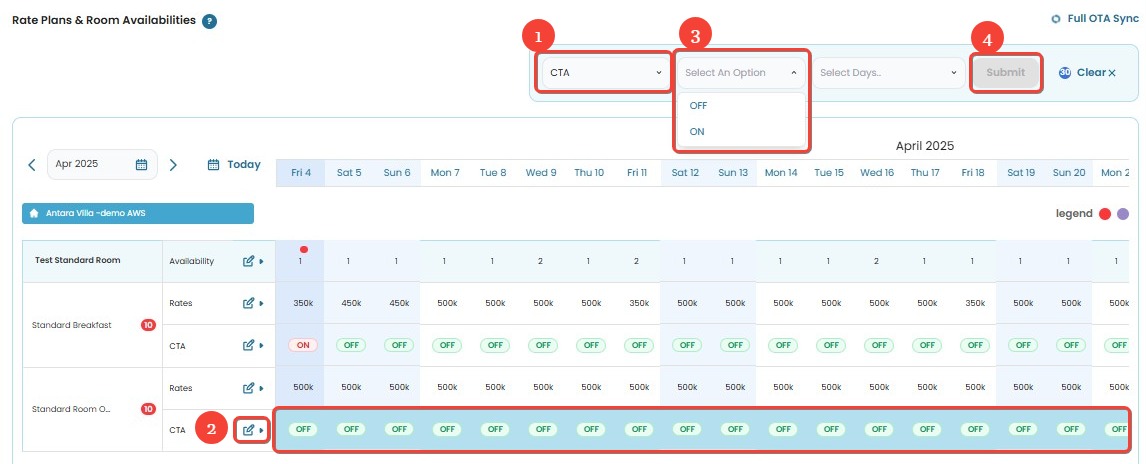
Row-Based Update
- Select the CTA option from the dropdown menu.
- Locate the CTA row in the table.
- Select the ON/OFF option:
- ON → Guests will not be able to check in on the selected date.
- OFF → Guests will be able to check in on the selected date.
- Click Submit to apply the changes. A success notification will confirm that the update has been applied.
[!NOTE]
- CTA (Close to Arrival) → Guests cannot check in on the selected dates.
- OFF means no restriction.
- ON means the restriction is active.
How to Remove CTA
This feature allows property managers to remove Close to Arrival (CTA) settings for specific weekdays or weekends, ensuring guests can check in across OTAs.
There are two ways to remove CTA:
General Removal
- Select CTA from the dropdown menu.
- Choose the ON/OFF option:
- ON → Guests will not be able to check in on the selected date(s).
- OFF → Guests will be able to check in on the selected date(s).
- Choose the days manually or use the Weekday/Weekend selection.
- Click Submit to apply the changes. A success notification will confirm that the update has been applied.
Row-Based Removal
- Select the CTA option from the dropdown menu.
- Locate the CTA row in the table. Blocked dates will be indicated with a blue highlight.
- Choose the ON/OFF option:
- ON → Guests will not be able to check in on the selected date(s).
- OFF → Guests will be able to check in on the selected date(s).
- Click Submit to apply the changes.
- Check the log to ensure the update has been successfully applied.
[!NOTE]
Troubleshooting CTA Issues
The CTA option is missing from the dropdown menu
- Refresh the page or clear your browser cache.
- Ensure you have the correct access permissions.
- Log out and log back in to see if the option appears.
CTA updates are not applied
- For general updates, ensure you have selected the correct days manually or using the Weekday/Weekend selection.
- For row-based updates, confirm that you have selected the correct ON/OFF option and clicked Submit.
- Refresh the page and try submitting the update again.
- If removing CTA using the row-based method, ensure the selected dates are properly highlighted before submission.
No success notification appears after submission
- Wait a few moments and check if the CTA updates are reflected in the OTA sync.
- If the issue persists, review the change log to confirm if the update was recorded.
- Contact support if the problem continues.
Unable to update or remove CTA for specific days
- The CTA setting may be locked due to system rules or restrictions.
- Check with the system admin or support team if any restrictions are applied.
- If using the row-based method, ensure that the date selection is correctly applied before making changes.
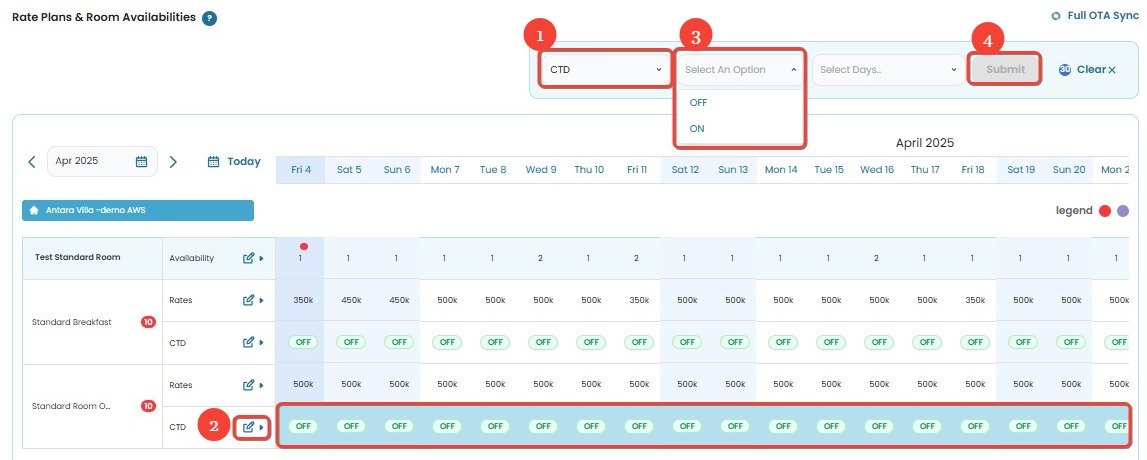
Close to Departure (CTD)
How to Update Close to Departure
This feature allows property managers to enable or disable Close to Departure (CTD) for specific weekdays or weekends. When CTD is enabled on a certain date, guests cannot check out on that date. This ensures more control over booking flows across OTAs.
There are two ways to update Close to Departure:
General Update
- Select Close to Departure from the dropdown menu.
- Choose the ON/OFF option:
- ON → Guests will not be able to check out on the selected date(s).
- OFF → Guests will be able to check out on the selected date(s).
- Choose the days manually or use the Weekday/Weekend selection.
- Click Submit to apply the changes. A success notification will confirm that the update has been applied.

Row-Based Update
- Select Close to Departure from the dropdown menu.
- Locate the Close to Departure row in the table.
- Select the ON/OFF option:
- ON → Guests will not be able to check out on the selected date(s).
- OFF → Guests will be able to check out on the selected date(s).
- Click Submit to apply the changes. A success notification will confirm that the update has been applied.
How to Remove Close to Departure
This feature allows property managers to remove Close to Departure (CTD) settings for specific weekdays or weekends, ensuring guests can check out on those dates across OTAs.
There are two ways to remove Close to Departure:
General Removal
- Select Close to Departure from the dropdown menu.
- Choose the ON/OFF option:
- ON → Guests will not be able to check out on the selected date(s).
- OFF → Guests will be able to check out on the selected date(s).
- Choose the days manually or use the Weekday/Weekend selection.
- Click Submit to apply the changes. A success notification will confirm that the update has been applied.
Row-Based Removal
- Select Close to Departure from the dropdown menu.
- Locate the Close to Departure row in the table. Blocked dates will be indicated with a blue highlight.
- Choose the ON/OFF option:
- ON → Guests will not be able to check out on the selected date(s).
- OFF → Guests will be able to check out on the selected date(s).
- Click Submit to apply the changes.
- Check the log to ensure the update has been successfully applied.
[!NOTE]
Troubleshooting Close to Departure Issues
The Close to Departure option is missing from the dropdown menu
- Refresh the page or clear your browser cache.
- Ensure you have the correct access permissions.
- Log out and log back in to see if the option appears.
Close to Departure updates are not applied
- For general updates, ensure you have selected the correct days manually or using the Weekday/Weekend selection.
- For row-based updates, confirm that you have selected the correct ON/OFF option and clicked Submit.
- Refresh the page and try submitting the update again.
- If removing CTD using the row-based method, ensure the selected dates are properly highlighted before submission.
No success notification appears after submission
- Ensure your internet connection is stable.
- Wait a few moments and check if the CTD updates are reflected in the OTA sync.
- If the issue persists, review the change log to confirm if the update was recorded.
- Contact support if the problem continues.
Unable to update or remove CTD for specific days
- The Close to Departure setting may be locked due to system rules or restrictions.
- Check with the system admin or support team if any restrictions are applied.
- If using the row-based method, ensure that the date selection is correctly applied before making changes.
Bulk Update
Bulk Update Availability
The Bulk Update feature allows property managers to update availability settings for multiple rooms and rate plans simultaneously. This ensures efficient management of inventory across various OTAs.
How to Bulk Update for Availability
- Click the Bulk Update button.

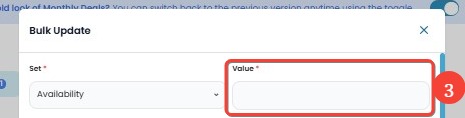
- In the Set dropdown, select Availability.
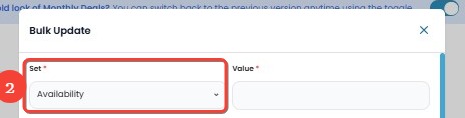
- Enter the desired value in the Value field.
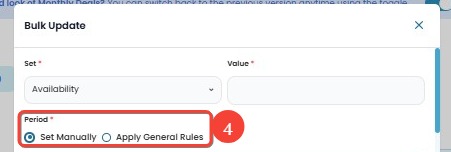
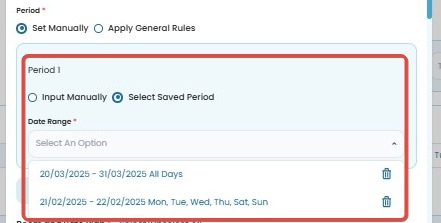
- Under Period, choose one of the following options:
- Set Manually → Manually define the period for the update.
- Apply General Rules → Use pre-defined general rules.
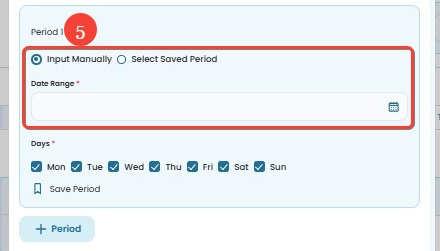
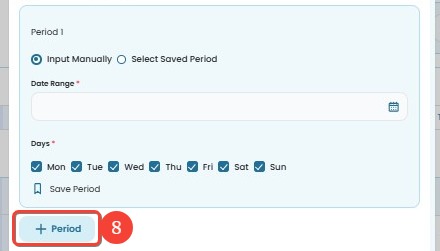
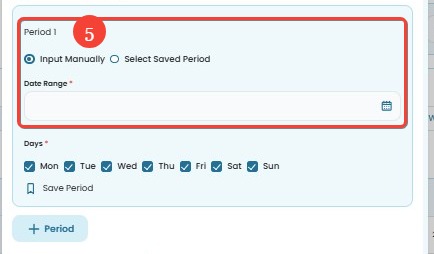
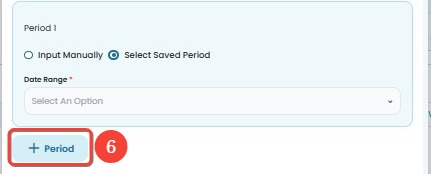
- In Period 1, choose between:
- Input Manually → Specify the Date Range manually.
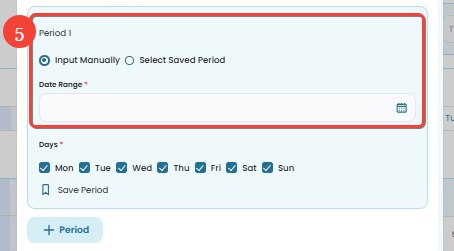
- Select Saved Period → Pick a previously saved period.
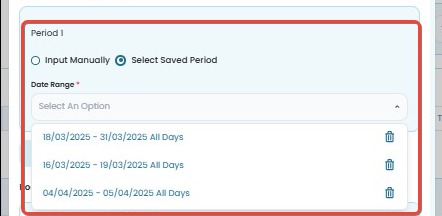
- Input Manually → Specify the Date Range manually.
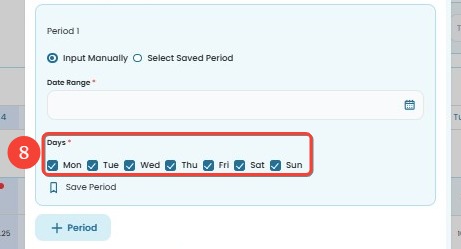
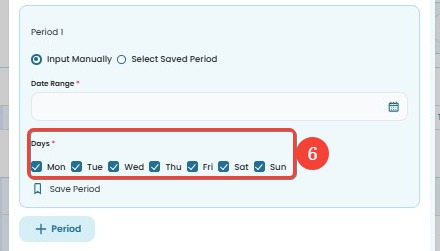
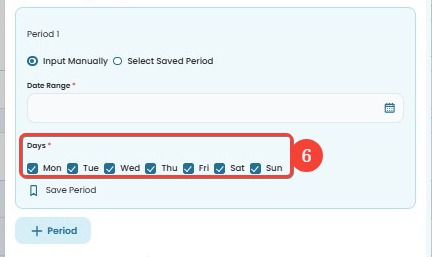
- Select the applicable days (Monday - Sunday) by checking the boxes.
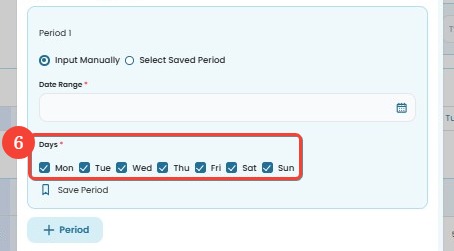
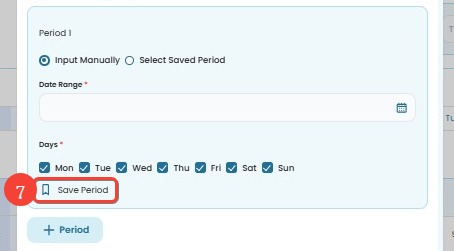
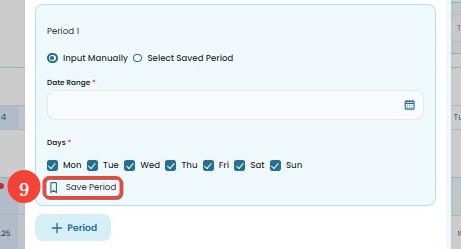
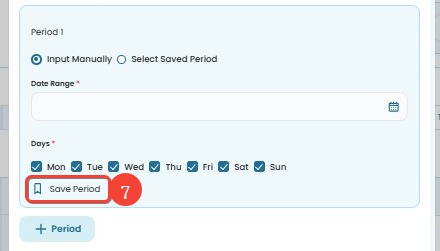
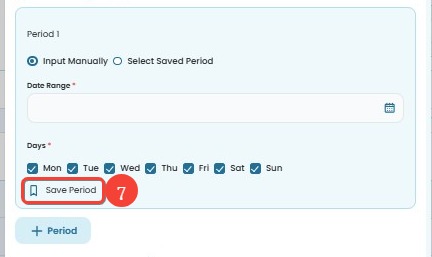
- (Optional) Click Save Period if you want to save the selected period for future use.
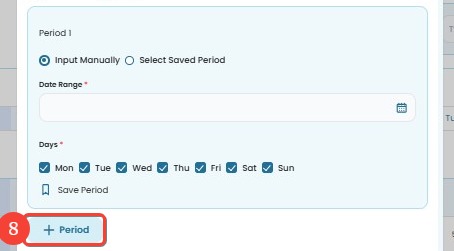
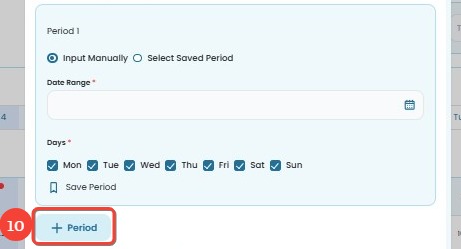
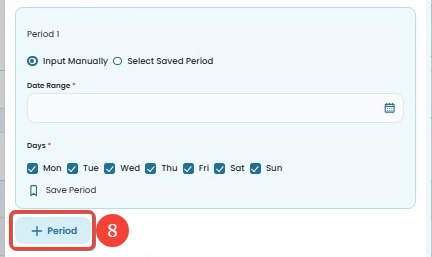
- (Optional) Click + Period if you need to add multiple periods for different date ranges.
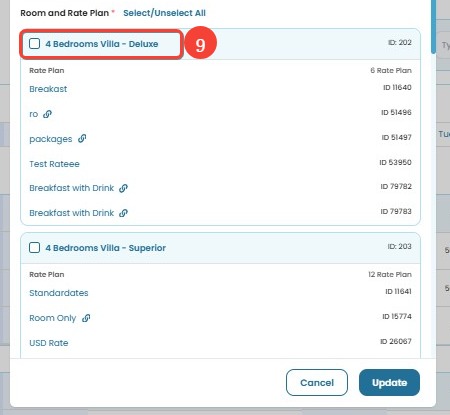
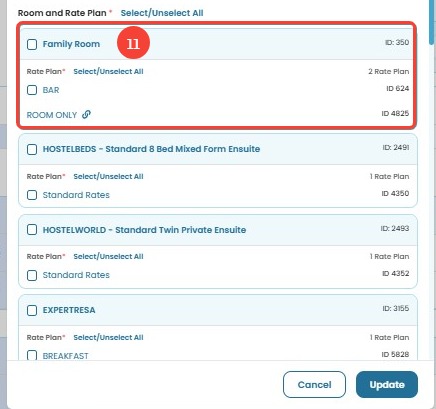
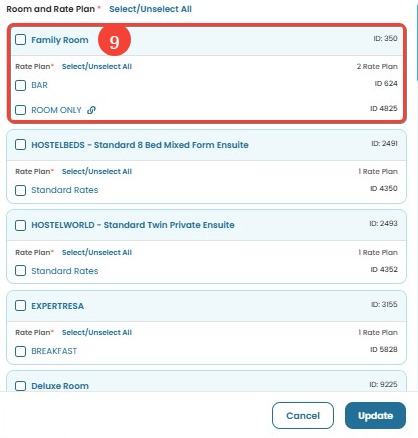
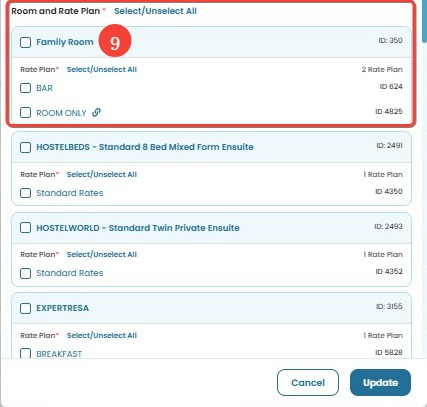
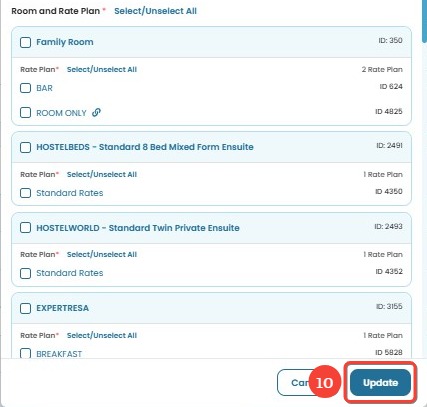
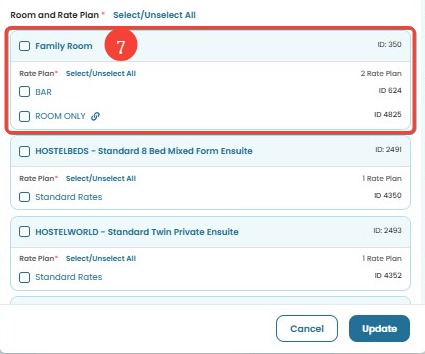
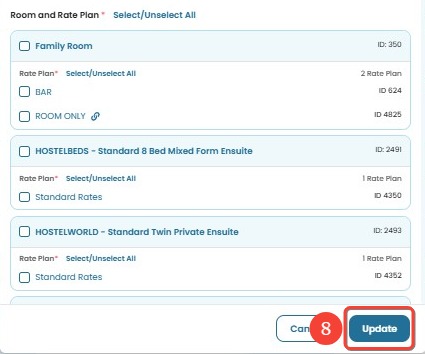
- Select the Room and Rate Plan to apply the update by checking the corresponding checkboxes in the list.
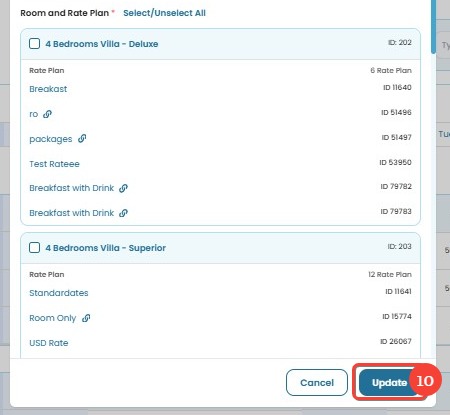
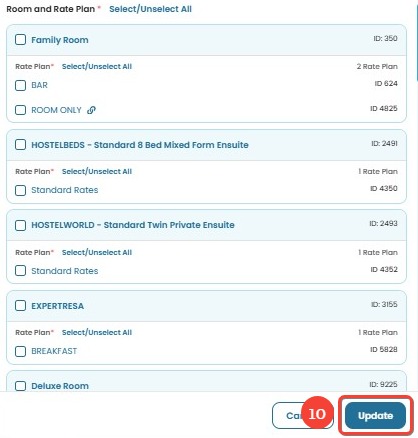
- Click Update to apply the changes. A success notification will confirm that the update has been successfully applied.
[!NOTE] Notes:
- Make sure to double-check the selected date range and days before submitting the update.
- Changes will be reflected across all selected OTAs.
- If the availability update does not appear immediately, allow some time for synchronization with the OTAs.
[!NOTE]
Troubleshooting Bulk Update Availability Issues
The Bulk Update button is missing
- Ensure you have the correct access permissions.
- Refresh the page or log out and log back in.
Availability updates are not applied
- Double-check that the correct date range and days have been selected.
- Confirm that the value entered is within the acceptable range.
- Refresh the page and try again.
- If the issue persists, review the change log or contact support.
No success notification appears after submission
- Ensure your internet connection is stable.
- Wait a few moments and check if the updates are reflected.
- If the issue persists, try reapplying the update.
Update does not reflect on OTA platforms
- Check if there is a delay in synchronization between the system and the OTA.
- Verify if availability settings are being overridden by other rules.
- Review the logs to confirm if the update was correctly applied.
Bulk Update Rates
How to Bulk Update for Rates
- Click the Bulk Update button.
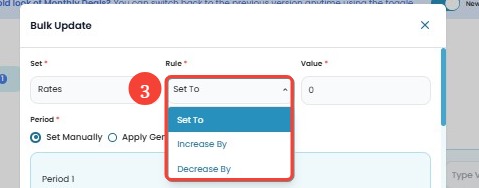
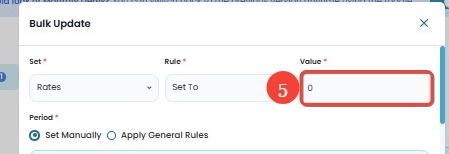
- In the Set dropdown, select Rates.
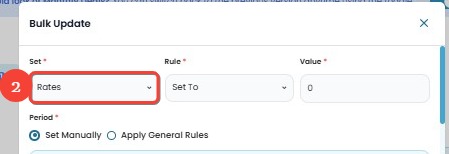
- In the Rule dropdown, select an applicable rule:
- Set To → Directly set a specific rate.
- Increase By → Increase the rate by a specific amount or percentage.
- Decrease By → Decrease the rate by a specific amount or percentage.
- If you select Increase By or Decrease By, an additional dropdown will appear allowing you to choose between Amount or Percentage:
- Amount: Directly adds or subtracts a fixed value. Example:
- If current rates are 100,000 and 150,000, and you select Increase By 100,000 (Amount), the new rates will be 200,000 and 250,000.
- Percentage: Adjusts the rate based on a percentage of the current rate. Example:
- If current rates are 100,000 and 200,000, and you select Decrease By 10%, the new rates will be 90,000 and 180,000.

- If current rates are 100,000 and 200,000, and you select Decrease By 10%, the new rates will be 90,000 and 180,000.
- Amount: Directly adds or subtracts a fixed value. Example:
- Enter the rate adjustment in the Value field (numbers only, without dot, comma, or special characters).
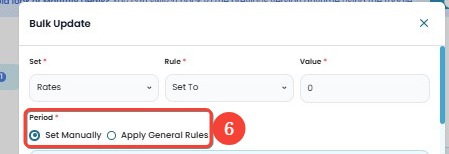
- Under Period, choose one of the following options:
- Set Manually → Define the period manually.
- Apply General Rules → Use pre-defined rules.
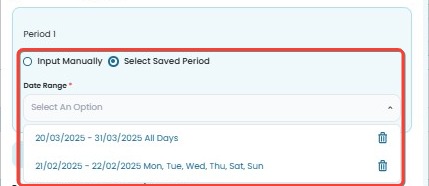
- In Period 1, choose between:
- Input Manually → Specify the Date Range manually.
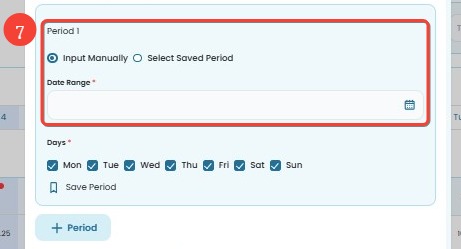
- Select Saved Period → Pick a previously saved period.
- Input Manually → Specify the Date Range manually.
- Select the applicable days (Monday - Sunday) by checking the boxes.
- (Optional) Click Save Period if you want to save the selected period for future use.
- (Optional) Click + Period if you need to add multiple periods for different rates.
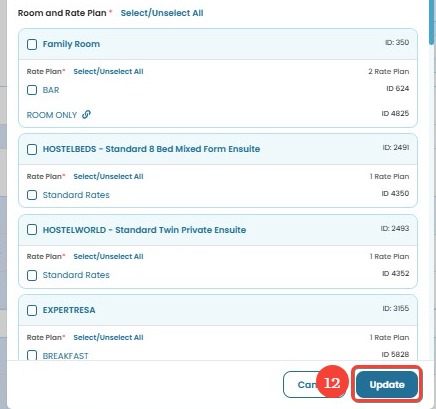
- Select the Room and Rate Plan to apply the update by checking the corresponding checkboxes in the list.
- Click Update to apply the changes. A success notification will confirm that the update has been successfully applied.
[!NOTE]
Important Notes:
- One room can have multiple rate plans.
- Linked Rate Plan (Child Rate Plan) is indicated by a chain icon.
- Rates for Monthly Deals cannot be updated directly. You must update the parent rate (Rooms). The child rate will automatically adjust according to the parent settings.
- Bulk Update does not support rate updates for child/linked rate plans. Adjustments should be made from the parent rate.
- Bulk update rates only works if Channel Manager is already connected to an OTA channel.
- Make sure to choose Increase By or Decrease By before selecting Percentage. Percentage option will only appear when using Increase By or Decrease By. It cannot be used with Set To, which requires a specific value.
- You can click the Trash icon to remove additional period.
- Bulk updates will reflect on all connected channels.
[!NOTE]
Troubleshooting Bulk Update Rates Issues
Rates are not updating
- Ensure you selected the correct rate plan and date range.
- Verify that linked rate plans are updated via their parent rates.
- Confirm that changes are within the acceptable value range.
- If the issue persists, refresh and retry or contact support.
Linked rate plan (child rate) is changing unexpectedly
- Ensure that changes are only applied to the parent rate, as child rates adjust automatically.
- Check if there are automated rules affecting rate calculations.
Rates change but do not match expected values
- Verify if the applied rule (Set To, Increase By, Decrease By) is correct.
- Check if additional discounts or markups are being applied automatically.
- Review any price rounding settings that might be affecting the final rate.
Rates updated successfully but not reflected in OTA
- Allow time for synchronization between the system and OTA.
- Check if rate parity rules are affecting the displayed rates. These are OTA-imposed rules that enforce rate consistency across platforms.
- Review the logs to confirm if updates were correctly applied.
Bulk Update Minimum Night
How to Bulk Update for Minimum Night
- Click the Bulk Update button.
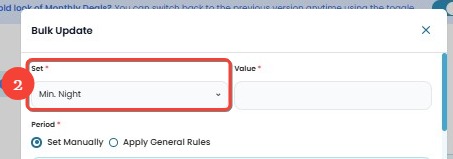
- In the Set dropdown, select Minimum Night.
- Input the desired minimum night value.
- Example: If your current Minimum Night is 1, and you want to set it to 2, then input 2.
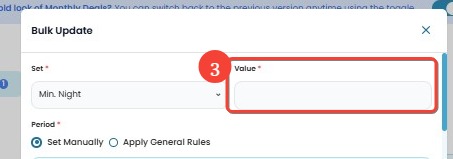
- Example: If your current Minimum Night is 1, and you want to set it to 2, then input 2.
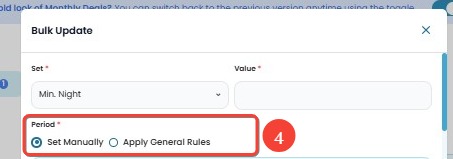
- Under Period, choose one of the following options:
- Set Manually → Define the period manually.
- Apply General Rules → Use pre-defined general rules.
- In Period 1, choose between:
- Input Manually → Specify the Date Range manually.
- Select Saved Period → Pick a previously saved period.
- Input Manually → Specify the Date Range manually.
- Select the applicable days (Monday - Sunday) by checking the boxes.
- (Optional) Click Save Period if you want to save the selected period for future use.
- (Optional) Click + Period if you need to add multiple periods.
- Select the Room and Rate Plan to apply the update by checking the corresponding checkboxes.
- Click Update to apply the changes. A success notification will confirm that the update has been successfully applied.
[!NOTE]
Important Notes:
- Minimum Night settings in Bookandlink apply at the Rate Plan level.
- You can add multiple periods by clicking + Period.
- Un/Select All: Use this option to quickly select or deselect all rooms and rate plans.
- Trash Icon: Use this to remove additional period blocks.
- Bulk Update Minimum Night will reflect across all connected channels.
[!NOTE]
Troubleshooting Bulk Update Minimum Night Issues
Minimum night update is not applied
- Ensure that you have selected the correct room and rate plan before clicking Update.
- Double-check if the selected date range includes the intended period.
- If the issue persists, refresh the page and retry.
Minimum night is not updating across channels
- Wait a few minutes and refresh, as synchronization might take some time.
- If changes are still not applied, try reapplying the update.
Unable to select a date range
- This may be due to a browser issue. Try clearing your browser cache or using an incognito window.
- Ensure that Set Manually is selected if you are trying to input a custom date range.
The "Update" button is disabled
- Check if all required fields are filled, including Value (Min. Night), Date Range, and Room/Rate Plan.
- If using a saved period, ensure that it is correctly applied.
Error message appears after clicking "Update"
- This could be due to a temporary system timeout. Try refreshing the page and attempting again.
- If the issue continues, check your internet connection or contact support.
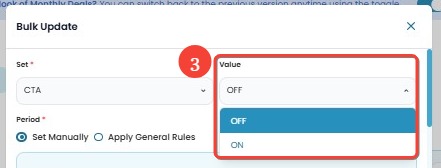
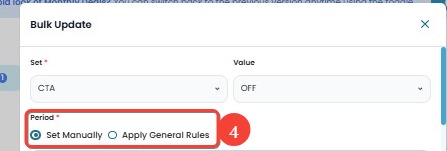
Bulk Update Close To Arrival (CTA)
How to Bulk Update for Close To Arrival (CTA)
- Click the Bulk Update button.
- In the Set dropdown, select CTA
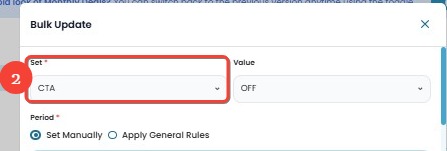
- In the Value dropdown, select:
- ON → Prevents check-in on OTAs.
- OFF → Allows check-in on OTAs.
- Under Period, select one of the following:
- Set Manually → Define the period manually.
- Apply General Rules → Use predefined rules.
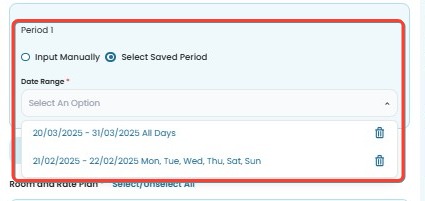
- In Period 1, choose between:
- Input Manually → Specify the Date Range manually.
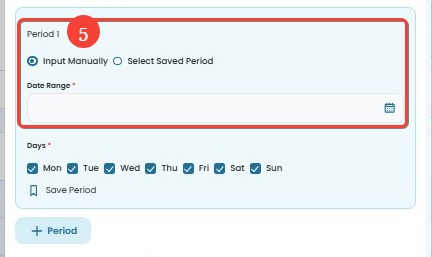
- Select Saved Period → Pick a previously saved period.
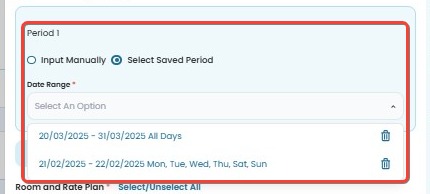
- Input Manually → Specify the Date Range manually.
- Select the applicable days (Monday - Sunday) by checking the boxes.
- (Optional) Click Save Period to save the selected period for future use.
- (Optional) Click + Period to add multiple periods with different settings.
- Select the applicable Room and Rate Plan by checking the corresponding checkboxes.
- Click Update to apply the changes. A success notification will confirm that the update has been applied.
[!NOTE]
Troubleshooting Bulk Update CTA Issues
CTA settings are not updating
- Ensure the correct room, rate plan, and date range are selected.
- Check if the selected rate plan supports CTA settings.
- If updating multiple periods, confirm that there are no overlapping date ranges.
- Try refreshing the page and repeating the update.
CTA updates successfully but does not reflect on OTAs
- Wait a few minutes, as updates may take time to synchronize with OTAs.
- Verify if the room is listed under multiple rate plans, and check if CTA is applied to all relevant plans.
- Ensure that channel mappings are correctly configured.
CTA is applied, but rooms are still available for check-in
- Confirm that the correct value (ON/OFF) was selected.
- Check if other restrictions, such as Stop Sell or Minimum Night Stay, are overriding CTA settings.
- Review the logs to ensure the update was processed successfully.
Bulk Update Close To Departure (CTD)
How to Bulk Update for Close To Departure (CTD)
- Click the Bulk Update button.
- In the Set dropdown, select CTD.
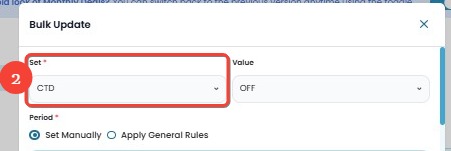
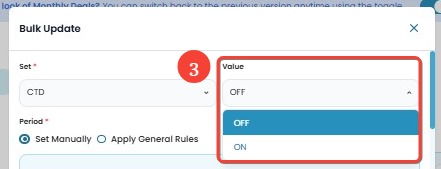
- In the Value dropdown, select:
- ON → Prevents check-out on OTAs.
- OFF → Allows check-out on OTAs.
- Under Period, select one of the following:
- Set Manually → Define the period manually.
- Apply General Rules → Use predefined rules.
- In Period 1, choose between:
- Input Manually → Specify the Date Range manually.
- Select Saved Period → Pick a previously saved period.
- Input Manually → Specify the Date Range manually.
- (Optional) Click + Period to add multiple periods with different settings.
- Select the applicable Room and Rate Plan by checking the corresponding checkboxes.
- Click Update to apply the changes. A success notification will confirm that the update has been applied.
[!NOTE]
Troubleshooting Bulk Update CTD Issues
CTD settings are not updating
- Ensure the correct room, rate plan, and date range are selected.
- Check if the selected rate plan supports CTD settings.
- If updating multiple periods, confirm that there are no overlapping date ranges.
- Try refreshing the page and repeating the update.
CTD updates successfully but does not reflect on OTAs
- Wait a few minutes, as updates may take time to synchronize with OTAs.
- Verify if the room is listed under multiple rate plans, and check if CTD is applied to all relevant plans.
- Ensure that channel mappings are correctly configured.
CTD is applied, but rooms are still available for check-out
- Confirm that the correct value (ON/OFF) was selected.
- Check if other restrictions, such as Stop Sell or Minimum Night Stay, are overriding CTD settings.
- Review the logs to ensure the update was processed successfully.
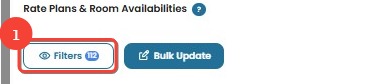
Filter
How to Use the Calendar View Filter
- Click the Filter button in the Calendar View.
- Under Restrictions, select the columns you want to display in the Rates and Availability Calendar:
- Minimum Nights
- Stop Sell
- CTA (Close to Arrival)
- CTD (Close to Departure)
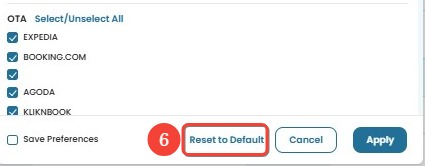
- Click Select/Unselect All to quickly select or deselect all restriction options.
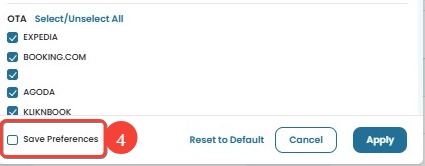
- Under OTA, select the channels you want to display in the calendar.
- Click Select/Unselect All to quickly select or deselect all OTA options.
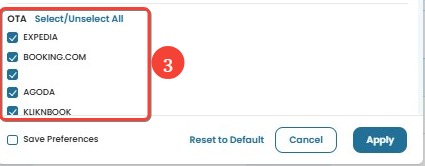
- Click Select/Unselect All to quickly select or deselect all OTA options.
- (Optional) Tick Save Preferences to save the selected filter settings even after you refresh the page.
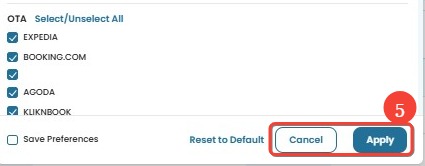
- Click Apply to update the Calendar View.
- If you click Cancel, no changes will be applied, and the filter settings will remain unchanged.
- If you click Cancel, no changes will be applied, and the filter settings will remain unchanged.
- If needed, click Reset to Default to revert to the original filter settings.
[!NOTE]
Troubleshooting Calendar View Filter Issues
Selected filters are not saved after page refresh
- Ensure that Save Preferences is checked before clicking Apply.
- If not selected, the filter settings will be lost when the page is refreshed.
Changes in filter are not reflected in the Calendar View
- Make sure to click Apply after adjusting the filters.
- If Cancel is clicked instead, no changes will take effect.
Restriction columns are not visible in the calendar
- Confirm that the desired options under Restrictions (e.g., Minimum Nights, Stop Sell, CTA, CTD) are selected.
- Use Select/Unselect All if needed, then click Apply.
OTA channels are not displayed in the calendar
- Verify that the correct OTA channels are selected in the OTA section.
- Click Select/Unselect All to quickly manage all selections.
Reset to Default doesn't restore the original settings
- Try clicking Reset to Default again and confirm the filters update.
- If it still doesn’t work, refresh the page and apply the desired settings manually.
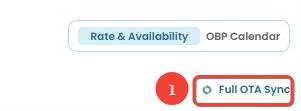
Full OTA Sync
Full OTA Sync allows you to send the existing table data to OTAs for up to two years ahead. This synchronization includes rates, availability, minimum nights, CTA, CTD, and Stop Sell. Only existing data in the table will be synced—newly added data will not be included in the update.
How to Use Full OTA Sync
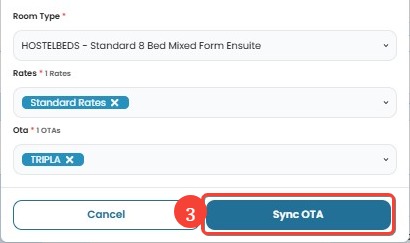
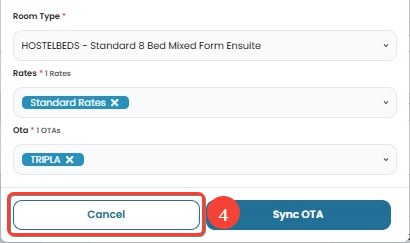
- Click the Full OTA Sync button in the Rates & Availability section.
- In the Full OTA Sync pop-up, select the data you want to sync:
- Room Type: Choose the room type to update.
- Rates: Select the rate plan(s) to sync.
- OTA: Select the OTA channels that will receive the updates.

- Click Sync OTA to send the existing table data to the selected OTAs.
- Only existing data will be synced. Newly added data will not be included in the update.
- The synchronization will update rates, availability, minimum nights, CTA, CTD, and Stop Sell up to the maximum date allowed by each OTA (usually up to two years ahead).
- Click Cancel if you do not wish to proceed.
[!NOTE]
Troubleshooting Full OTA Sync Issues
Sync button is disabled
- Ensure that at least one Room Type, Rate, and OTA is selected before clicking Sync OTA.
Not all data is updated in OTA
- Only existing data in the table is synced. Newly added data is not included. Ensure the data already exists before syncing.
Sync process takes too long
- A large amount of data is being processed. Wait for the process to complete.
- If it takes too long, try syncing smaller batches by selecting fewer room types or rates.
OTA does not reflect the updates
- Some OTAs take time to process updates. Wait a few minutes and check again.
- If the issue persists, retry syncing or contact support.
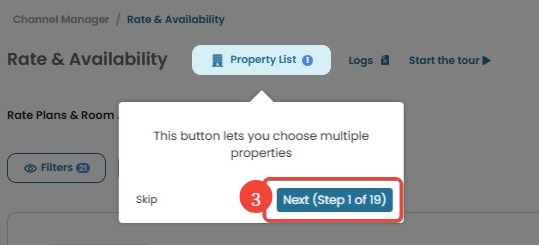
Rate and Availability Tour
The Rate and Availability Tour provides a step-by-step guide to help you understand and navigate the Rates & Availability feature effectively. This guided tour will walk you through the essential functionalities to ensure you get the most out of it.
How to Start the Tour
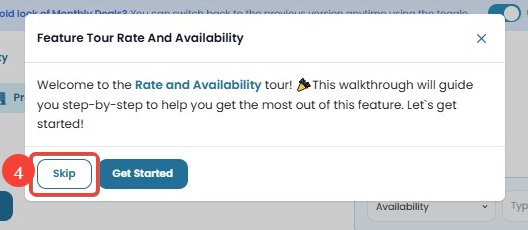
- When you access the Rates & Availability section for the first time, a pop-up will appear prompting you to start the tour.
- Click Get Started to begin the guided tour.
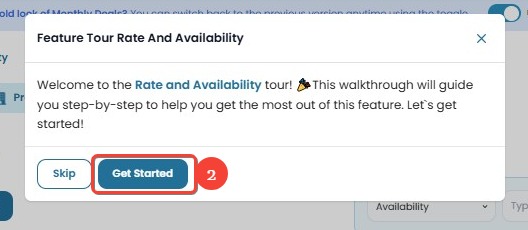
- Follow the on-screen instructions to learn about key features step by step.
- If you don’t want to take the tour at the moment, click Skip to dismiss the pop-up.
[!NOTE]
Troubleshooting Feature Tour Issues
The tour does not appear
- The tour will only appear the first time you access Rates & Availability.
- If you skipped it previously, it will not show again automatically.
I want to restart the tour
- If you skipped the tour but want to take it again, check if there is an option to restart it in the settings.
- If not available, contact support for assistance.
OBP Calendar
Coming Soon.....