Introduction
The Rooms section allows property managers to create and manage Room Types, Rateplans, and Linked Rateplans. You can also rearrange the order of room types and rateplans for better visibility and organization on the booking page.
Create Room Type
The Create Room Type function allows property managers to define new room types by entering the room name, description, and total units. Additional options include selecting specific amenities and uploading room-type-specific images. These room types serve as the foundation for assigning rateplans and are critical for organizing accommodation offerings effectively.
How to Create Room Type
-
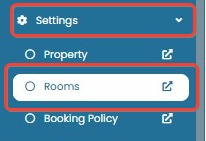
Go to Settings > Rooms.
-
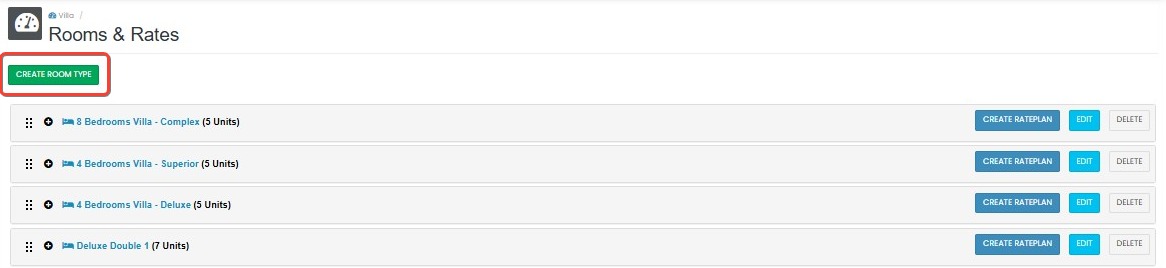
Click "Create Room Type" to begin.
-
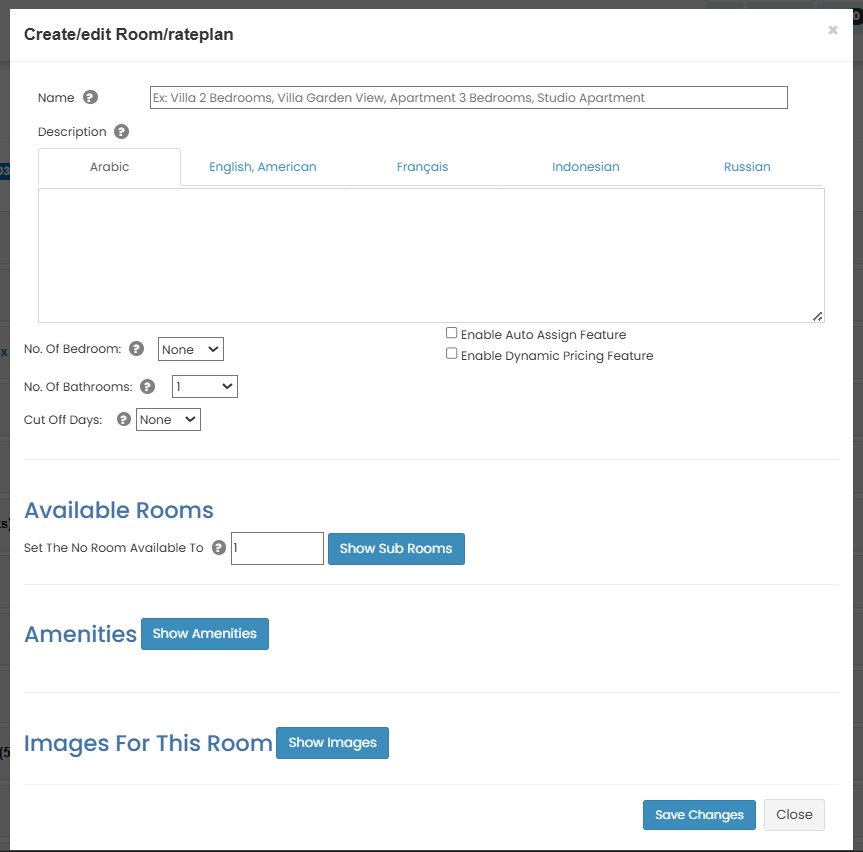
Fill in the Room Type details:
- Name – The name of the room type (e.g., Standard Room).
- Description – A short description of this room type.
- Total Unit – Total number of rooms available under this type.
- No. of Bedroom – Number of bedrooms inside the unit.
- Cut Off Days – Limit how many days before arrival the room can be booked.
- Enable Auto Assign Feature – Automatically assign rooms from available inventory.
- Enable Dynamic Pricing Feature – Enable price adjustment based on demand and rules.
- Available Rooms – Select specific rooms that belong to this room type.
Note: The Free Allotment feature allows availability to be synchronized without manual room allotment configuration. Effective May 8, 2026, this feature can only be activated through the Support Team. Please contact your support team for activation assistance.
-
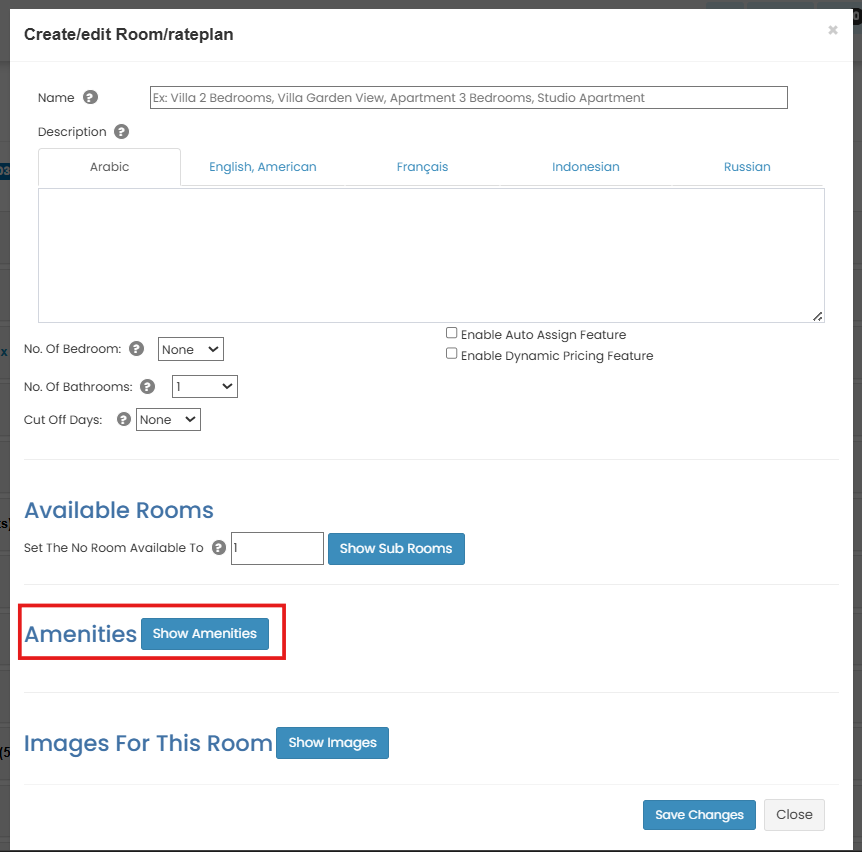
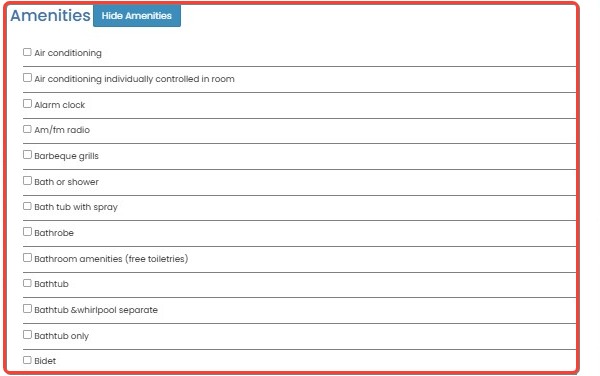
Click "Show Amenities" and select available option
-
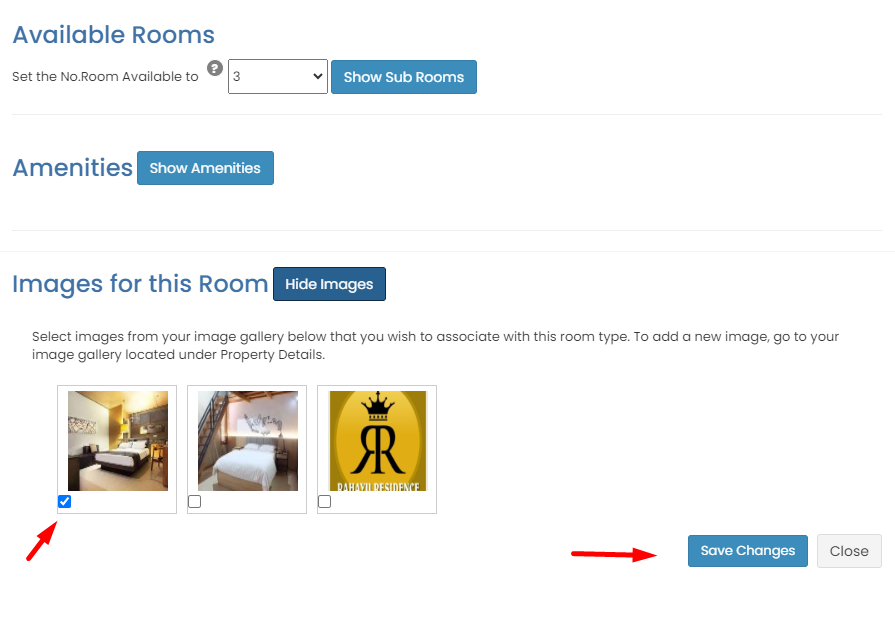
Click "Show Images", then upload and assign images specific to this room type.

-
Click "Save Changes" to complete the setup.
[!NOTE]
Troubleshooting Create Room Type
Unable to Save Room Type
- Ensure that all required fields (e.g., Room Name, Description, Total Unit) are filled out.
- Check if you have selected at least one Available Room. If none are selected, the system will not allow you to save.
- If any images are being uploaded, verify that they meet the required format and dimension guidelines.
Error While Uploading Images
- Make sure that the images you are uploading meet the recommended size and format.
- Refresh the page and try uploading again if the images don’t appear.
Amenities List Not Showing
- Try clicking on "Show Amenities" again to refresh the list.
- Ensure you have selected the right option to enable amenities for the room type.
Changes Not Reflected After Saving
- Wait a few seconds for the system to update after clicking Save Changes.
- Refresh the page after waiting for the confirmation notification to ensure the changes are saved.
Create Rateplan
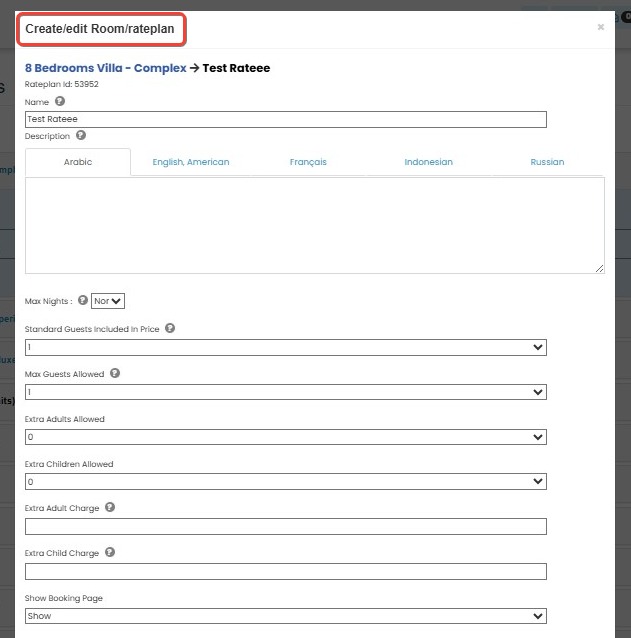
The Create Rateplan feature enables the setup of pricing and booking rules for a specific room type. It includes fields for setting default rates, minimum stays, cancellation policies, deposit amounts, and extra person charges. Rateplans also allow properties to define whether the rate should be visible on the booking page, supporting flexible pricing strategies.
How to Create Rateplan
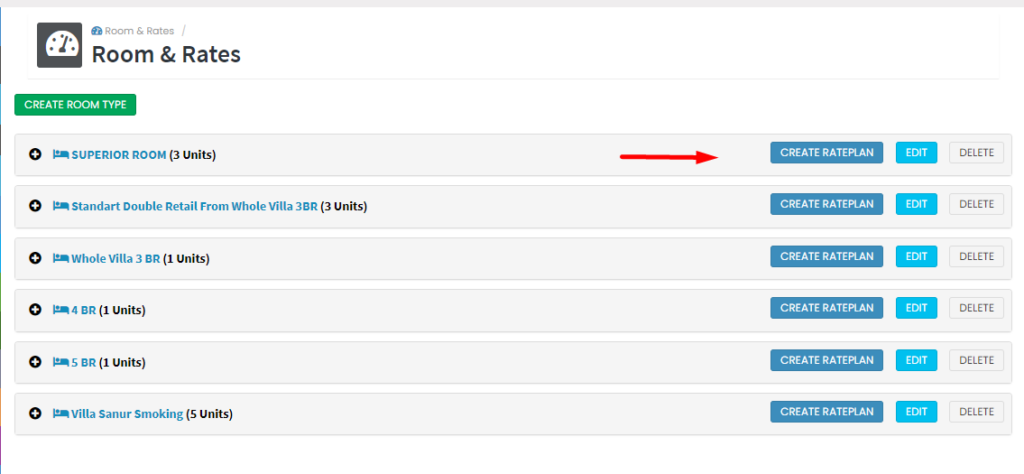
- Click "Create Rateplan".
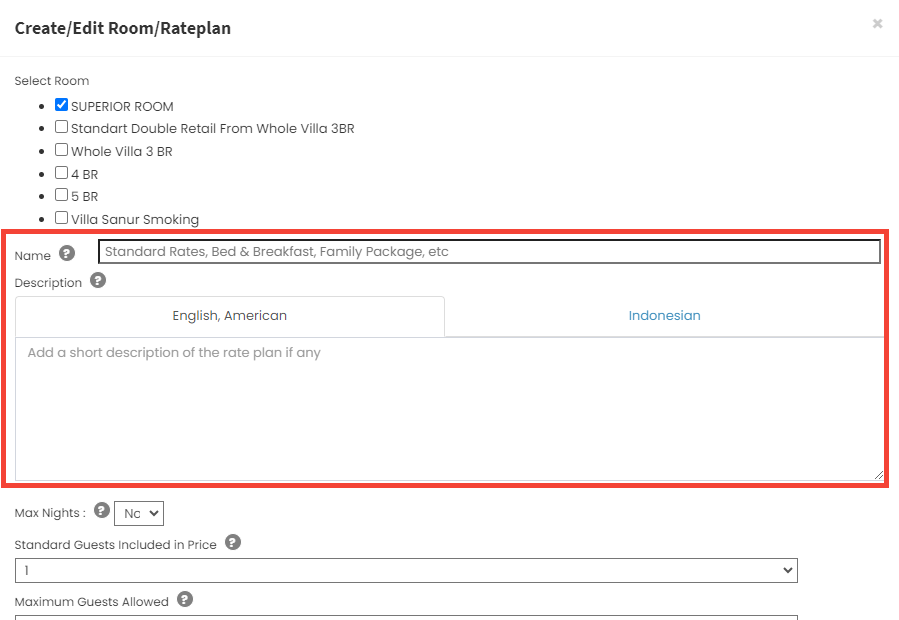
- Fill in the Rateplan name and description.
- Configure rateplan settings:
- Number of persons
- Extra person charges (if applicable)
- Visibility on Booking Page (Show/Hide)
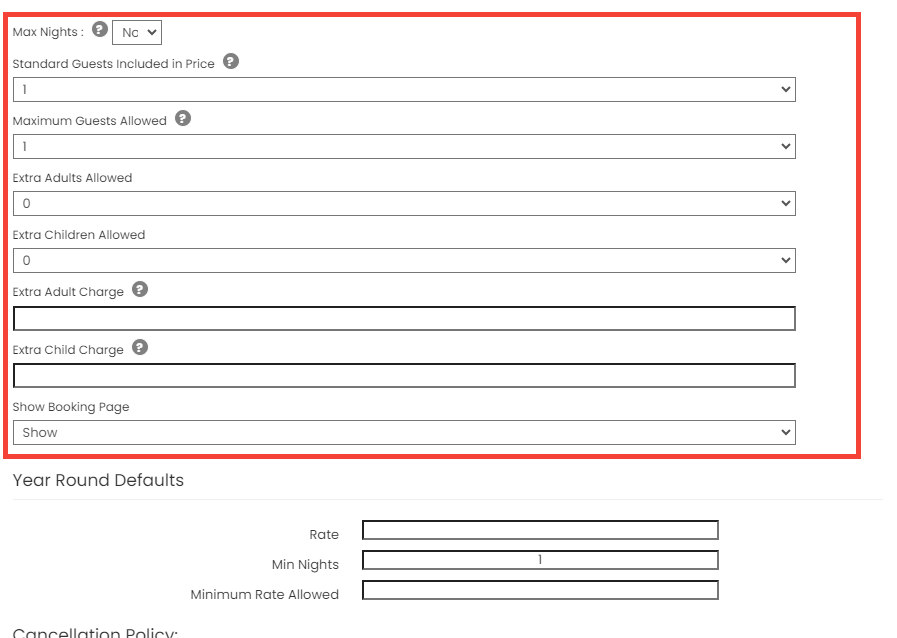
- Additional settings:
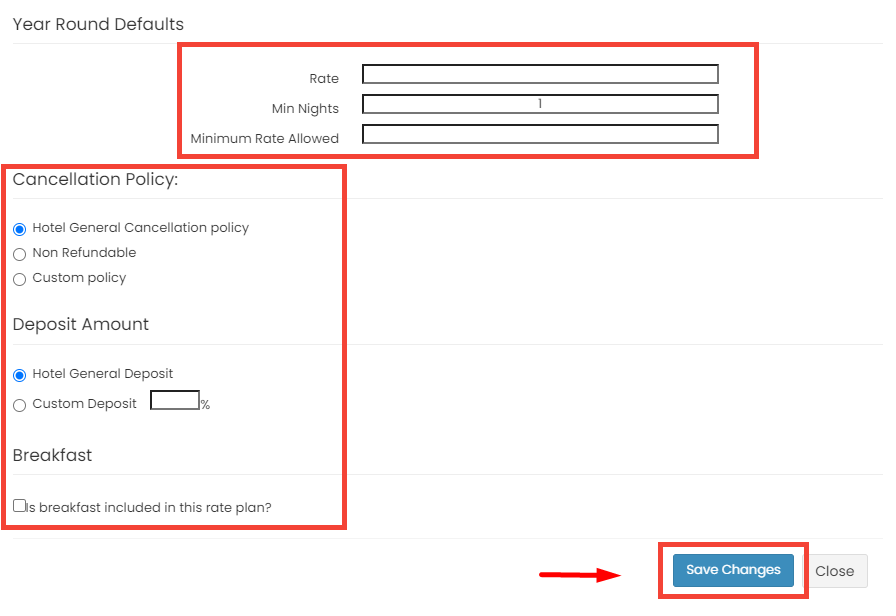
- Default Rate
- Minimum Nights
- Minimum Rate Allowed
- Cancellation Policy
- Deposit Amount
- Breakfast (tick = include breakfast; untick = room only)
- Click "Save Changes" to finish.
[!NOTE]
Troubleshooting Create Rateplan
Unable to Save Rateplan
- Ensure all required fields (e.g., Rateplan Name, Description, Default Rate) are filled out.
- If using a cancellation policy, ensure that the policy is properly selected from the available options.
- Check if all settings like Number of Persons and Extra Person Charges are properly configured.
Rateplan Not Visible on Booking Page
- Make sure that the Visibility on Booking Page is set to Show.
- Verify that the Default Rate is set and that it is valid for display on the booking page.
Extra Person Charges Not Applied
- Double-check the Extra Person Charges setting to ensure it is enabled and properly configured.
- Ensure that the Number of Persons field is correctly set according to the room's capacity.
Changes Not Reflected After Saving
- Wait a few seconds for the system to update after clicking Save Changes.
- Refresh the page after the confirmation message appears to verify that the changes have been applied correctly.
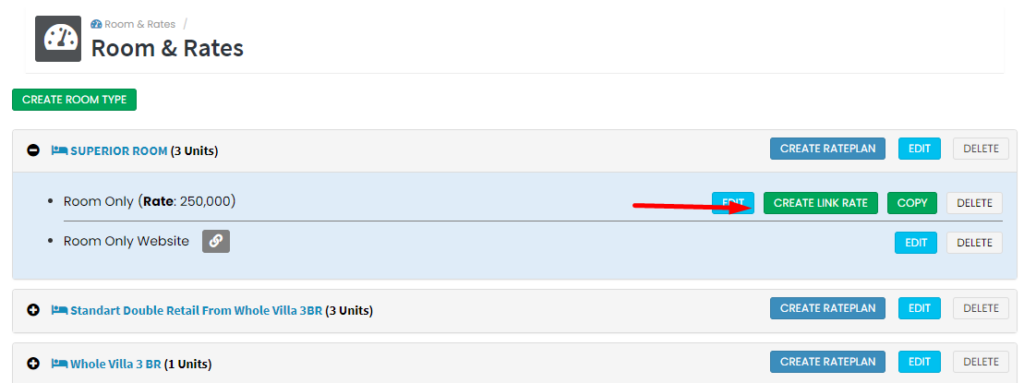
Create Linked Rateplan
Linked Rateplans are derivative rate structures based on a parent rateplan. This option simplifies the process of creating discounted or adjusted pricing by applying increase/decrease rules using fixed amounts or percentages. Linked rateplans inherit the room type and rateplan context while allowing configuration for visibility, policies, and additional guest handling.
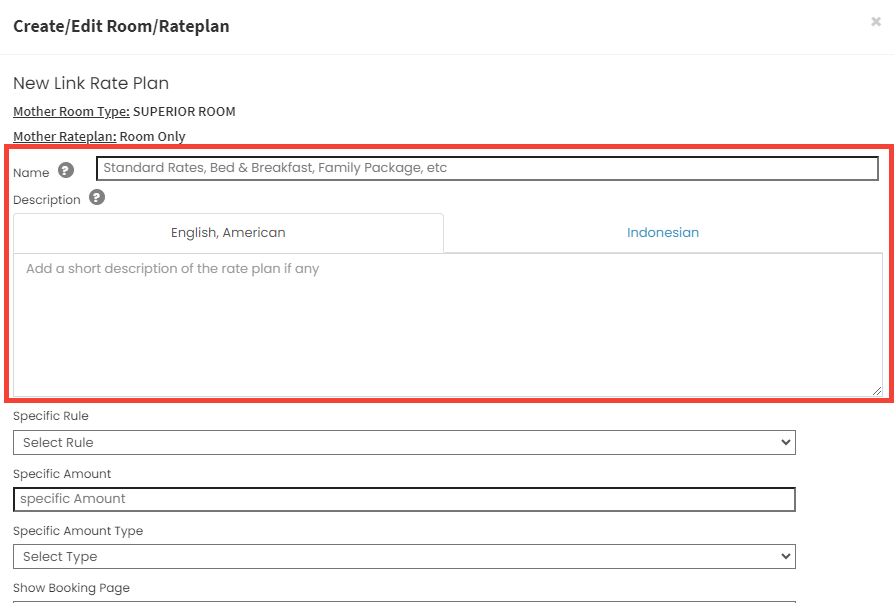
How to Create Linked Rateplan
-
Click "Create Link Rate".
-
Fill in name and description.
- Name – Enter the name of the Linked Rateplan.
- Description – Provide details about this rateplan (optional, multilingual).
-
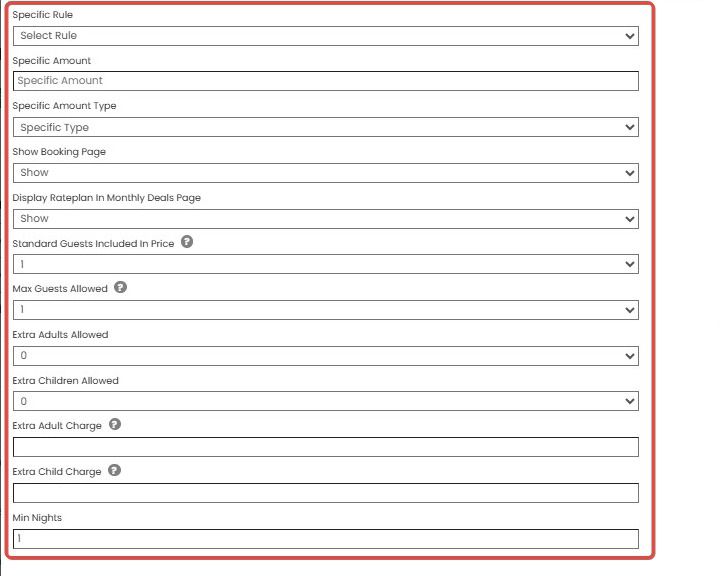
Configure linked rate settings:
- Rule – Choose whether the linked price will increase or decrease from the base rate.
- Amount – Enter the value to add or subtract.
- Amount Type – Choose between Amount (fixed value) or Percentage.
- Show/Hide on Booking Page – Control visibility to guests.
- Show/Hide Rateplan in Monthly Deals Calendar – Control visibility for calendar-based deal management.
- Number of Persons – Define default guest capacity.
- Extra Person & Charges – Set policy and charges for additional guests.
- Minimum Nights – Minimum stay requirement.
-
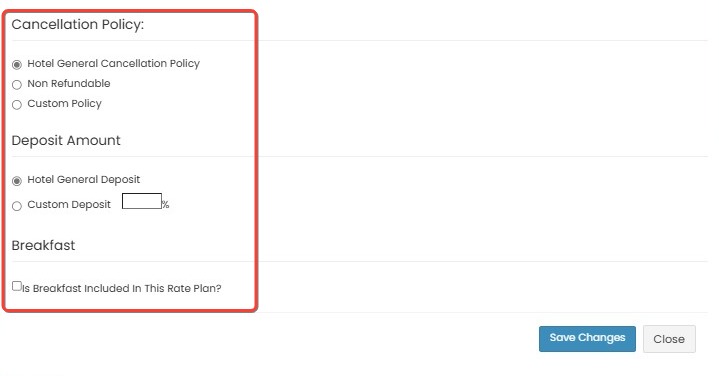
Additional settings:
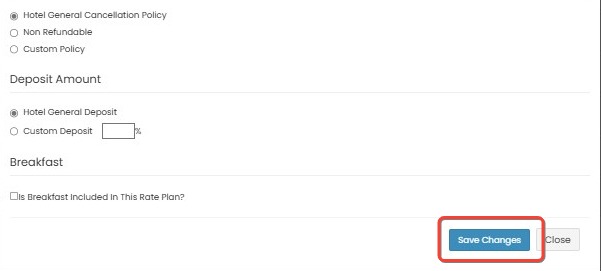
- Cancellation Policy:
Choose one of the following predefined cancellation options:- Hotel General Cancellation Policy – applies the property's default policy.
- Non-Refundable – guest will be charged 100% regardless of cancellation time.
- Custom Policy – select this option to define a custom cancellation policy. After selecting this option, a field will appear where you can input the details of your custom policy.
- Deposit Amount:
Choose from:- Hotel General Deposit – applies the deposit rule set at the property level.
- Custom Deposit – define a custom percentage by filling in the field next to it.
- Breakfast Inclusion:
- Tick the checkbox to indicate that breakfast is included in the rate. Leave it unticked for Room Only rates.
- Tick the checkbox to indicate that breakfast is included in the rate. Leave it unticked for Room Only rates.
- Cancellation Policy:
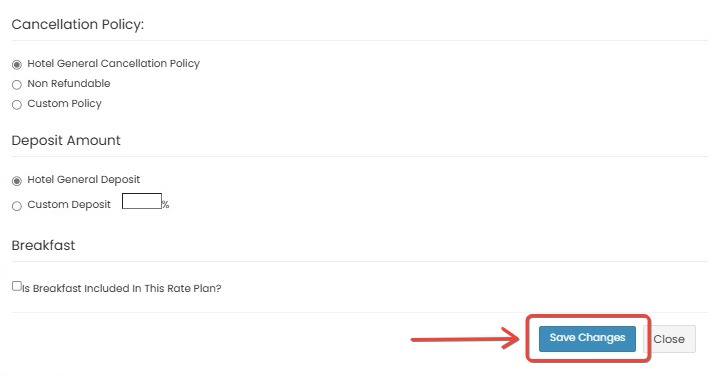
-
Click "Save Changes" to apply settings.
[!NOTE]
Troubleshooting Create Linked Rateplan
Unable to Save Linked Rateplan
- Ensure that all required fields (e.g., Name, Description, Rule, Amount) are filled out correctly.
- Verify that you have selected a valid Rule (increase or decrease) and provided the appropriate Amount.
Linked Rateplan Not Visible on Booking Page
- Check the Show/Hide on Booking Page setting and ensure it is set to Show.
- Ensure that the Show/Hide Rateplan in Monthly Deals Calendar is also set correctly if you want it visible there.
Extra Person Charges Not Applied
- Double-check the Extra Person & Charges settings to ensure that the policy and charges for additional guests are configured correctly.
Cancellation Policy Not Working as Expected
- Make sure the correct Cancellation Policy option is selected and configured.
- If using a Custom Policy, ensure the details are correctly entered.
Deposit Amount Not Applied
- Confirm that the Deposit Amount is correctly set to either the Hotel General Deposit or a Custom Deposit with the correct percentage.
Changes Not Reflected After Saving
- Wait for the confirmation message after saving. Refresh the page after the message disappears to verify that the changes have been applied correctly.
Re-Arrange Room Type & Rateplan Layout
In this section, you can manually re-arrange the order of Room Types and Rateplans for your property. By default, Room Types and Rateplans are sorted by their creation, but you can customize the order based on your preferences. This feature allows you to improve the organization of your property’s room offerings and rates for better accessibility.
How to Re-Arrange Room Type & Rateplan Layout
By default, Room Types and Rateplans are sorted by creation ID. You can re-order them manually.
- Click the ( + ) icon to expand rateplan section.
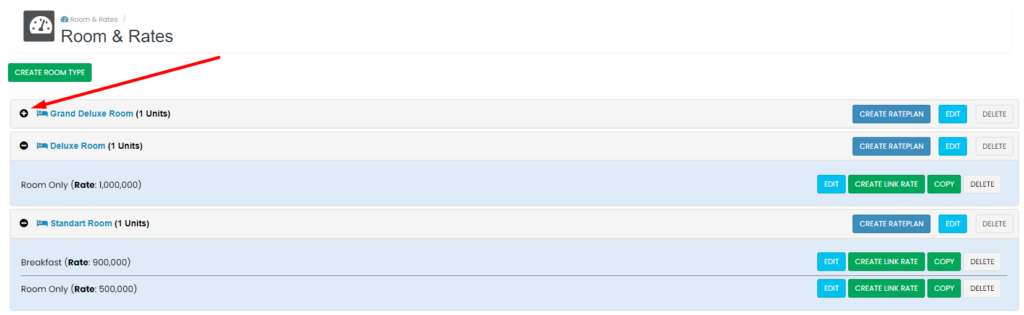
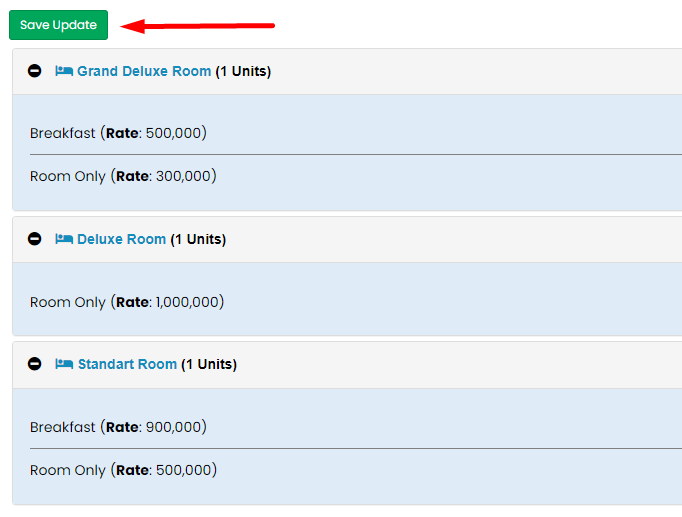
- Hover on a Room Type or Rateplan, then click and drag to rearrange the order. Note: When moving a rateplan, do not drag it outside its Room Type container.
- After rearranging, a Save Update button will appear. Click it to save changes.
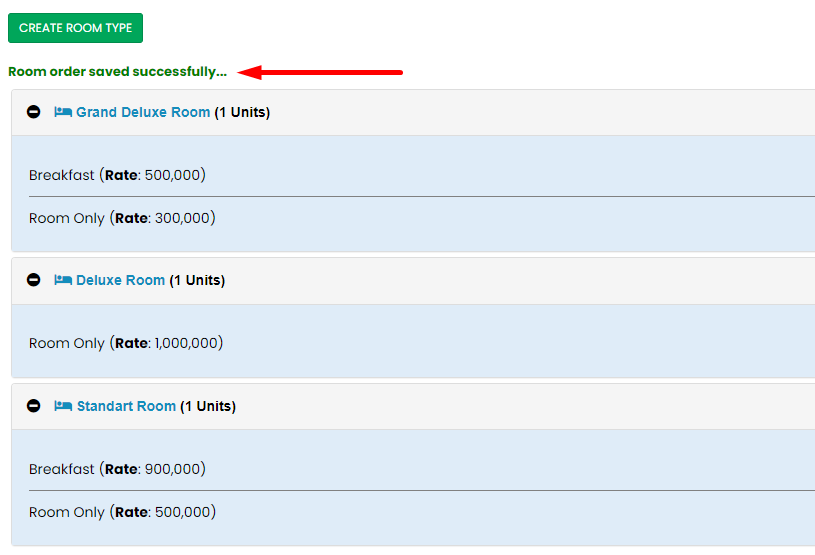
- A success notification will appear. Wait until the message disappears and wait 5–10 seconds before refreshing the browser.
[!NOTE]
Troubleshooting Re-Arrange Room Type & Rateplan Layout
Changes Not Saving After Rearranging
- Ensure that after rearranging, the Save Update button is clicked to confirm the changes.
- If the button does not appear, make sure that the Room Types and Rateplans are properly dragged within the container (rateplans should not be moved outside their Room Type section).
Re-arranged Items Do Not Reflect Immediately
- Wait for the success notification after saving the changes. Refresh the browser only after the notification disappears to allow time for the update to apply.
Unable to Drag and Drop Rateplans
- Ensure you are hovering on the Room Type or Rateplan correctly. If dragging still doesn't work, try refreshing the page and attempting again.
- Make sure you do not drag the rateplan outside its Room Type container.
Layout Not Appearing as Expected After Refresh
- If the changes do not appear after a page refresh, wait 5–10 seconds before refreshing again. This allows the system to fully save and reflect the updates.
Edit
The Edit option allows property managers to modify the name and description of existing room types or rateplans. Multilingual support is included to ensure localized display across different guest regions. Changes are applied immediately after saving through a pop-up form.
How to Edit Room Type or Rateplan
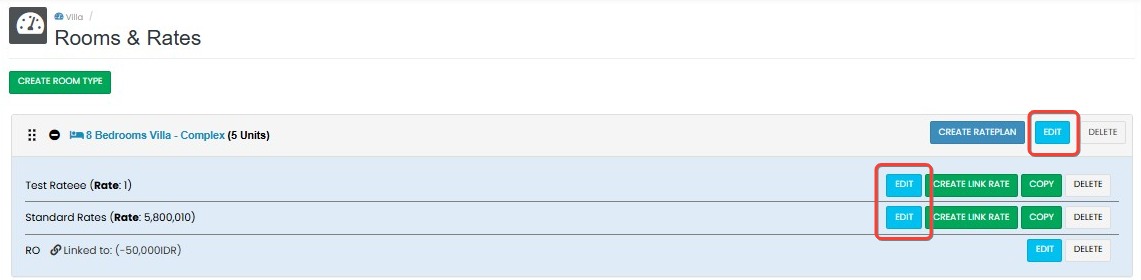
- Click the Edit button next to the Room Type or Rateplan you want to modify.
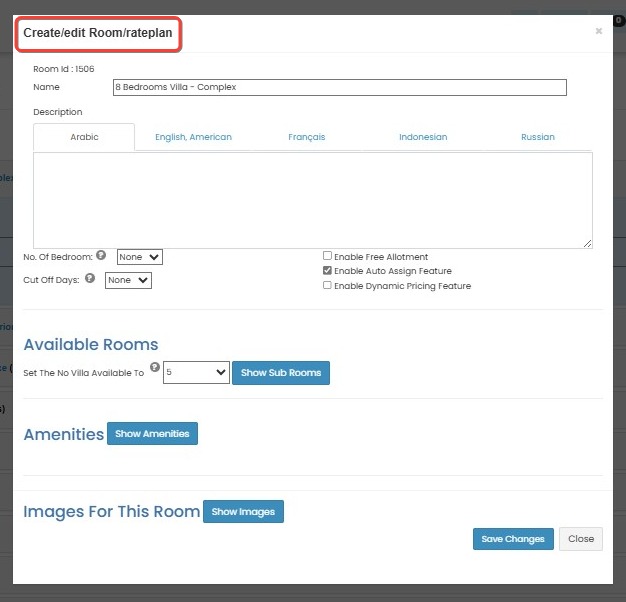
- A popup form will appear showing the current name and multilingual description fields.
- For Rateplan, the popup includes Mother Room Type and Rateplan Name, with language tabs (Arabic, English, American, Français, Indonesian, Russian) to update the description.
- For Linked Rateplan
- For Rateplan, the popup includes Mother Room Type and Rateplan Name, with language tabs (Arabic, English, American, Français, Indonesian, Russian) to update the description.
- Modify the content as needed, then click Save Changes to apply the update.
[!NOTE]
Troubleshooting Edit Room Type or Rateplan
Unable to Open the Edit Popup
- Ensure that you are clicking the Edit button next to the correct Room Type or Rateplan. If the popup does not appear, try refreshing the page and then clicking Edit again.
Changes Not Saved After Editing
- Double-check that after modifying the name or description, you have clicked Save Changes. If the popup closes without saving, the changes will not be applied.
- If the Save Changes button is unresponsive, check for internet connectivity issues.
Multilingual Descriptions Not Updating
- Ensure that you are selecting the correct language tab and inputting the updated description in the desired language.
- If the language tab is missing or does not show the expected options, try clearing your browser cache or refresh the page.
Edit Button Not Visible
- Make sure that you have the appropriate permissions to edit Room Types or Rateplans. If the Edit button is not visible, contact the admin to ensure your access rights are correctly configured.
Popup Form Not Displaying Correct Fields
- If the popup form does not show the expected fields for name and description, refresh the page and try again. If the issue persists, verify that the Room Type or Rateplan is correctly set up in the system.
Copy
How to Copy a Rateplan
- Click the Copy button next to the Rateplan you want to duplicate.
- The system will automatically generate a duplicate Rateplan beneath the original, using the same rate and configuration.
- The copied Rateplan will have “Copy” appended to its name and can be edited independently.

[!NOTE]
Troubleshooting Copy Rateplan
Copy Button Not Responding
- Ensure that you are clicking the Copy button next to the correct Rateplan. If the button does not work, refresh the page or clear your browser cache.
Duplicate Rateplan Not Appearing
- After clicking the Copy button, check if the duplicate Rateplan appears directly beneath the original. If it does not appear, refresh the page or try clicking the Copy button again.
Changes Not Reflected in Copied Rateplan
- Ensure that after copying, you click the Save Changes button if any modifications are made to the copied Rateplan. Any changes will not be saved unless you explicitly click Save Changes.
Unable to Edit Copied Rateplan
- If the copied Rateplan cannot be edited, check if there is an issue with permissions. You may need specific access rights to modify rateplans. Contact your admin if necessary.
Copy Rateplan Displays Incorrect Configuration
- If the copied Rateplan displays incorrect settings or rate information, ensure that the original Rateplan was configured properly before copying. If the issue persists, try copying again or verify if any system errors occurred during the duplication process.
Delete Room
How to Delete Room Type or Rateplan
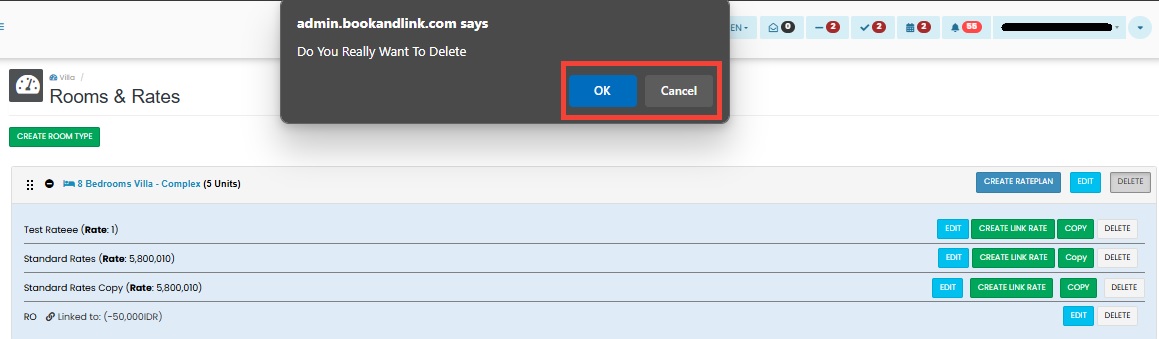
- Click the Delete button next to the Room Type or Rateplan you wish to remove.

- A confirmation dialog will appear with the message:
"Do you really want to delete this Rateplan?" - Click OK to confirm the deletion, or Cancel to close the dialog without removing the item.
[!NOTE]
Troubleshooting Delete Room Type or Rateplan
Delete Button Not Responding
- Ensure that the Delete button is clicked next to the correct Room Type or Rateplan. If it still does not respond, refresh the page or clear your browser cache and try again.
Confirmation Dialog Not Appearing
- If the confirmation dialog does not appear, check if your browser is blocking pop-ups. Allow pop-ups for this site or try using a different browser.
Unable to Delete Room Type or Rateplan
- If the deletion fails, verify if the Room Type or Rateplan is associated with any active bookings or ongoing reservations. These dependencies may prevent deletion.
Room Type or Rateplan Still Visible After Deletion
- If the item is not removed immediately, refresh the page or wait for a few seconds. In some cases, it may take a few moments for the system to update.
Accidentally Deleted the Wrong Item
- If you accidentally delete the wrong item, check if there is an undo or recovery option within the system. If not, you may need to manually recreate the deleted item.