


Monthly Deals
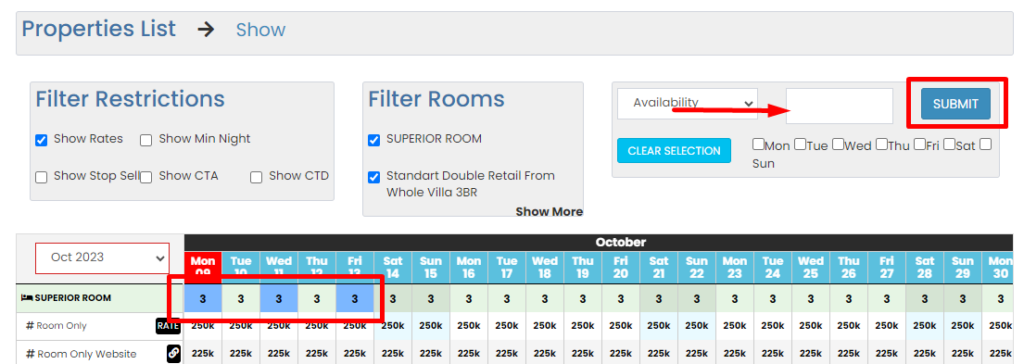
Update Availabillity
- Step 1. Select/block dates on the inventory row
The block dates will be indicate with blue block color - Step 2. Input value/new inventory
- Step 3. Submit
Once "Submission Done" the inventory will be updated

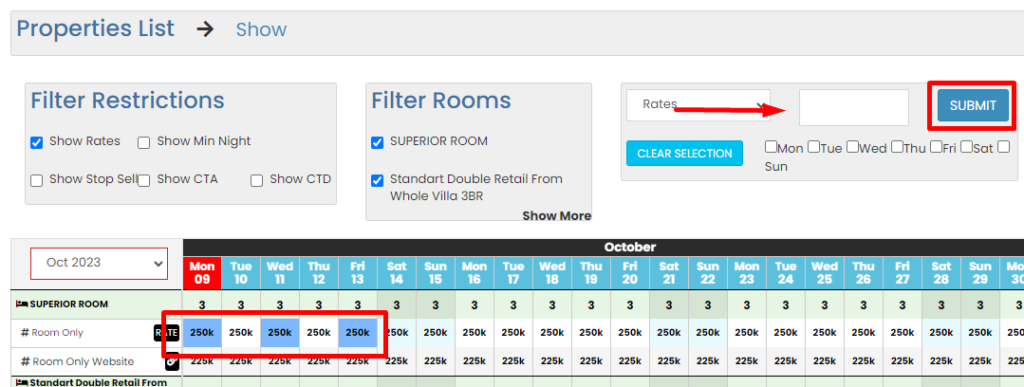
Update Rates
- Step 1. Select/block dates on the rate/price row
The block dates will be indicate with blue block color - Step 2. Input value/new rate or price
Notes : do not put "comma (,) , stop (.)"
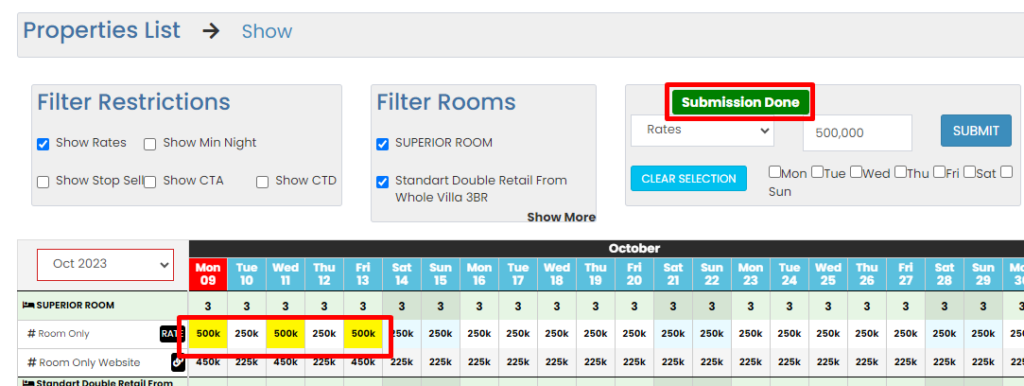
example : input 500000 instead of 500.000 or 500,000 - Step 3. Submit
Once "Submission Done" the rate/price will be updated
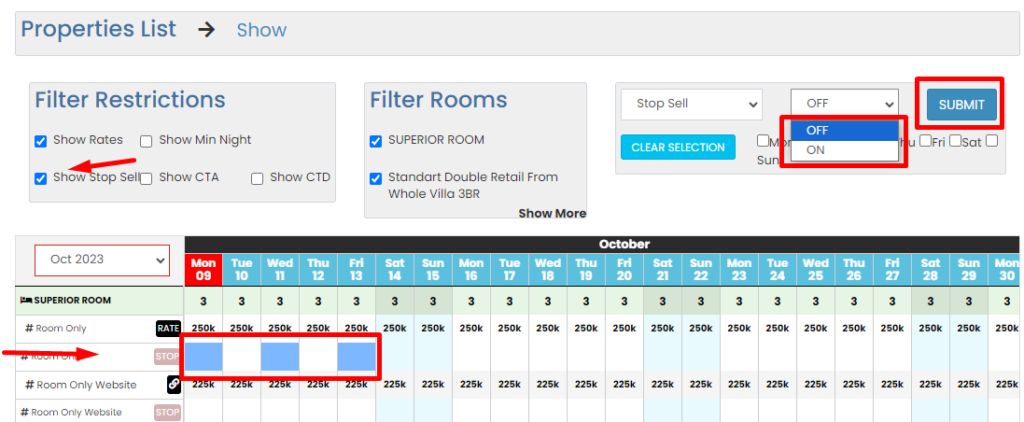
Update Stop Sell
How to do Stop Sell
- Step 1. tick "show stop sell"
- Step 2. Select/block dates on the stop sell row
The block dates will be indicate with blue block color - Step 3. Select ON
- Step 4. Submit
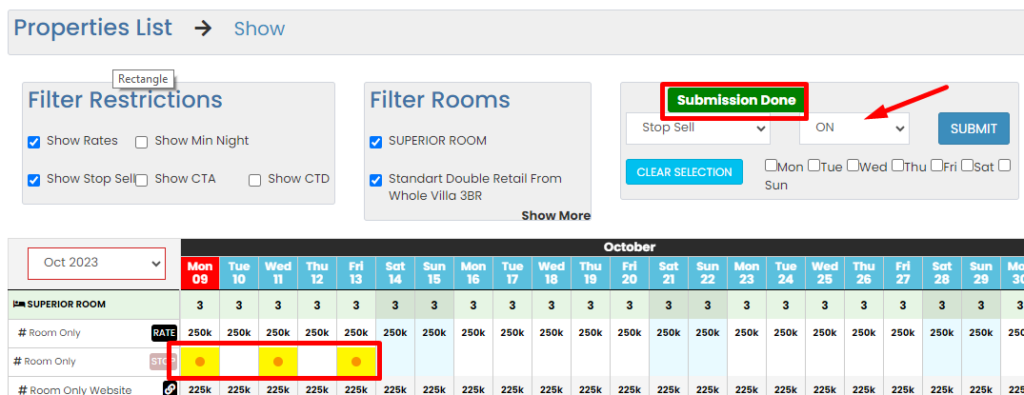
Notes :
- OFF means no stop sell
- ON means stop sell
Submission Done and the block dates will be indicate with orange circle button
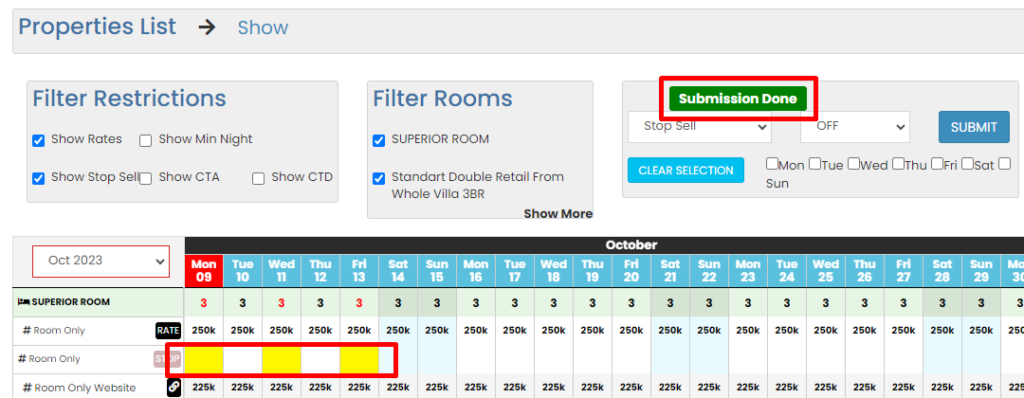
How to remove Stop Sell
- Step 1. tick "show stop sell"
- Step 2. Select/block dates on the stop sell row
The block dates will be indicate with blue block color - Step 3. Select OFF
- Step 4. Submit
Notes :
- OFF means no stop sell
- ON means stop sell
Submission Done and on block dates orange circle button will be removed

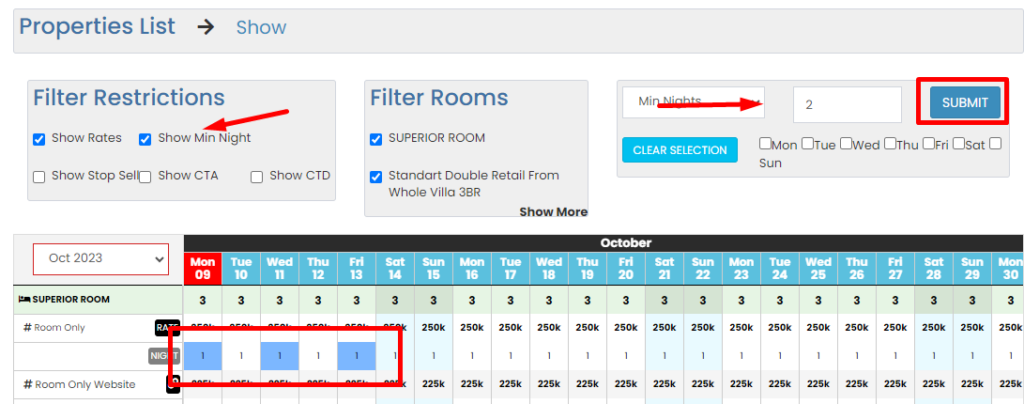
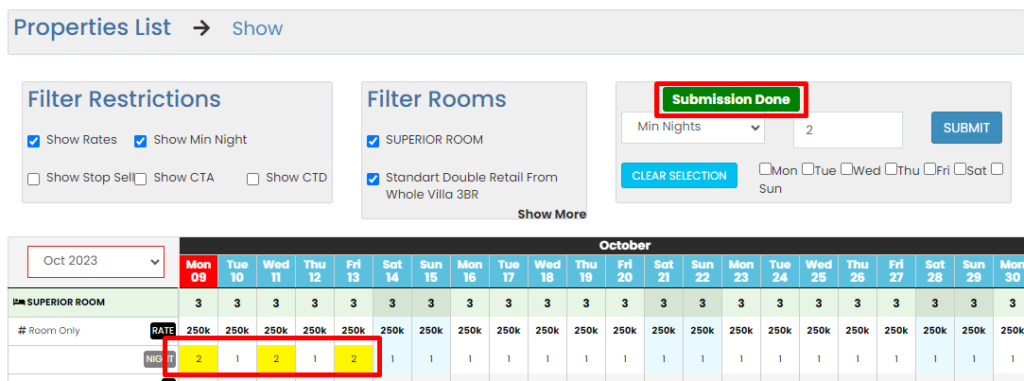
Update Minimum Night
- Step 1. tick Show Min Night
- Step 2. Select/block dates on the minimum night row
The block dates will be indicate with blue block color - Step 3. Input value/new minimum night set
- Step 4. Submit
Once "Submission Done" minimum night will be updated
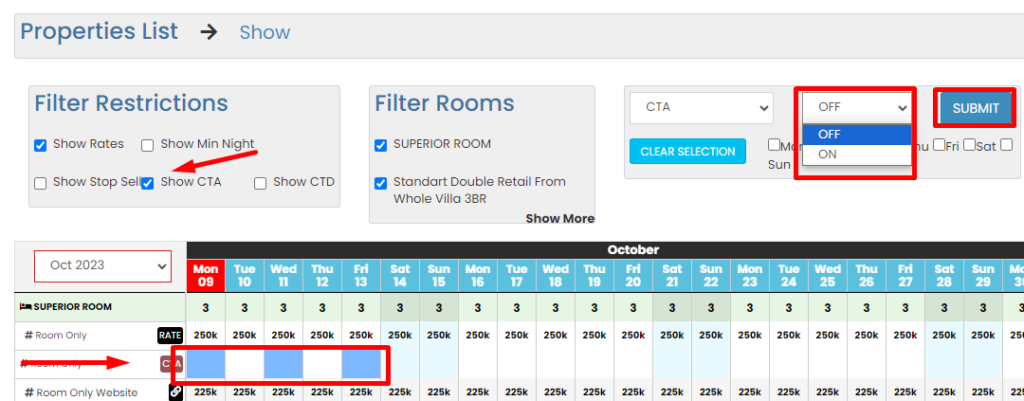
Update Close To Arrival
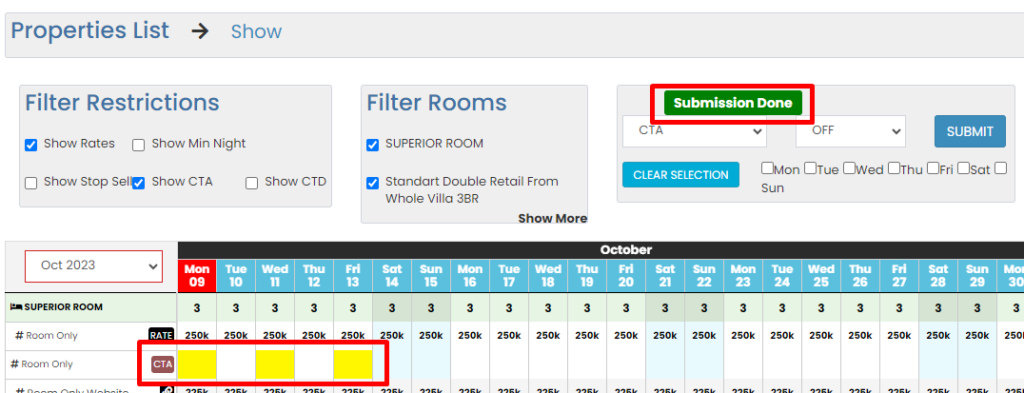
How to set CTA
- Step 1. tick "show CTA"
- Step 2. Select/block dates on the CTA row
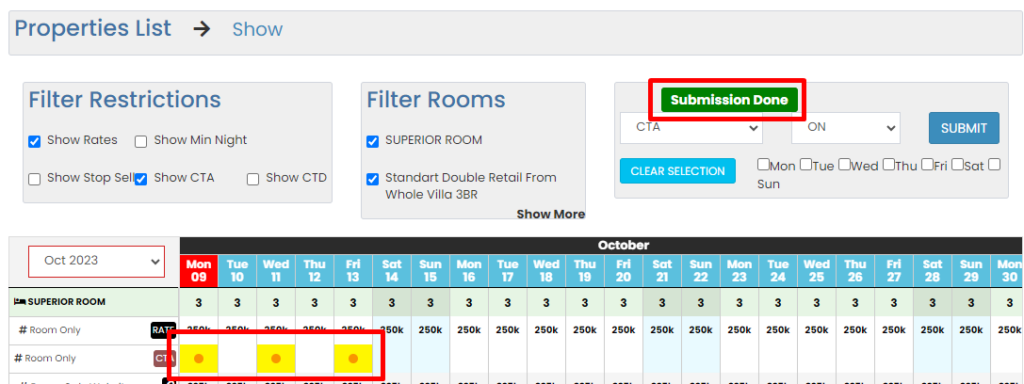
The block dates will be indicate with blue block color - Step 3. Select ON
- Step 4. Submit
Notes :
- OFF means no CTA
- ON means CTA
Submission Done and the block dates will be indicate with orange circle button
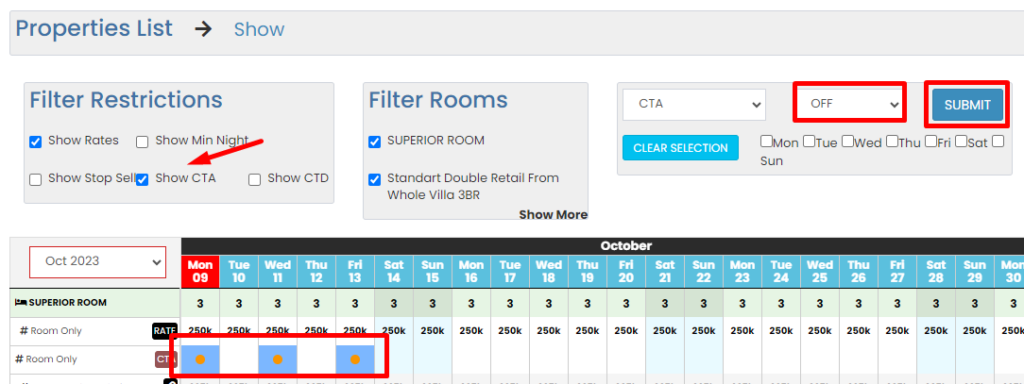
How to remove CTA
- Step 1. tick "show CTA"
- Step 2. Select/block dates on the CTA row
The block dates will be indicate with blue block color - Step 3. Select OFF
- Step 4. Submit
Notes :
- OFF means no CTA
- ON means CTA
Submission Done and on block dates orange circle button will be removed
Update Close To Departure
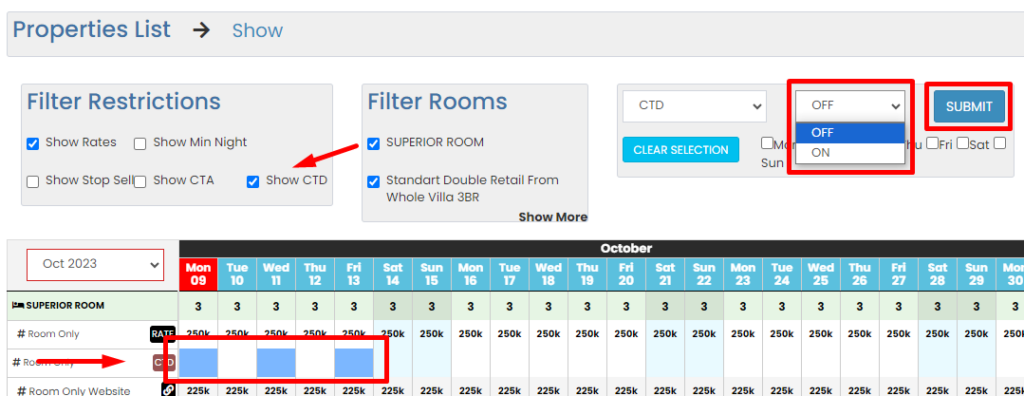
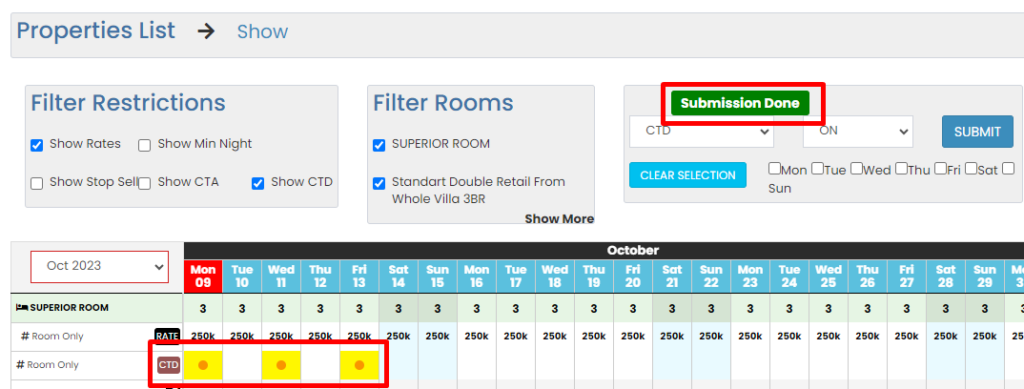
How to set CTD
- Step 1. tick "show CTD"
- Step 2. Select/block dates on the CTD row
The block dates will be indicate with blue block color - Step 3. Select ON
- Step 4. Submit
Notes :
- OFF means no CTD
- ON means CTD
Submission Done and the block dates will be indicate with orange circle button
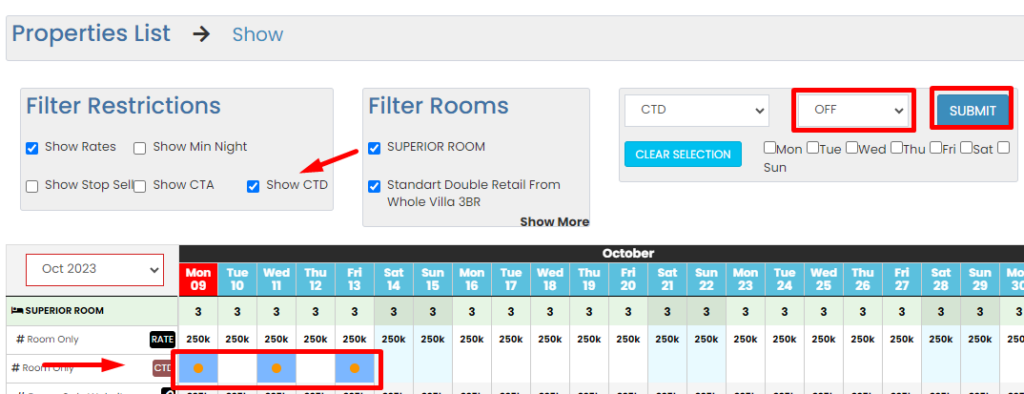
How to remove CTD
- Step 1. tick "show CTD"
- Step 2. Select/block dates on the CTD row
The block dates will be indicate with blue block color - Step 3. Select OFF
- Step 4. Submit
Notes :
- OFF means no CTD
- ON means CTD
Submission Done and on block dates orange circle button will be removed

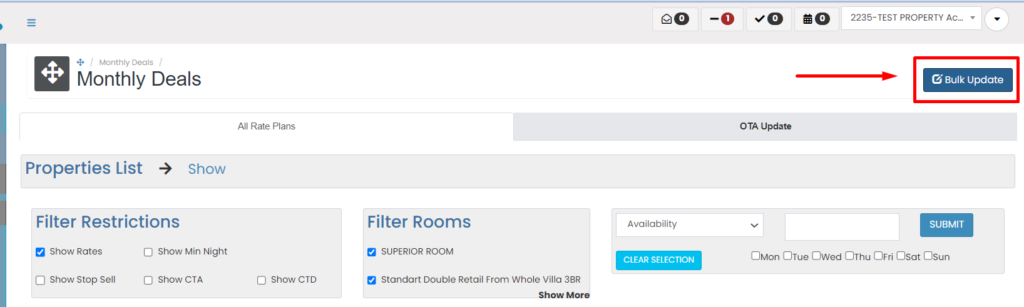
Bulk Update Availability
Bulk update now available on Monthly deals menu
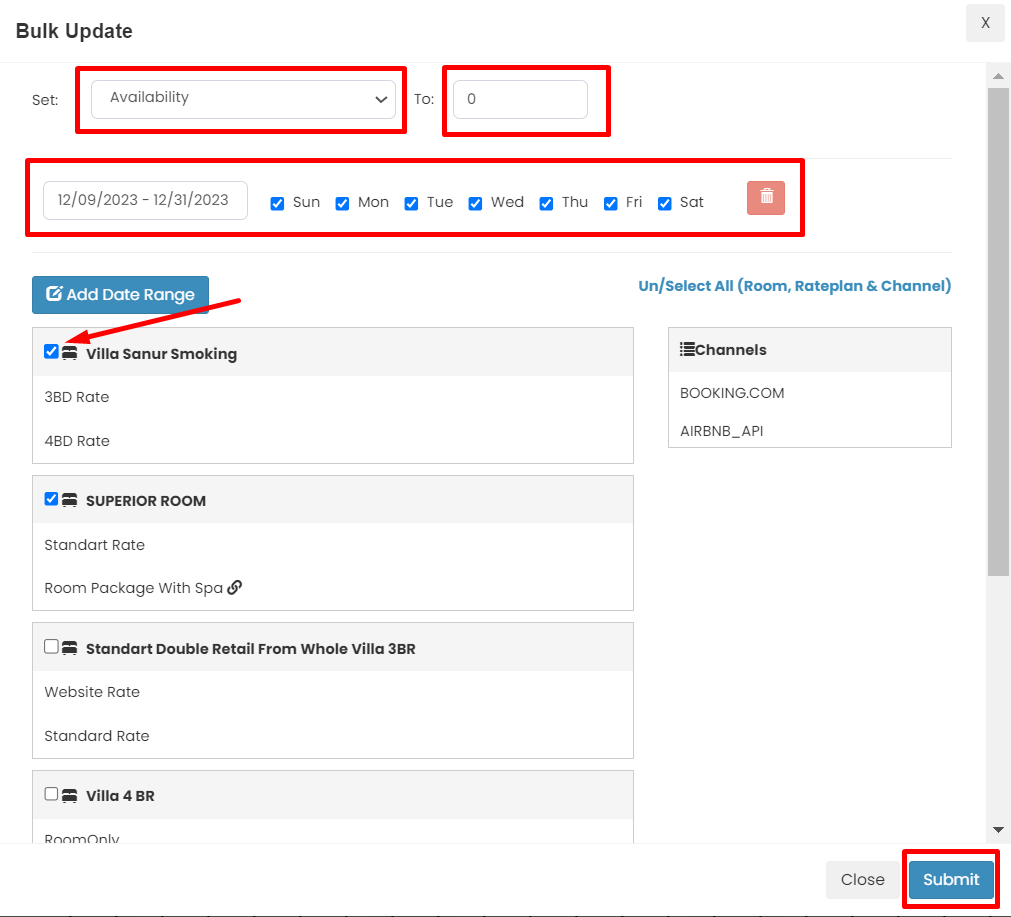
- 1. Set to Availability
- 2. Input the number
- 3. Input the period that want to update availability
- 4. Tick room type that want to update availabilty
- 5. Click submit and wait until succses notification appear
Note :
- You can add more period by click Add Date Range
Bulk Update Rates
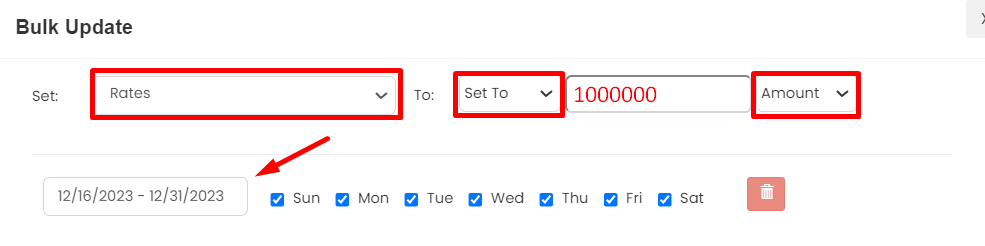
Step 1.
- 1. Choose Rates
- 2. You can choose type of update rates by Set To, Increase or Decrease
- 3. Input the number without dot, comma or any special character
- 4. You can choose Amount or Percentage
- 5. Input the period that want to update rates
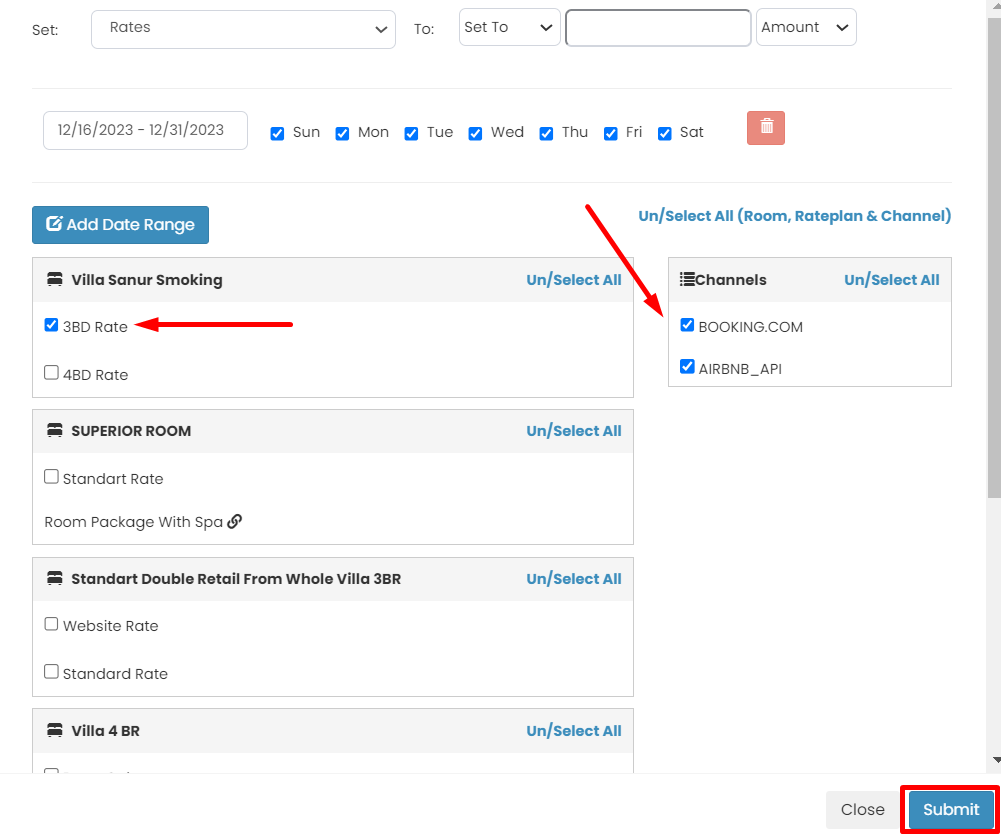
Step 2.
- 1. Tick Rateplan that want to update rates
- 2. Tick OTA that want to update rates
- 3. Click submit and wait until succses notification appear
Note :
- Bulk update rates only working if Channel Manager already connect with OTA channel
- Please make sure when choose Percentage, you already pick type of update rates by Decrease or Increase not Set To
- You can tick all OTA when do update, its means the rates you update will implement to all OTA or you can tick one of OTA and its call Exception (click here for Exception article)
- You can add more period by click Add Date Range
Bulk Update Stop Sell
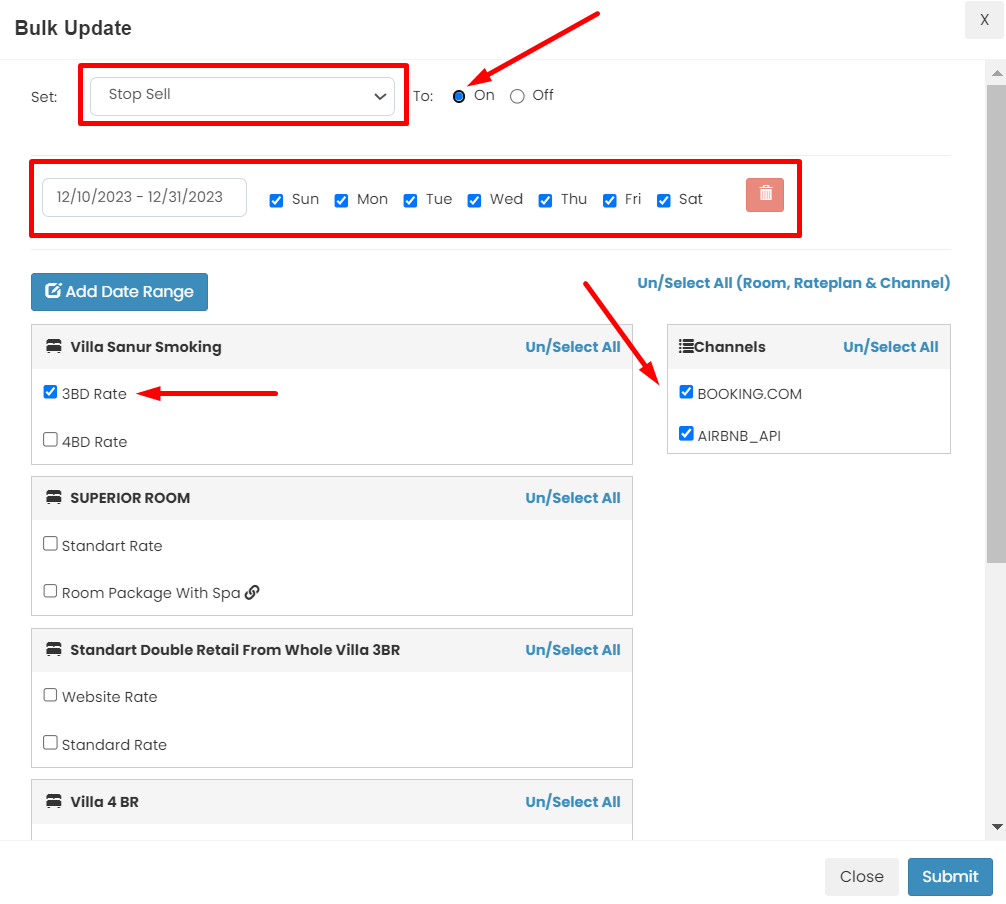
- 1. Choose Stop Sell
- 2. Tick On
- 3. Input the period that want to update stop sell
- 4. Tick Rateplan that want to update stop sell
- 5. Tick OTA that want to update stop sell
- 6. Click submit and wait until succses notification appear
Note :
- Bulk update Stop sell only working if Channel Manager already connect with OTA channel
- You can tick all OTA when do update, its means the stop sale you update will implement to all OTA or you can tick one of OTA and its call Exception (click here for Exception article)
- Bookandlink Stop Sell are working on Rateplan Level
- You can add more period by click Add Date Range
Bulk Update Minimum Night
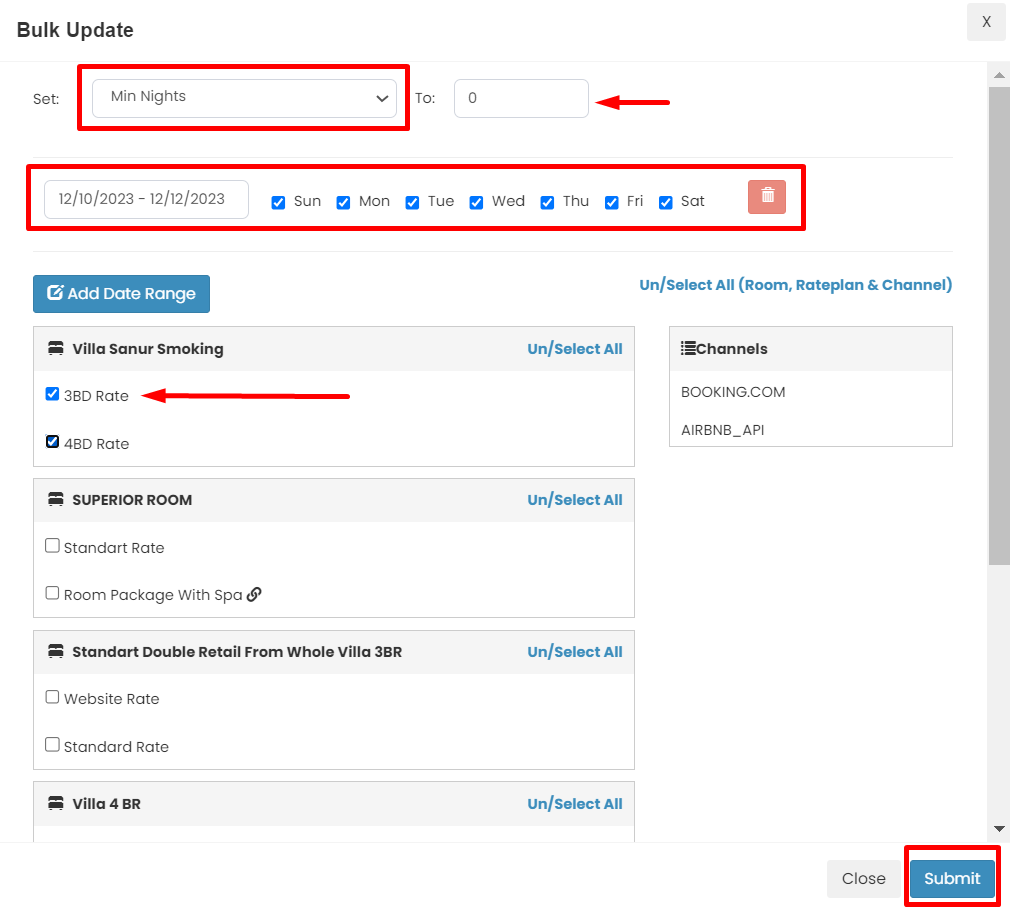
- 1. Choose Min Night
- 2. Input the number
- 3. Input the period that want to update stop sell
- 4. Tick Rateplan that want to update minimum night
- 5. Click submit and wait until succses notification appear
Note :
- Bookandlink Minimum night are working on Rateplan Level
- You can add more period by click Add Date Range
Bulk Update Close to Arrival
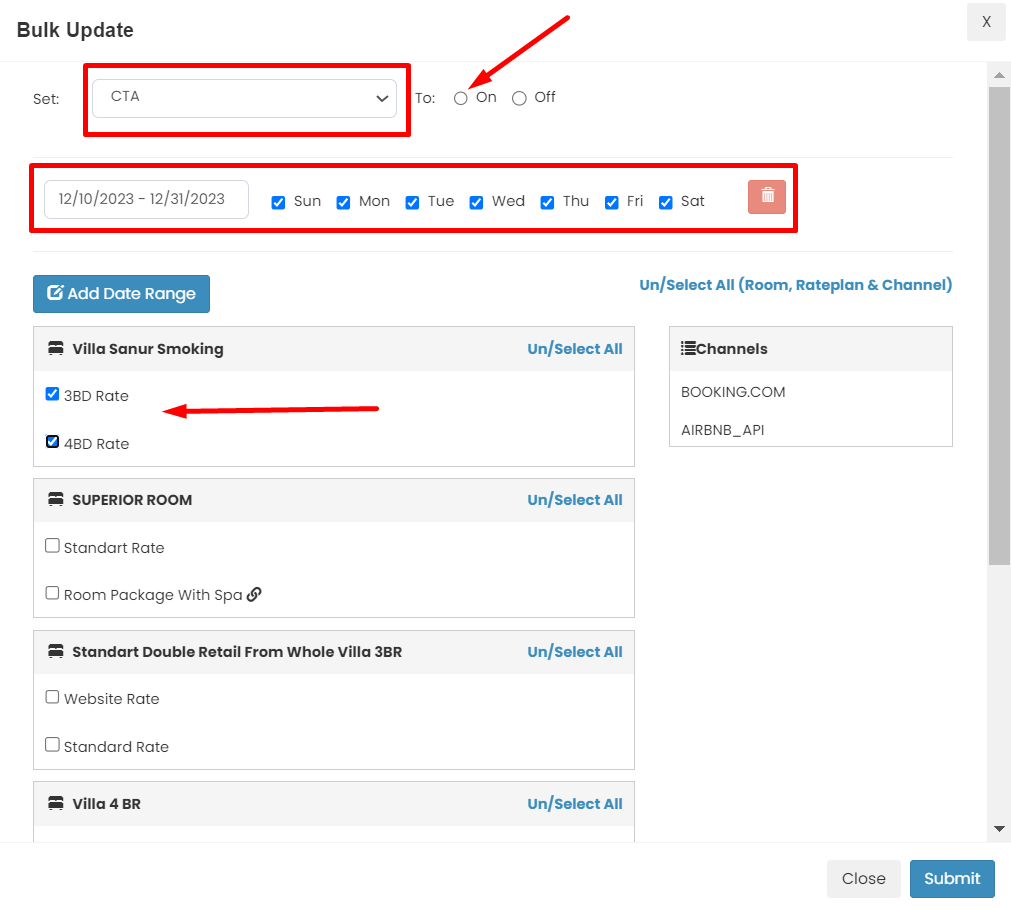
- 1. Choose CTA
- 2. Tick On
- 3. Input the period that want to update CTA
- 4. Tick Rateplan that want to update CTA
- 5. Click submit and wait until succses notification appear
Note :
- Bookandlink Close To Arrival are working on Rateplan Level
- You can add more period by click Add Date Range
Bulk Update Close to Departure
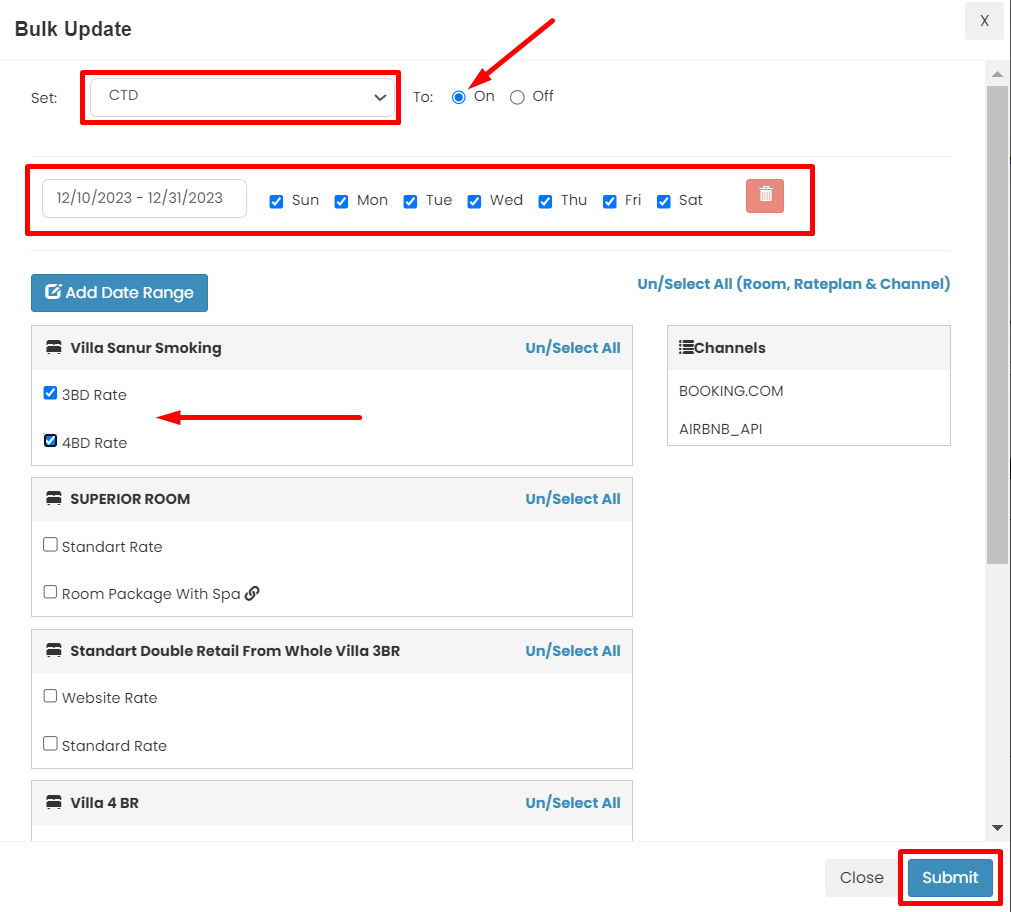
- 1. Choose CTD
- 2. Tick On
- 3. Input the period that want to update CTD
- 4. Tick Rateplan that want to update CTD
- 5. Click submit and wait until succses notification appear
Note :
- Bookandlink Close To Departure are working on Rateplan Level
- You can add more period by click Add Date Range
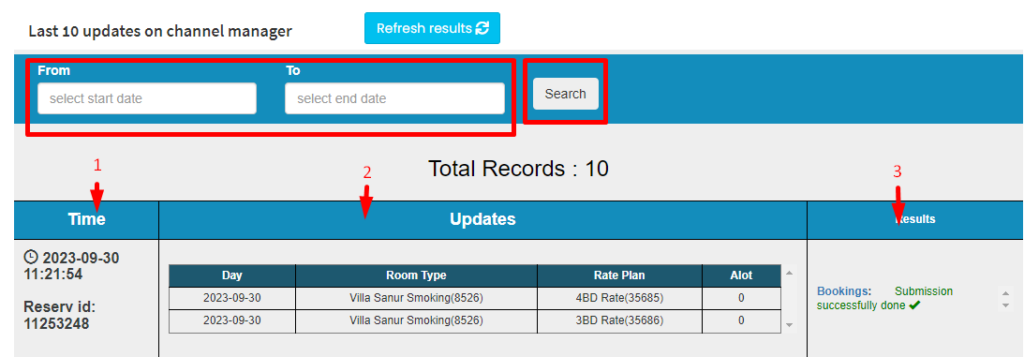
Last 10 Update History
Check your log regularly to identify error happen during update in advance by
Search from - to selected date
Sample Log :
Timestamp : when the update is occured
Updates :
Day => dates update
Room Type => room type update
Rateplan => rateplan update
Alot => inventory update
Results :
OTA : Submission successfully done